1. Киришүү
This manual provides comprehensive instructions for the installation, operation, and maintenance of your PUTORSEN Quad Monitor Mount (Model: B0FLXV7B8D). This monitor mount is designed to support multiple displays, enhancing your workspace ergonomics and productivity. Please read this manual thoroughly before installation and retain it for future reference.

Сүрөт 1.1: Бүттүview of the PUTORSEN Quad Monitor Mount supporting four displays.
2. Коопсуздук маалыматы
Орнотуу жана колдонуу учурунда төмөнкү коопсуздук чараларын сактаңыз:
- Do not exceed the maximum weight capacity for each arm and the top bracket. Refer to the Specifications section for details.
- Ensure the mounting surface (desk) is stable and capable of supporting the combined weight of the mount and all attached monitors.
- Verify that all screws and connections are securely tightened before use. Loose connections can lead to instability and potential damage.
- Keep children and pets away from the installation area. Small parts may pose a choking hazard.
- If you encounter any difficulties during installation, consult a qualified professional.
3. Пакеттин мазмуну
Орнотууну улантуудан мурун, бардык компоненттердин бар экенин жана бузулбаганын текшериңиз. Эгерде кандайдыр бир тетиктер жок болсо же бузулган болсо, кардарларды колдоо кызматына кайрылыңыз.
- Main Pole and Base Assembly
- Upper Monitor Bracket
- Lower Monitor Arms (2)
- VESA плиталары (4)
- C-Clamp Монтаждоочу жабдык
- Тырмактын негизин орнотуучу жабдыктар
- Кабелдик башкаруу клиптери
- Assembly Tools (Hex Keys, Wrench)
- Instruction Manual
4. Техникалык шарттар
| Өзгөчөлүк | Деталь |
|---|---|
| Модель номери | B0FLXV7B8D |
| Бренд | ПУТОРЛОР |
| Upper Monitor Support | Up to 49" Ultrawide (Flat: 44 lbs / 20 kg, Curved: 30.8 lbs / 14 kg) |
| Lower Monitor Support | Three 27" monitors or two 32" monitors (15.4 lbs / 7 kg each) |
| VESA шайкештиги | 75x75мм, 100x100мм |
| Үстөлдүн калыңдыгы (C-Clamp/Grommet) | 0.39" - 1.77" (10 мм - 45 мм) |
| Уюлдун бийиктиги | 800мм (16.1") |
| Колду толук узартуу | 1322мм (52.04") |
| Tilt (Center Bracket) | +50° / -20° |
| Tilt (Lower Arms) | ±35° |
| Айлануучу | 180° |
| Айлануу | 360° |
| Элемент Салмагы | 18.04 фунт |
| Пакеттин өлчөмдөрү | 17.83 x 10.04 x 7.17 дюйм |
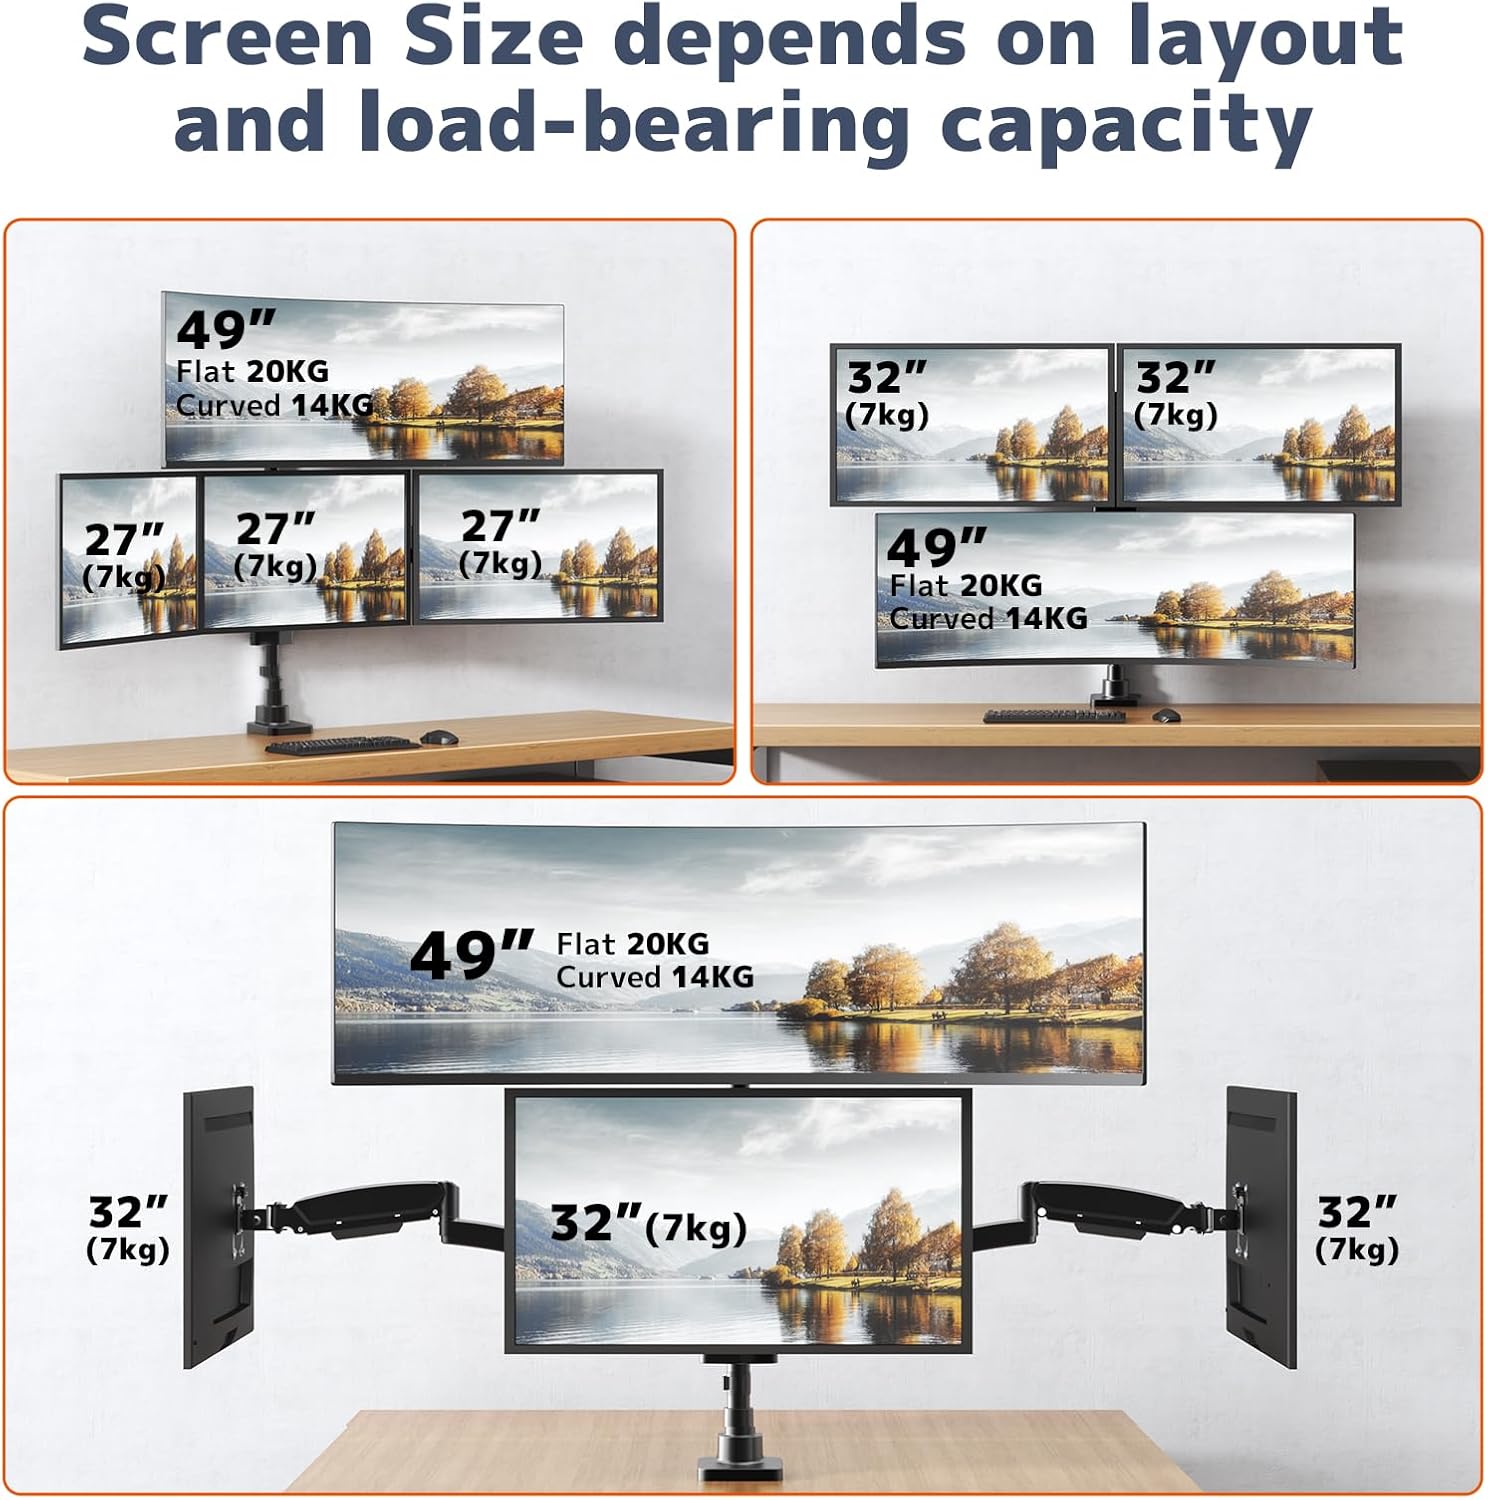
Image 4.1: Supported screen sizes and load capacities for different monitor layouts.

Image 4.2: Detailed product dimensions and articulation ranges for tilt, swivel, and rotation.
5. Орнотуу жана орнотуу
Follow these steps to assemble and install your monitor mount:
5.1 Орнотуу вариантын тандаңыз
Орнотуу C-cl экөөнү тең колдойтamp and grommet base installation. Select the option best suited for your desk.
- C-Clamp Орнотуу: C-cl тиркеңизamp to the edge of your desk. Ensure the desk thickness is between 0.39" and 1.77". Tighten the clamp коопсуз.
- Громметтин негизин орнотуу: If your desk has a grommet hole, use the grommet base hardware. Ensure the hole diameter and desk thickness are compatible with the provided hardware.
5.2 Штанганы жана жебелерди чогултуу
- Attach the main pole to your chosen base (C-clamp же тромб).
- Slide the upper monitor bracket onto the pole and secure it at the desired height.
- Attach the two lower monitor arms to the pole, positioning them below the upper bracket.
- Бардык байланыштардын бекем экенине ынаныңыз.
5.3 Мониторлорду тиркөө
- Attach the VESA plates to the back of each monitor using the appropriate screws.
- Carefully slide the monitors (with VESA plates attached) onto the corresponding arms/bracket until they click into place.
- Tighten any security screws on the VESA plates to prevent accidental detachment.

Image 5.1: Fully assembled monitor mount with monitors attached.
5.4 Adjusting Arm Length
The 3-section arm design allows for adjustment of arm length. If a monitor is too close or too far from the wall, you can remove one or two segments from the arm to shorten its extension.
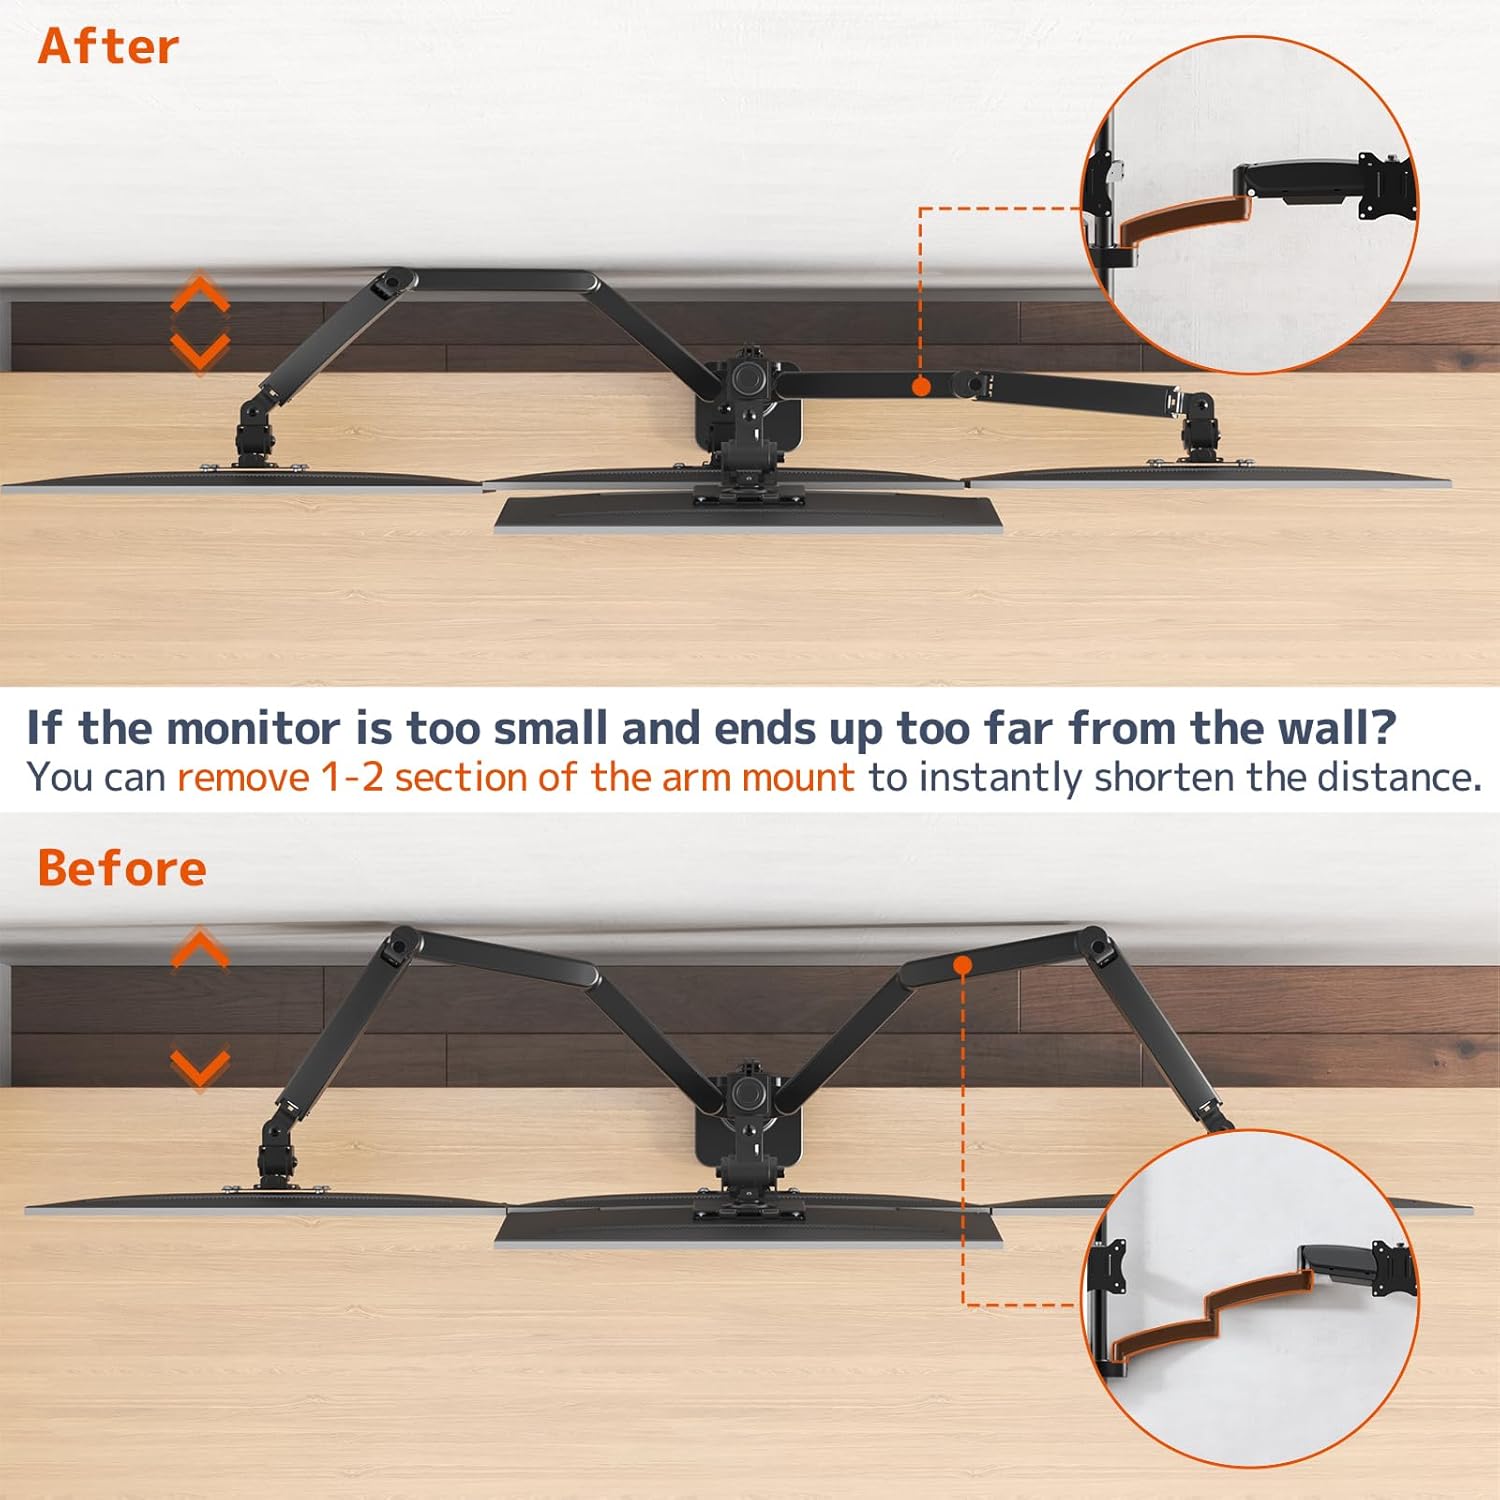
Image 5.2: Illustration of shortening the monitor arm by removing segments.

Image 5.3: Guide for required desk-to-wall distance based on screen width.
6. Иштөө жана тууралоо
The PUTORSEN Quad Monitor Mount offers extensive adjustability for optimal viewсооронуч.
6.1 Газ пружинанын чыңалуусун жөндөө
The gas spring arms allow for smooth height adjustment. If a monitor sags or rises too easily, adjust the gas spring tension using the provided hex key. Turn clockwise to increase tension (for heavier monitors) or counter-clockwise to decrease tension (for lighter monitors).

Image 6.1: Illustration of the sturdy gas spring arm design for stable equilibrium.
6.2 Эңкейүү, айлануу жана айлануу
- Россия: Adjust the monitor screen vertically to reduce glare and optimize viewing angles. The center bracket tilts +50°/-20°, and lower arms tilt ±35°.
- Айлануучу: Pivot the monitor horizontally up to 180° to share your screen or change viewбагыт.
- Айлануу: Пейзаждык жана тигинен багыттардын ортосунда которулуу үчүн мониторду 360° буруңуз.

Image 6.2: Users adjusting the position of their monitors for ergonomic comfort.

Сүрөт 6.3: Мисamples of flexible monitor arrangements, including stacked and side-by-side setups.
7. Техникалык тейлөө
Үзгүлтүксүз техникалык тейлөө мониторуңуздун узак мөөнөттүү иштешин жана коопсуз иштешин камсыз кылат.
- Тазалоо: Орноткуч беттерди жумшак, d менен сүртүңүзamp кездеме. Финишке зыян келтирүүчү абразивдүү тазалагычтардан же эриткичтерден качыңыз.
- Байланыштарды текшерүү: Periodically inspect all screws and bolts to ensure they remain tight. Re-tighten if necessary.
- Gas Spring Check: If you notice a change in the gas spring's performance, re-adjust the tension as described in the Operating section.
8. Кыйынчылыктарды
Жалпы маселелерди чечүү үчүн бул бөлүмдү караңыз.
8.1 Monitor Sags or Does Not Stay in Position
- Себеби: Газ пружинанын чыңалуусу монитордун салмагы үчүн өтө төмөн.
- Чечим: Increase the gas spring tension by turning the adjustment screw clockwise with the provided hex key.
- Себеби: Monitor weight exceeds the arm's capacity.
- Чечим: Verify your monitor's weight against the specifications. Do not exceed the maximum weight capacity.
8.2 Monitor Rises Too Easily
- Себеби: Газ пружинанын чыңалуусу монитордун салмагы үчүн өтө жогору.
- Чечим: Decrease the gas spring tension by turning the adjustment screw counter-clockwise with the provided hex key.
8.3 Mount Feels Unstable
- Себеби: Монтаж clamp/громмет жетиштуу бекемделбейт.
- Чечим: C-clди кайра тартыңызamp or grommet base to the desk. Ensure the desk surface is robust.
- Себеби: Monitor arm connections are loose.
- Чечим: Check and tighten all screws connecting the arms to the pole and the VESA plates to the monitors.

Image 8.1: Illustration demonstrating improved stability of the current design compared to older models.
9. Кепилдик жана колдоо
For warranty information or technical support, please refer to the product packaging or contact PUTORSEN customer service directly. Keep your purchase receipt as proof of purchase.