1. Киришүү
This manual provides instructions for the installation, operation, and maintenance of your AOOEPU WD-R1200U Dual Band WiFi Extender Signal Booster. This device is designed to expand your existing wireless network coverage, eliminate dead zones, and provide stable internet access throughout your home or office.
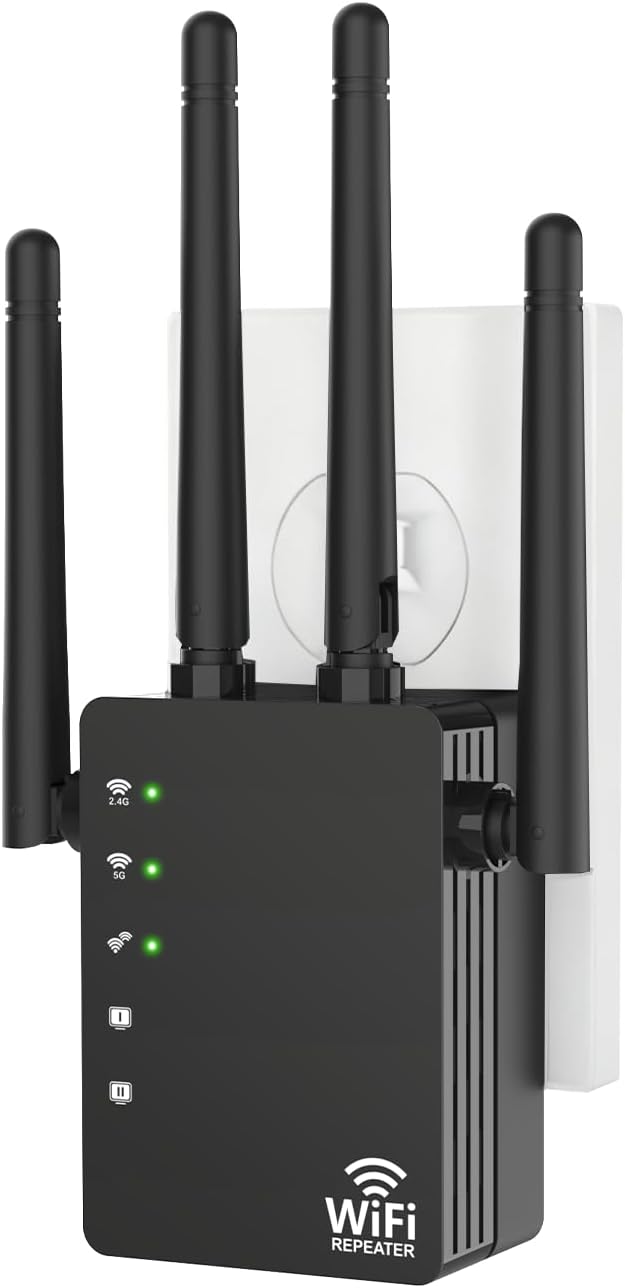
Сүрөт 1.1: Алдыңкы view of the AOOEPU WD-R1200U WiFi Extender.
2. Пакеттин мазмуну
Пакетиңизде бардык буюмдар бар экенин текшериңиз:
- AOOEPU WD-R1200U WiFi Extender (1 unit)
- Ethernet кабели (1 даана)
- Quick Installation Guide (1 unit)
3. Продукциянын өзгөчөлүктөрү
- Кеңири камтуу: Extends WiFi network coverage up to 12800 Sq.Ft, eliminating dead zones.
- Жогорку ылдамдыктагы кош тилкелүү: Supports 2.4GHz (up to 300Mbps) and 5GHz (up to 867-1200Mbps) frequencies for a combined speed of up to 1200Mbps.
- Кеңири шайкештик: Compatible with most standard routers and supports up to 105 connected devices simultaneously.
- Өркүндөтүлгөн коопсуздук: Features WPA/WPA2 security protocols and encryption standards to protect your network.
- Stable Signal Penetration: Maintains strong connectivity through walls and other barriers.
- Бир нече кирүү режимдери: Supports Repeater, Access Point (AP), and Router modes.
- Ethernet порттору: Includes Ethernet ports for wired connections to devices like game consoles and smart TVs.

Сүрөт 3.1: Бүттүview of key features including easy setup, device compatibility, and network coverage.

Image 3.2: Visual representation of the extender's extensive coverage capability.

Image 3.3: Illustration of the wide range of devices compatible with the extender.
4. Орнотуу нускамалары
The AOOEPU WD-R1200U WiFi Extender offers a straightforward setup process. You can use either the WPS button method or a manual setup via a web браузер.
4.1. WPS Button Setup (Recommended)
- Plug the WiFi Extender into a power outlet near your existing router. Wait for the power indicator light to turn on.
- Press the WPS button on your existing router. The WPS light on your router should start blinking.
- Within two minutes, press the WPS button on the AOOEPU WD-R1200U WiFi Extender. The WPS indicator on the extender will blink.
- Wait for approximately 30-60 seconds. The indicator lights on the extender should become solid, indicating a successful connection.
- Unplug the extender and relocate it to a desired location between your router and the WiFi dead zone. Ensure the signal strength indicator on the extender shows a good connection to your router.

Image 4.1: Step-by-step visual guide for WPS setup.
4.2. Manual Setup via Web Браузер
- Plug the WiFi Extender into a power outlet near your existing router.
- Connect your computer or mobile device to the extender's default WiFi network (e.g., 'AOOEPU_EXT' or similar, usually found on a label on the device). No password is required initially.
- ачуу а web браузерди иштетип, демейки IP дарегин же домен атын киргизиңиз (мисалы,
192.168.10.1orrepeater.net) provided in the Quick Installation Guide. - Follow the on-screen instructions to log in (default username/password is usually 'admin'/'admin') and select your desired operating mode (Repeater, AP, or Router).
- If selecting Repeater mode, choose your existing WiFi network from the list and enter its password.
- Configure the extender's network name (SSID) and password. It is recommended to use a different SSID to distinguish it from your main network.
- Complete the setup. The extender will restart.
- Relocate the extender to an optimal position and connect your devices to the new extended network.
5. Иштөө режимдери
The AOOEPU WD-R1200U supports three primary operating modes:
- Кайталоо режими: Extends the coverage of an existing wireless network. This is the most common use case for a WiFi extender.
- Кирүү чекити (AP) режими: Converts a wired network connection into a wireless one. Ideal for areas with Ethernet access but no WiFi.
- Багыттоочу режим: Functions as a primary router, creating a new private wireless network from a modem connection.

Image 5.1: Visual explanation of the three access modes.
6. Техникалык тейлөө
To ensure optimal performance and longevity of your WiFi Extender, consider the following maintenance tips:
- Жайгашкан жери: Position the extender in an open area, away from obstructions like large metal objects, thick walls, or other electronic devices that may cause interference.
- Тазалоо: Түзмөктү кургак, жумшак чүпүрөк менен акырын сүртүңүз. Суюк тазалоочу каражаттарды же аэрозольдорду колдонбоңуз.
- Программалык камсыздоонун жаңыртуулары: Мезгил-мезгили менен өндүрүүчүнүн текшерүү webмикропрограммалык камсыздоону жаңыртуу сайты. Микропрограммалык камсыздоону жаңыртуу иштин натыйжалуулугун жакшыртып, жаңы функцияларды кошуп, коопсуздукту жогорулатат.
- Кайтаруу: If the device becomes unresponsive or you forget your settings, you can perform a factory reset by pressing and holding the reset button (usually a small pinhole) for about 8-10 seconds. This will revert all settings to their factory defaults.
7. Кыйынчылыктарды
If you encounter issues with your AOOEPU WD-R1200U WiFi Extender, refer to the following common problems and solutions:
| Көйгөй | Мүмкүн чечим |
|---|---|
| Кубат жок/Түзмөк күйбөй жатат | Кеңейткичтин иштеп жаткан розеткага бекем сайылганын текшериңиз. Башка розетканы колдонуп көрүңүз. |
| Cannot connect to the extender's WiFi network | Verify the extender is powered on. Check if you are selecting the correct network name (SSID). If using manual setup, ensure the password is correct. Try resetting the extender. |
| Weak or unstable signal from the extender | Relocate the extender closer to your main router. Ensure there are no major obstructions. Adjust the antennas for better reception. |
| Internet access issues after connecting to the extender | Confirm your main router has internet access. Re-run the setup process to ensure the extender is correctly configured to your main network. Check for IP address conflicts. |
| WPS setup fails | Ensure both WPS buttons are pressed within the two-minute window. Some routers require WPS to be enabled in their settings. Try the manual setup method. |
8. Техникалык шарттар
| Өзгөчөлүк | Деталь |
|---|---|
| Модель номери | WD-R1200U |
| Продукциянын өлчөмдөрү | 6.8 x 3.66 x 2 дюйм |
| Элемент Салмагы | 5.3 унция |
| Зымсыз байланыш стандарты | 802.11a/b/g/n/ac |
| Маалыматтарды өткөрүү ылдамдыгы | 1200 Megabytes Per Second (Mbps) |
| Жыштык тилкелери | 2.4 ГГц жана 5 ГГц |
| Өзгөчөлүктөр | 1-Tap Setup, 360 Degree Coverage, Directional Antenna, Firewall, WiFi Mesh |
| Өндүрүүчү | Shenzhen Century Xinyang Tech Co.,Ltd |
9. Кепилдик жана колдоо
For warranty information and technical support, please refer to the documentation included with your product or visit the official AOOEPU webсайт. Кепилдик дооматтары үчүн сатып алуу дүмүрчөгүңүздү сактаңыз.