
Introduction
Thank you for choosing the Brifit Refrigerator and Freezer Thermometer. This device is designed to help you monitor temperatures in your refrigerator, freezer, or other environments with high accuracy using two wireless remote sensors. This manual provides detailed instructions for setup, operation, maintenance, and troubleshooting to ensure optimal performance and longevity of your thermometer.
Продукт өзгөчөлүктөрү
- Жогорку тактык: Equipped with two wireless sensors for accurate temperature measurement in up to three locations simultaneously (main unit and two sensors).
- Кең температура диапазону: Main unit measures -9.9℃ to 60℃ (14.2℉ to 140℉); remote sensors measure -40℃ to 60℃ (-40℉ to 140℉).
- Зымсыз берүү: Up to 100 meters (328 feet) transmission range in open areas.
- Түстүү дисплей: Features a vibrant color LCD screen for enhanced readability.
- Температура сигнализациясы: Customizable high/low temperature alarms for each sensor with audible alerts and a red backlight warning.
- МАКС/МИН жазуу: Displays maximum and minimum temperature values recorded over time.
- Кош кубат режимдери: Main unit can be powered by USB (cable included) or 2x AAA batteries (not included).
- Арткы жарык функциясы: Backlight is always on when powered by USB; automatically turns off after 8 seconds when powered by batteries to conserve energy.
- Ийкемдүү орнотуу: Main unit features integrated magnets, a hanging hole, and a foldable stand. Sensors include a hanging hole.

Image: Key features including temperature range, accuracy, and humidity accuracy.
Пакеттин мазмуну
- 1 x Main Display Unit
- 2 x Wireless Remote Sensors
- 1 х USB кабелинин
- 1 x User Manual

Image: All items included in the package.
Продукт бүттүview
Негизги дисплей бирдиги
The main unit features a color LCD screen displaying indoor temperature and humidity, as well as temperatures from the two remote sensors. It has buttons for backlight control, ℃/℉ switching, and alarm settings.
Wireless Remote Sensors
The two compact wireless sensors are designed to be placed in refrigerators, freezers, or other areas you wish to monitor. They transmit temperature data to the main unit.
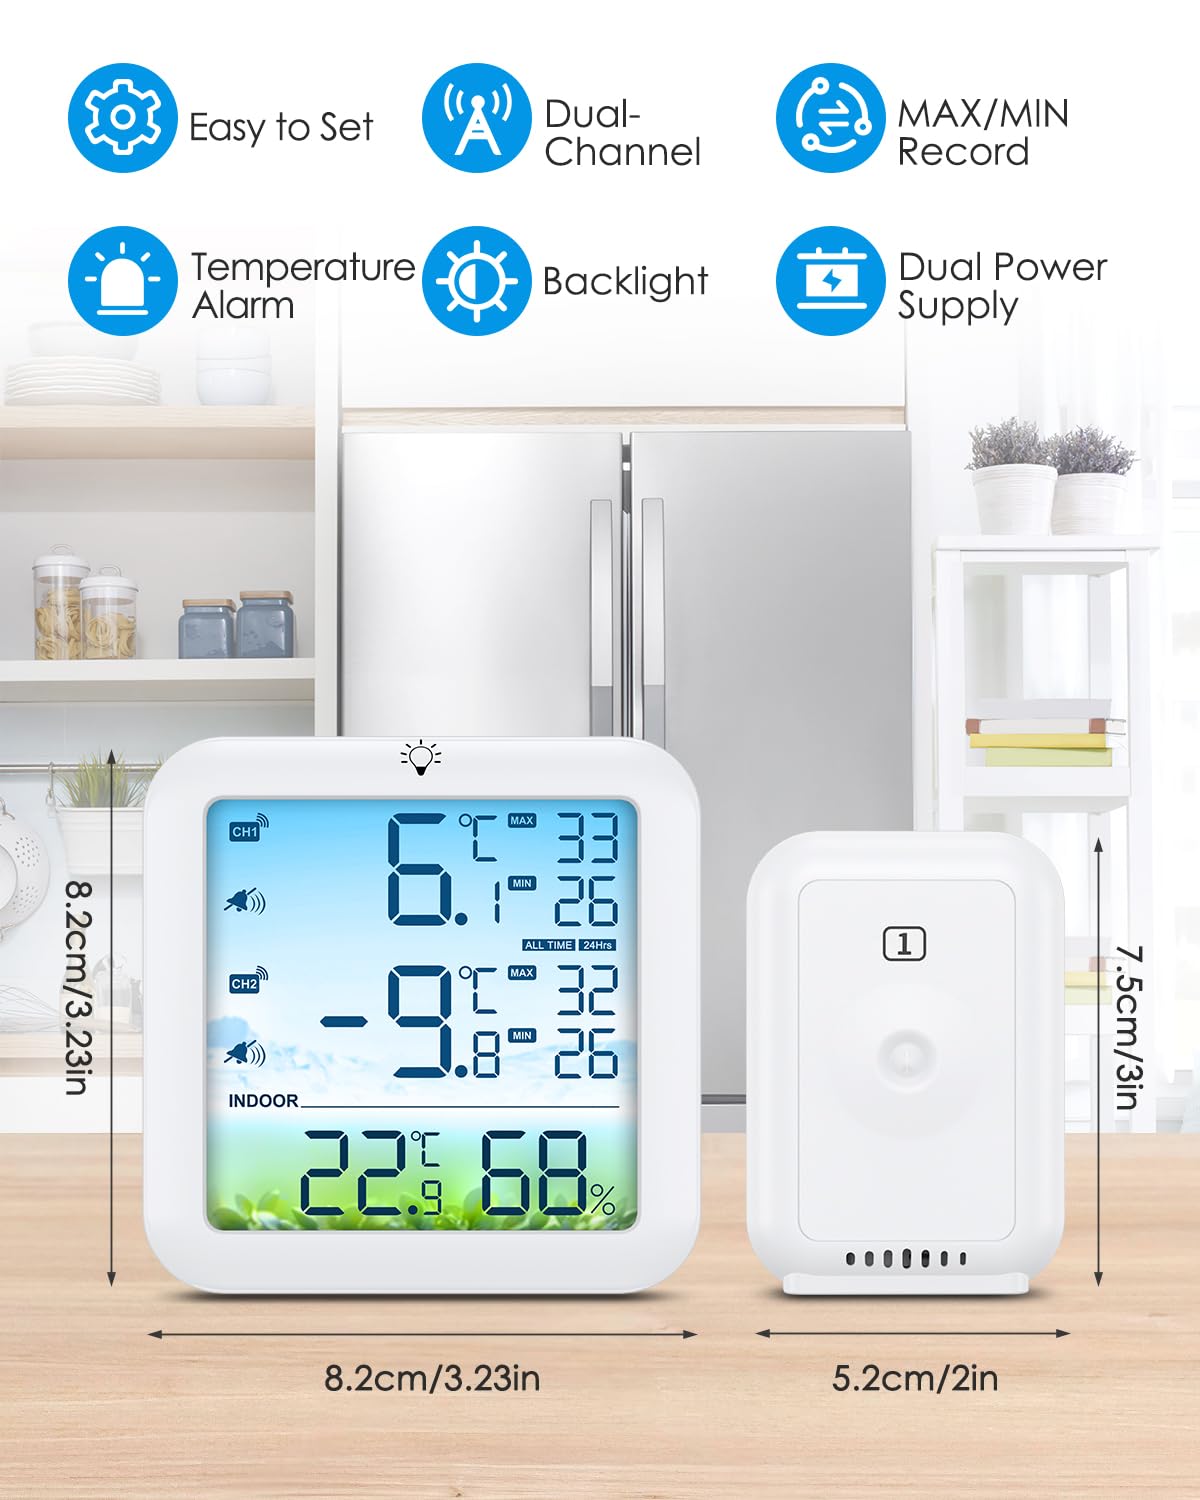
Image: Main display unit and remote sensor with dimensions and key features.
Жайгашуу
- Батареяларды салыңыз: Open the battery compartment on the back of the main unit and each remote sensor. Insert 2x AAA batteries into the main unit and 2x AAA batteries into each sensor, ensuring correct polarity (+/-). Batteries are not included.
- Күйгүзүү: The main unit will automatically power on once batteries are inserted or USB power is connected. The sensors will also power on.
- Жупташтырган сенсорлор: The main unit will automatically search for and connect to the remote sensors. Ensure sensors are within range during initial setup. The channel indicators (CH1, CH2) on the main unit will display the sensor temperatures once connected. If a sensor does not connect, try re-inserting its batteries or moving it closer to the main unit.
Иштөө нускамалары
Температураны которуу бирдиктери (℃/℉)
Long press the '℃/℉' button (often combined with the backlight button) on the main unit to switch between Celsius and Fahrenheit display modes.
Viewing and Clearing MAX/MIN Records
- The main unit automatically records the maximum and minimum temperatures for the indoor unit and each sensor.
- Press the 'MEM' button to cycle through current, maximum (MAX), and minimum (MIN) temperature readings.
- To clear the MAX/MIN records, long press the 'MEM' button while MAX or MIN values are displayed. The records will reset to current temperatures.
Температура Ойготкуч Функциясы
The thermometer allows you to set high and low temperature alarms for each remote sensor (CH1, CH2).
- Press the 'ALERT' button to enter alarm setting mode. The alarm icon will flash.
- Use the '+' and '-' buttons to adjust the desired high temperature limit for CH1. Press 'ALERT' again to confirm.
- Repeat the process to set the low temperature limit for CH1, then high and low limits for CH2.
- Once all limits are set, press 'ALERT' one last time to exit alarm setting mode.
- If the temperature from a sensor exceeds the set limits, the main unit will emit an audible alarm and the screen backlight will turn red. The alarm will sound every 20 seconds.
- To silence the alarm, press any button. The red backlight will remain until the temperature returns to within the set range.

Image: Comparison of normal and alarm display modes.
Backlight and Power Modes
- USB Power: When the main unit is connected via the USB cable, the backlight will remain continuously on for easy viewing.
- Батарея кубаттуулугу: When powered by 2x AAA batteries, the backlight will automatically turn off after 8 seconds of inactivity to conserve battery life. Short press the backlight button to temporarily activate it.
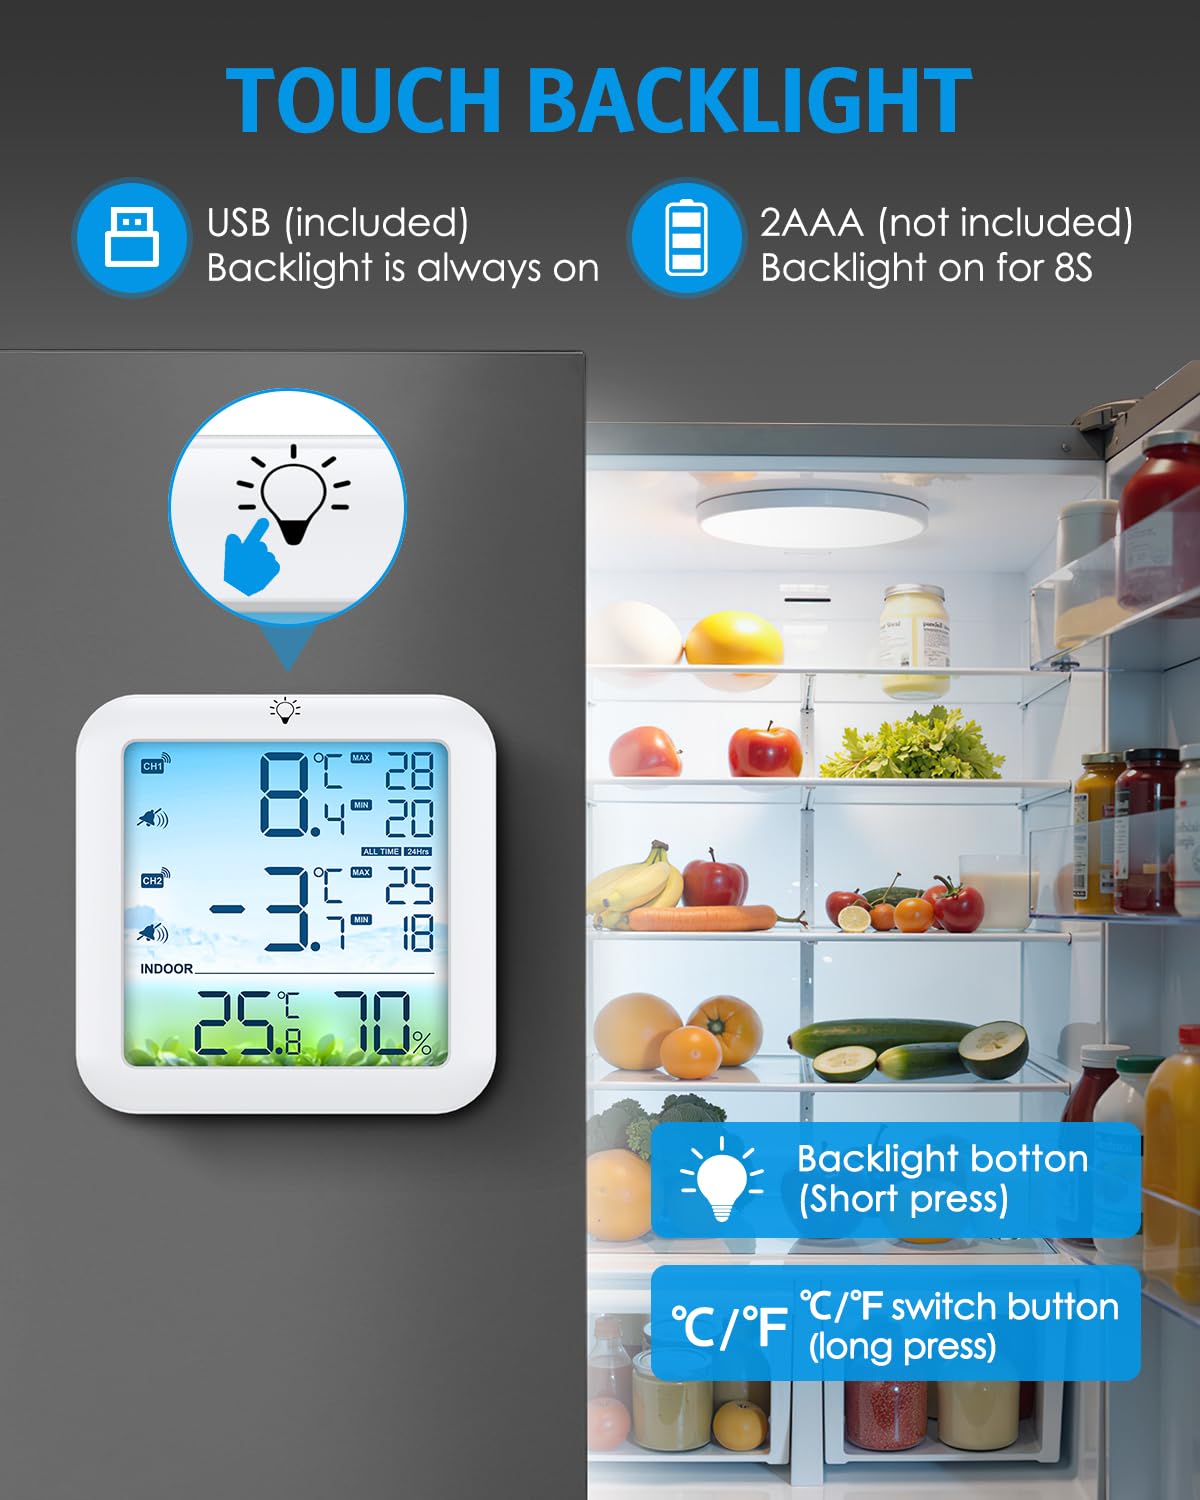
Image: Backlight and temperature unit switch buttons.
Орнотуу
Негизги дисплей блогунун жайгашуусу
The main unit offers multiple installation options:
- Магниттик тиркеме: Use the integrated magnets on the back to attach it to a refrigerator door or any metallic surface.
- Дубалга илинүүчү: Utilize the hanging hole to mount it on a wall hook.
- Стол үстүндөгү стенд: Deploy the foldable stand on the back to place it on a flat surface like a kitchen counter or desk.
Remote Sensor Placement
Place the remote sensors in the desired monitoring locations, such as inside a refrigerator, freezer, wine cellar, or outdoor area. Each sensor has a hanging hole for convenient placement. Ensure sensors are not exposed to direct sunlight or rain to prolong their lifespan.

Image: Installation options for the main unit.

Image: Wireless remote sensor placement in a refrigerator.
Техникалык тейлөө
- Тазалоо: Негизги блокту жана сенсорлорду жумшак, d менен сүртүңүзamp кездеме. Абразивдүү тазалоочу каражаттарды колдонбоңуз же түзмөктөрдү сууга салбаңыз.
- Батареяны алмаштыруу: Replace batteries in the main unit and sensors when the low battery indicator appears on the display. Ensure to use fresh AAA batteries and dispose of old batteries responsibly.
- Сактагыч: If storing the device for an extended period, remove all batteries to prevent leakage and damage. Store in a cool, dry place.
Проблемаларды чечүү
| Көйгөй | Мүмкүн себеп | Чечим |
|---|---|---|
| Негизги блокто дисплей жок | Dead or incorrectly inserted batteries; No USB power. | Check battery polarity, replace batteries, or connect USB power. |
| Sensor temperature not displayed or '---' shown | Sensor out of range; Dead sensor batteries; Pairing issue. | Move sensor closer to main unit; Replace sensor batteries; Re-insert sensor batteries to force re-pairing. |
| Temperature alarm not working | Alarm not enabled; Alarm limits set incorrectly. | Ensure alarm is activated in settings; Verify high/low temperature limits are appropriate. |
| Температураны туура эмес көрсөткүчтөр | Sensor exposed to direct heat/cold source; Sensor placed too close to a wall/obstruction. | Relocate sensor to a more representative area; Ensure proper air circulation around the sensor. |
Техникалык шарттар
| Өзгөчөлүк | Деталь |
|---|---|
| Модел | WA179-EU |
| Бренд | капчык |
| Main Unit Temperature Range | -9.9℃ден 60℃ге чейин (14.2℉ден 140℉ге чейин) |
| Remote Sensor Temperature Range | -40℃ден 60℃ге чейин (-40℉ден 140℉ге чейин) |
| Температуранын тактыгы | ±1℃ (±2℉) |
| Humidity Accuracy (Main Unit) | ±5% RH (10%-99% RH) |
| Зымсыз берүү диапазону | Ачык жерлерде 100 метрге (328 фут) чейин |
| Электр менен камсыздоо (негизги блок) | USB power (cable included) or 2 x AAA batteries (not included) |
| Power Supply (Remote Sensor) | 2 x AAA batteries (not included) per sensor |
| Дисплей түрү | Түстүү LCD |
| Ойготкуч диапазону | -40℃ден 60℃ге чейин (-40℉ден 140℉ге чейин) |
| Негизги бирдиктин өлчөмдөрү | Болжол менен 8.2 см x 8.2 см |
| Remote Sensor Dimensions | Болжол менен 5.2 см x 7.5 см |
Кепилдик жана колдоо
For warranty information or technical support, please refer to the documentation included with your purchase or contact Brifit customer service through their official website or the retailer where the product was purchased. Please have your model number (WA179-EU) and purchase details ready when contacting support.