1. Киришүү
This manual provides detailed instructions for the installation, operation, and maintenance of your UNITOPSCI Android 15 Car Stereo. Please read this manual thoroughly before using the product to ensure proper functionality and safety. This unit is specifically designed for Lexus ES models from 2001 to 2005 (ES250, ES300, ES330).

Image 1.1: UNITOPSCI Android 15 Car Stereo with main accessories.
2. Пакеттин мазмуну
Төмөндө тизмеленген нерселердин баары пакетиңизге камтылганын текшериңиз:
- 1 x Унаа радиосу
- 1 x Кубат кабели
- 1 x Арткы унаа View Камера
- 1 x Орнотуу куралдарынын топтому
- 1 x GPS антеннасы
- 1 x Арткы камеранын киргизүү кабели
- 1 x RCA кабели
- 2 х USB кабелдери
- 1 x User Manual
- 1 x Микрофон

Image 2.1: Visual representation of the package contents and unit dimensions.
3. Шайкештик жана маанилүү эскертүүлөр
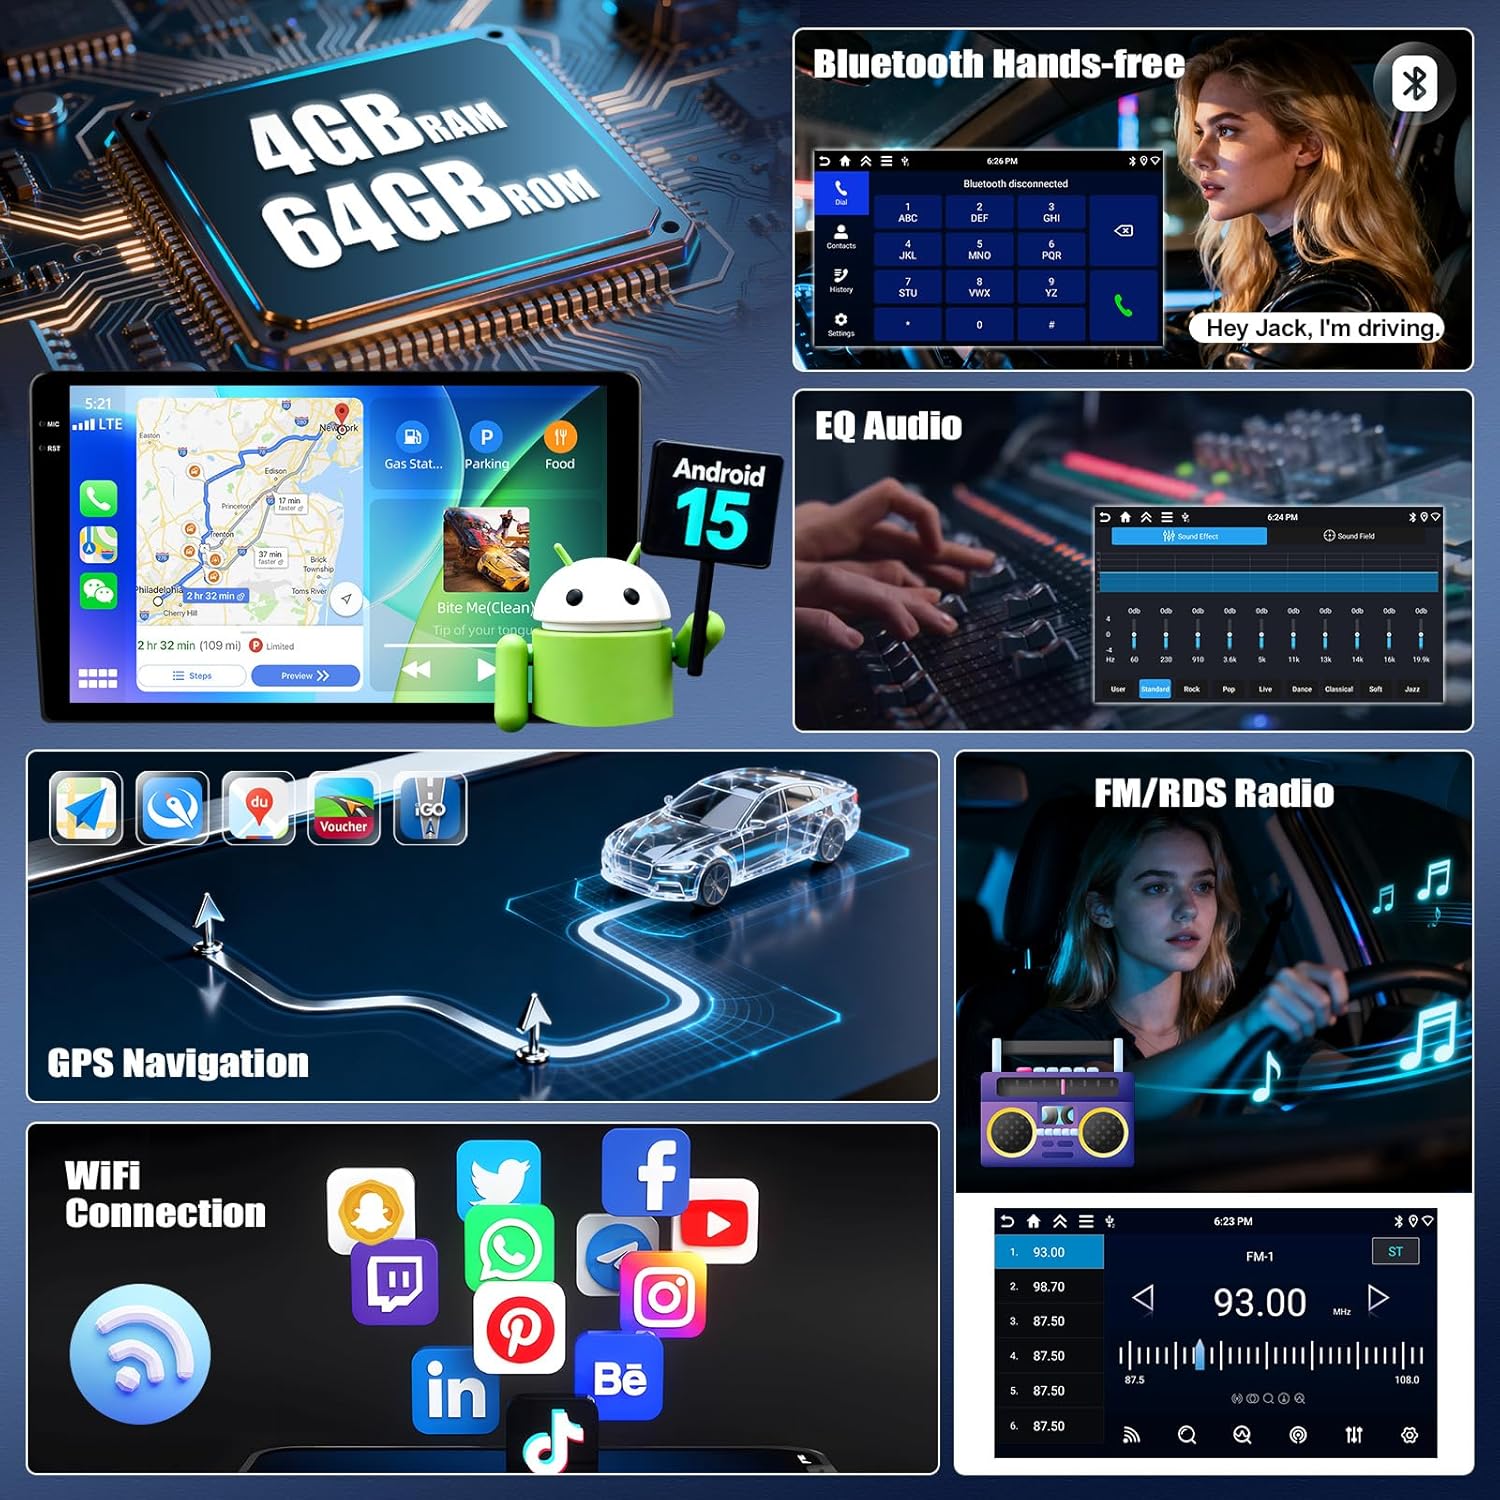
This car stereo is designed for Lexus ES 2001-2005 ES250/300/330 models. It features a 9-inch IPS touchscreen with 1280*720P resolution and runs on Android 15 with 4GB RAM and 64GB ROM.
3.1 Wiring Harness and CANBUS
Маанилүү: If your vehicle's original CD player has an incompatible back interface (as shown in Image 3.1, types B, C, or D), you may need to purchase an additional wiring harness and CANBUS decoder separately. The standard wiring harness included is for basic configurations (Type A). Please consult customer support if you are unsure about your vehicle's specific configuration.
Сүрөт 3.1: Мисamples of compatible (A) and incompatible (B, C, D) CD player back interfaces.
4. Орнотуу жана орнотуу
Installation of this car stereo requires technical knowledge. It is recommended to seek professional installation to avoid damage to the unit or your vehicle. Ensure the vehicle's battery is disconnected before beginning installation.
4.1 General Installation Steps (Consult a professional or vehicle-specific guide for detailed steps):
- Remove the original car stereo unit from the dashboard.
- Connect the provided power cable, RCA cables, USB cables, GPS antenna, and rear camera input cable to the new head unit.
- If required, connect the additional wiring harness and CANBUS decoder.
- Carefully route all cables to their respective locations in the vehicle.
- Mount the new car stereo into the dashboard opening.
- Унаанын аккумуляторун кайра туташтырып, бардык функцияларын текшериңиз.
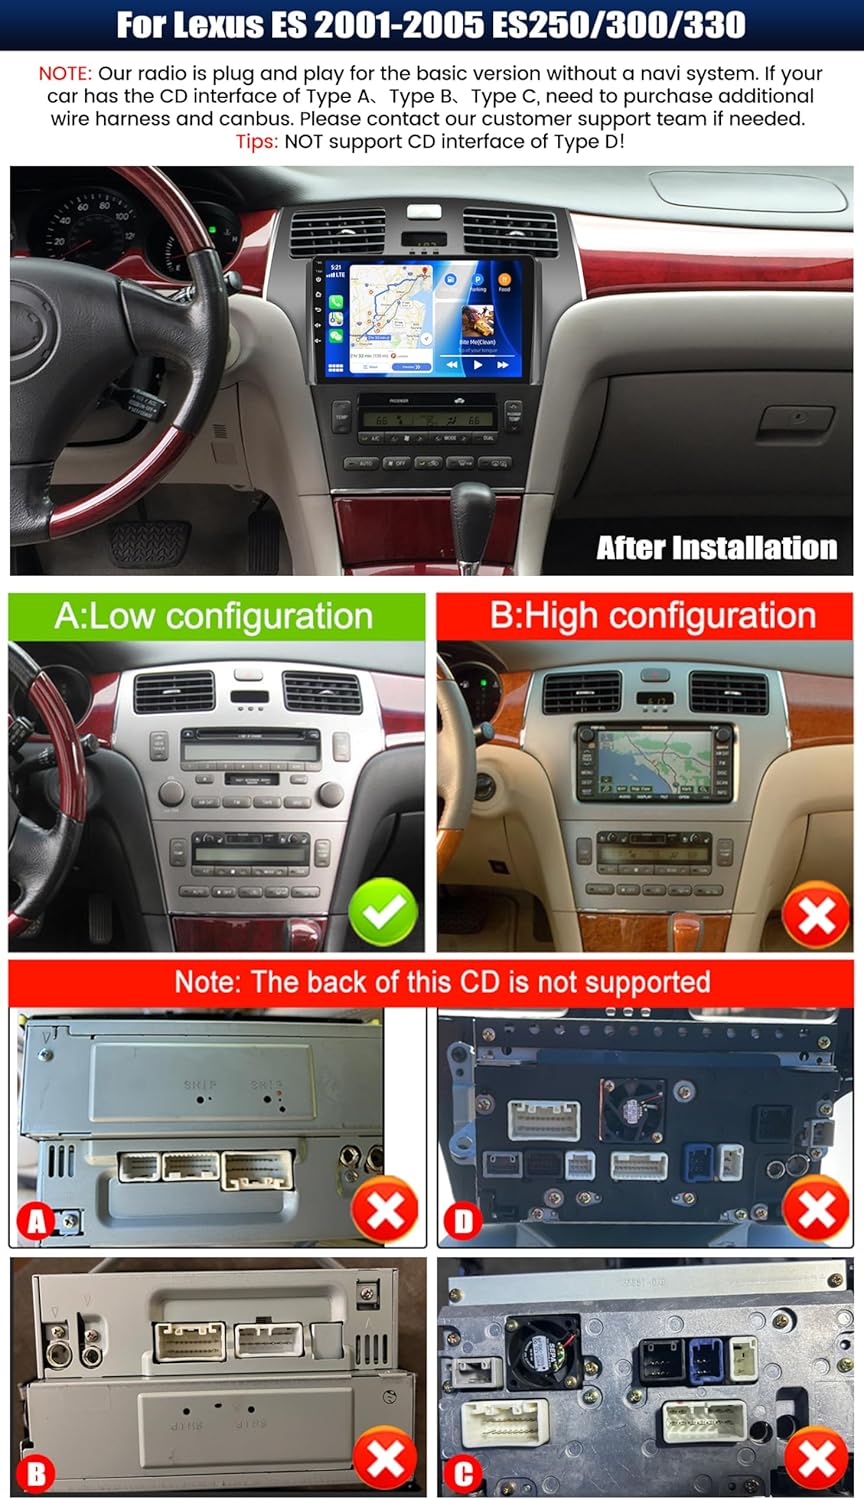
Сүрөт 4.1: Мисample of the car stereo installed in a Lexus ES dashboard.
5. Иштөө нускамалары
5.1 Wireless CarPlay / Android Auto
The unit supports wireless CarPlay for iOS devices and wireless Android Auto for Android devices. This allows seamless integration of your smartphone's navigation, music, calls, and messaging functions directly on the car stereo display.
- Смартфонуңузда Bluetooth жана Wi-Fi иштетилгенин текшериңиз.
- Унаа стереосунда CarPlay же Android Auto тиркемесине өтүңүз.
- Түзмөгүңүздү жупташтыруу үчүн экрандагы көрсөтмөлөрдү аткарыңыз.
- Once connected, you can access compatible apps and use voice commands (Siri or Google Assistant).

Image 5.1: Wireless CarPlay and Android Auto functionality.
5.2 Mirror Link функциясы
Mirror Link allows you to display your smartphone's screen on the car stereo. For Android devices, you can also control the phone directly from the stereo's touchscreen.
- Connect your smartphone to the car stereo via USB or Wi-Fi.
- Унаа стереосунда "Mirror Link" тиркемесин ачыңыз.
- Байланышты орнотуу үчүн экрандагы нускамаларды аткарыңыз.
5.3 GPS навигациясы
The unit features a built-in GPS module supporting both online and offline navigation. Pre-installed maps for North America and worldwide are available.
- To use online navigation, ensure the unit is connected to Wi-Fi.
- For offline navigation, download map data in advance.
- Access navigation through the dedicated 'GPS' or 'Maps' application.

Image 5.2: GPS Navigation and Wi-Fi connectivity.
5.4 Bluetooth 5.0
Телефонуңузду Bluetooth аркылуу туташтырып, үнсүз чалуу жана аудио агымы.
- Смартфонуңузда жана унаа стереосунда Bluetooth'ду иштетиңиз.
- Издөө available devices on the car stereo and select your phone.
- Жупташтыруу кодун эки түзмөктө тең ырастаңыз.
- Жупташтырылгандан кийин, сиз чалууларды жасап/кабыл алып, зымсыз музыка ойной аласыз.
5.5 FM/RDS радиосу
The built-in FM/RDS tuner provides enhanced radio signal reception. You can store up to 18 preset stations.
- Access the 'Radio' application.
- Жеткиликтүү станцияларды табуу үчүн сканерлөө функциясын колдонуңуз.
- Press and hold a preset button to save the current station.
5.6 EQ Audio Settings
Adjust audio output with the integrated Equalizer (EQ) to customize your listening experience. Multiple preset sound effects are available.
- Navigate to 'Sound Settings' or 'EQ' in the main menu.
- Choose from various preset sound modes (e.g., Pop, Rock, Jazz) or manually adjust frequency bands.

Image 5.3: Bluetooth, FM/RDS Radio, and EQ Audio interfaces.
5.7 Рулду башкаруу (SWC)
The unit supports steering wheel controls, allowing you to manage audio functions (volume, track skipping, call answering) without taking your hands off the wheel.
- Access the 'Steering Wheel Control' settings in the system menu.
- Рулдагы ар бир баскычты керектүү функцияга программалоо үчүн экрандагы нускамаларды аткарыңыз.
5.8 Бөлүнгөн экрандын иштеши
The split-screen feature allows you to run two applications simultaneously on the display, such as navigation and music playback. You can adjust the size and position of each app.
- From a running application, swipe from the side or long-press the recent apps button (method may vary by UI theme) to activate split-screen mode.
- Биринчиси менен катар иштөө үчүн экинчи колдонмону тандаңыз.

Image 5.4: Display features including IPS touchscreen, UI themes, and split screen.
6. Арткы View Камеранын иштеши
камтылган AHD камдык камерасы ачык-айкын камсыз кылат view of the area behind your vehicle when reversing. It automatically activates when the vehicle is shifted into reverse gear.
- Ensure the rear camera is properly installed and connected to the 'Rear Camera Input' on the head unit.
- When the vehicle is in reverse, the display will automatically switch to the camera feed, showing parking assist lines.

Image 6.1: Steering Wheel Control interface and AHD Backup Camera view.
7. Техникалык шарттар
| Өзгөчөлүк | Спецификация |
|---|---|
| Операция системасы | Android 15 |
| RAM | 4 ГБ |
| ROM | 64 ГБ |
| Дисплей өлчөмү | 9 дюйм |
| Screen Resolution | 1280 x 720P IPS |
| Bluetooth версиясы | 5.0 |
| Байланыш | Bluetooth, Wi-Fi, USB |
| Өзгөчөлүктөр | Wireless CarPlay, Android Auto, Mirror Link, GPS Navigation, FM/RDS, EQ, Steering Wheel Control, AHD Backup Camera, Multiple UI Themes, Split Screen |
| Карта түрү | North America, Worldwide (offline/online) |
| Элемент Салмагы | 3.89 фунт |
| Пакеттин өлчөмдөрү | 15.35 x 9.65 x 3.35 дюйм |
8. Кыйынчылыктарды
Эгерде сиз унааңыздын стереосу менен көйгөйлөргө туш болсоңуз, төмөнкү жалпы көйгөйлөрдү чечүү кадамдарын караңыз:
- Кубат жок: Бардык электр туташууларын жана сактагычтарды текшериңиз. Унаанын аккумулятору туура туташтырылганын текшериңиз.
- Үн жок: Динамиктердин туташууларын текшериңиз. Үн деңгээлин жана эквалайзер жөндөөлөрүн текшериңиз. Туура аудио булагынын тандалганын текшериңиз.
- GPS сигналын жоготуу: GPS антеннасынын туура орнотулганын жана ачык экенин текшериңиз view асмандын. Бирдиктеги GPS жөндөөлөрүн текшериңиз.
- Bluetooth туташуу маселелери: Ensure Bluetooth is enabled on both devices. Delete previous pairings and attempt to re-pair.
- CarPlay/Android Auto туташпай жатат: Ensure Wi-Fi and Bluetooth are active on your phone. Try restarting both the phone and the car stereo. Check for software updates for the car stereo.
- Арткы камера көрүнбөйт: Check the camera's power and video input connections. Ensure the reverse gear signal wire is correctly connected.
- Сенсордук экран жооп бербейт: Try restarting the unit. If the issue persists, a factory reset may be necessary (note: this will erase all user data).
Туруктуу маселелер үчүн кардарларды колдоо кызматына кайрылыңыз.
9. Техникалык тейлөө
Унааңыздын стереосун туура тейлөө анын узак мөөнөттүү иштешин жана оптималдуу иштешин камсыз кылат.
- Экранды тазалоо: Сенсордук экранды акырын сүртүү үчүн жумшак, түксүз чүпүрөктү колдонуңуз. өжөр тактар үчүн, бир аз гampчүпүрөккө суу же экранды тазалоочу каражат. Катуу химиялык заттардан же абразивдүү материалдардан алыс болуңуз.
- Программалык камсыздоо жаңыртуулары: Periodically check for available software updates to ensure optimal performance and access to new features. Follow the instructions provided with the update.
- Экологиялык шарттар: Аппаратты экстремалдык температурага, түз күн нуруна узак убакытка же ашыкча нымдуулукка дуушар кылуудан алыс болуңуз.
- Кабелдик байланыштар: Periodically check that all cables are securely connected to prevent intermittent issues.
10. Кепилдик жана колдоо
UNITOPSCI offers comprehensive support for your product:
- Кепилдик: The product comes with a 12-month replacement service.
- Акчаны кайтарып берүү кепилдиги: 30 күндүк акчаны кайтарып берүү кепилдиги берилет.
- Кайтаруулар: Enjoy 60-days no-worry returns.
- Техникалык колдоо: Dedicated 24/7 professional after-sales team is available to assist with installation or usage inquiries. Lifetime after-sales consultation and technical support are provided.
Байланыш маалыматы:
For online support, please contact: UNITOPSCI@126.com

Image 10.1: UNITOPSCI customer support information.