
1. Киришүү
This manual provides detailed instructions for the installation, operation, and maintenance of your plplaaoo 100A MPPT Solar Charge Controller. This advanced controller is designed to optimize energy harvest from your solar panels and manage battery charging efficiently for 12V, 24V, 36V, and 48V solar power systems. Please read this manual thoroughly before installation and use to ensure proper function and safety.
2. Коопсуздук нускамалары
Орнотуу жана иштетүү учурунда төмөнкү коопсуздук чараларын сактаңыз:
- Ensure all wiring is correctly connected and securely fastened to prevent loose connections and overheating.
- Always disconnect the solar panel and battery power before installing or adjusting the controller.
- Use appropriate tools and wear protective gear, including eye protection, during installation.
- Install the controller in a well-ventilated area, away from flammable gases and liquids.
- Контроллерди өз алдынча бөлбөңүз же оңдоого аракет кылбаңыз. Тейлөө үчүн квалификациялуу кызматкерлерге кайрылыңыз.
- Ensure the battery bank is properly sized and compatible with the controller's voltage жана учурдагы рейтингдер.
- Avoid short-circuiting the solar panel, battery, or load terminals.
3. Продукциянын өзгөчөлүктөрү
- Maximum Power Point Tracking (MPPT): Achieves up to 98% conversion efficiency by intelligently tracking the maximum power point of solar panels under varying conditions.
- Automatic Voltage Адаптация: Automatically detects and adapts to 12V, 24V, 36V, or 48V battery systems.
- Multifunctional Control: Supports various operating modes including PWM charging, constant current output, and voltage жөнгө салуу.
- Integrated USB and DC Outputs: Features dual 5V 1A USB ports and a 2A DC output for charging external devices.
- Комплекстүү коргоо: Includes safeguards against overvoltage, overcurrent, overtemperature, overload, short circuits, and reverse polarity.
- Колдонуучуга ыңгайлуу интерфейс: Equipped with a backlit LCD display for real-time monitoring and intuitive buttons for configuration.
- Туруктуу курулуш: Features an aluminum heatsink for efficient cooling and robust design for harsh environments (0°C to 60°C).
- Батарея шайкештиги: Compatible with gel, sealed lead-acid, and lithium batteries.
4. Пакеттин мазмуну
- 1 x plplaaoo 100A MPPT Solar Charge Controller
- 1 x User Manual
5. Продукт бүтүп калдыview жана компоненттер
Familiarize yourself with the main components and interface of the solar charge controller.

5.1-сүрөт: Фронт view of the solar charge controller, highlighting the LCD screen and various connection terminals.
The controller features an intuitive LCD display and clearly labeled ports for easy connection. The display provides real-time information about the system's status.
5.2-сүрөт: Деталдаштырылган view of the controller's connection ports.

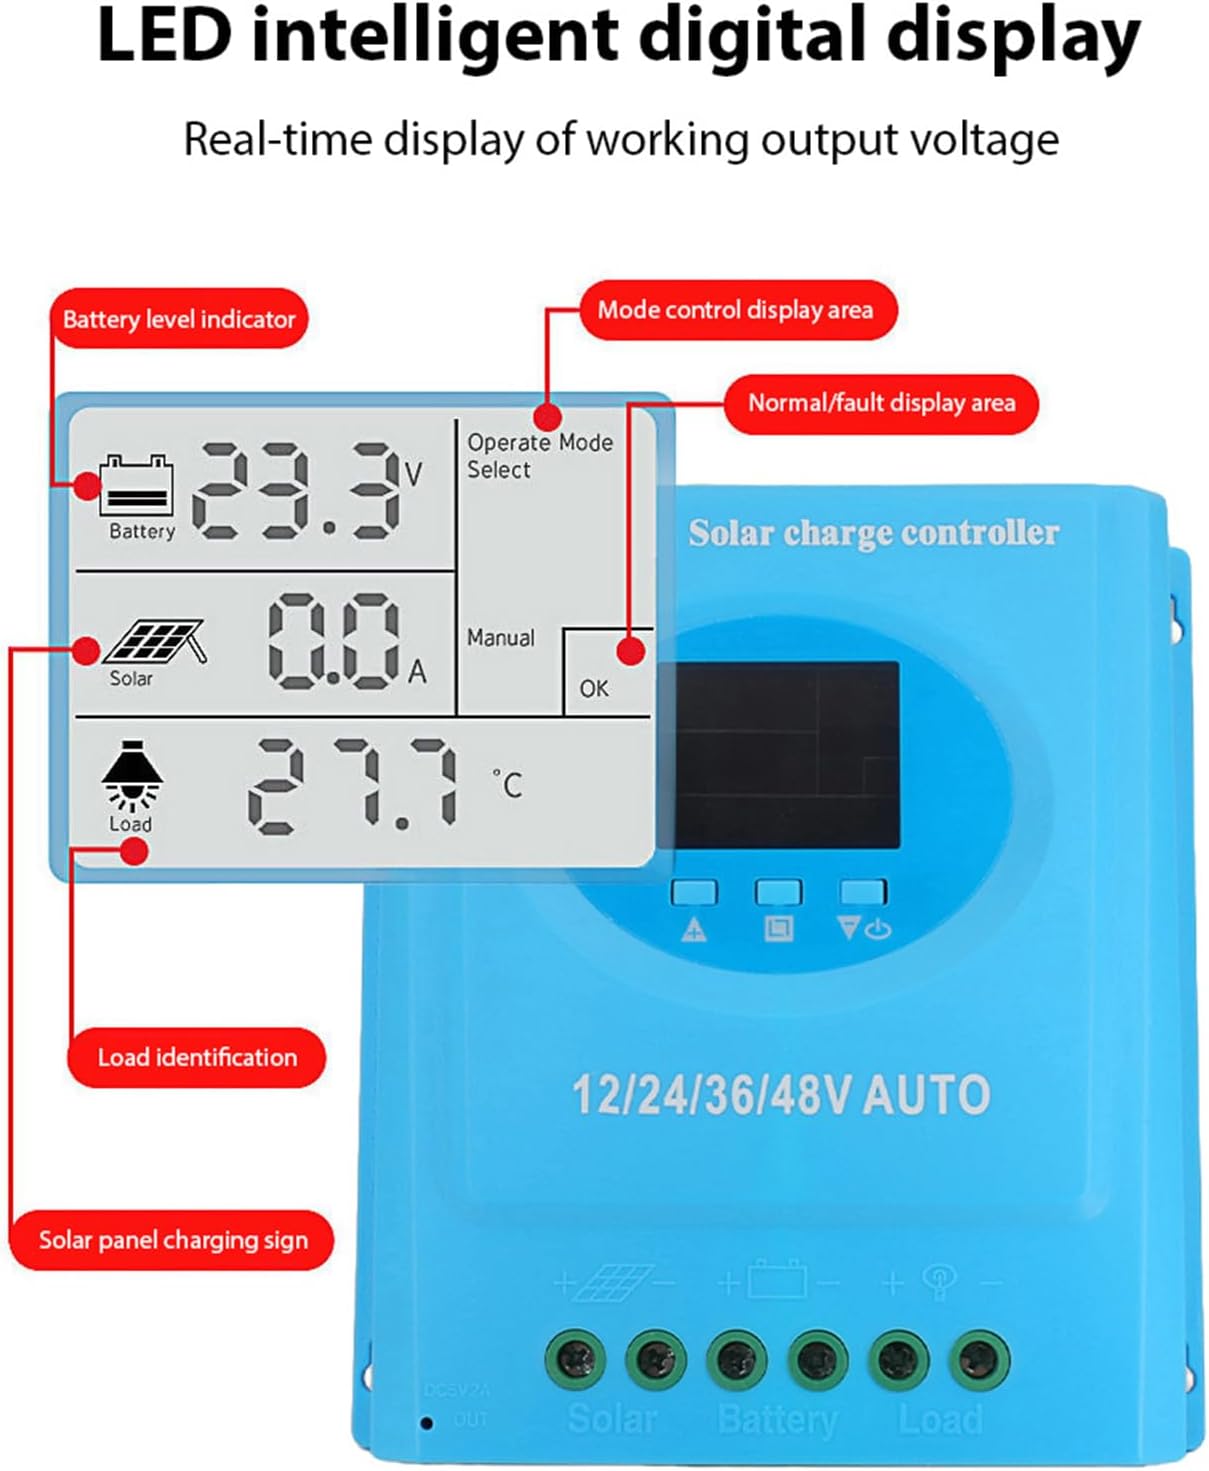
5.3-сүрөт: Деталдаштырылган view of the LCD display, indicating battery level, solar panel charging sign, load identification, operating mode, and real-time voltage.
5.1. Туташуу порттору
- Кош USB интерфейси: Two 5V 1A USB ports for charging mobile devices.
- Күн панелинин порту: Connects to your solar panels (positive and negative).
- Батарея порту: Connects to your battery bank (positive and negative).
- Туруктуу жүктөө порту: Connects to your DC loads (positive and negative).
- DC чыгаруу порту: Additional DC output.
6. Орнотуу жана орнотуу
Follow these steps for proper installation of the solar charge controller. Ensure all power sources are disconnected before beginning.
6.1. Зымдарды тартуу ыкмасы
Connect the components in the following order to prevent damage:
- Батареяны туташтыруу: Connect the battery to the controller's battery terminals (positive to positive, negative to negative). The controller will automatically detect the battery voltage.
- Күн панелин туташтыруу: Connect the solar panel to the controller's solar panel terminals (positive to positive, negative to negative).
- Туруктуу токтун жүктөмүн туташтырыңыз: Connect the DC load to the controller's load terminals (positive to positive, negative to negative).
Маанилүү: Always connect the battery first, then the solar panel, and finally the load. Disconnect in the reverse order.

6.1-сүрөт: Solar energy system wiring diagram. Note the correct polarity for all connections.
6.2. Монтаждоо
Mount the controller vertically on a flat surface in a well-ventilated area, ensuring adequate clearance for air circulation around the heatsink. Avoid direct sunlight, high temperatures, and humid environments.
7. Иштөө нускамалары
Once installed, the controller will automatically begin operating. The LCD display provides real-time system status.
7.1. ЖК дисплей маалымат
The LCD screen displays various parameters:
- Батарея деңгээлинин көрсөткүчү: Shows the current charge status of the battery.
- Solar Panel Charging Sign: Indicates when the solar panels are actively charging the battery.
- Load Identification: Shows the status of the connected DC load.
- Operating Mode Display Area: Учурдагы иштөө режимин көрсөтөт (мисалы, кол, автоматтык).
- Normal/Fault Display Area: Indicates normal operation or displays error codes if a fault occurs.
- Real-time Working Output Voltage: Учурдагы томду көрсөтөтtagсистеманын э.
7.2. Баскыч функциялары
The controller typically features multiple buttons for navigation and setting adjustments:
- Меню баскычы: Used to enter and exit the menu settings.
- Өйдө/ылдый баскычтары: Used to navigate through menu options and adjust parameter values.
- OK баскычы: Used to confirm selections and save settings.
Refer to the on-screen menu for specific parameter adjustments such as battery type, load control mode, and charging thresholds.
8. Техникалык тейлөө
Regular maintenance ensures optimal performance and longevity of your solar charge controller.
- Тазалоо: Periodically clean the controller's exterior with a dry cloth to remove dust and debris. Ensure ventilation openings are clear.
- Туташуу текшерүү: Annually inspect all wiring connections for tightness and corrosion. Re-tighten if necessary.
- Экологиялык текшерүү: Ensure the installation environment remains within the specified operating temperature range and is free from excessive moisture or dust.
- Батареяны текшерүү: Regularly check the battery terminals for corrosion and ensure the battery is in good condition.
9. Кыйынчылыктарды
If you encounter issues with your solar charge controller, refer to the following common problems and solutions:
| Көйгөй | Мүмкүн себеп | Чечим |
|---|---|---|
| Контроллер күйбөй жатат / LCD дисплей бош |
|
|
| Батарея заряддалбай жатат |
|
|
| Жүк иштебейт |
|
|
| Ката коду көрсөтүлдү | Атайын система катасы. | Refer to the controller's display for the specific error code and consult the full product documentation or contact support for detailed interpretation and resolution. |
10. Техникалык шарттар
| Параметр | Нарк |
|---|---|
| Модел | plplaaoozi6egog4wm-0A |
| Бренд | plplaaoo |
| Номиналдуу ток | 100A |
| System Voltage | 12V / 24V / 36V / 48V Automatic Adaptation |
| Заряддоо түрү | MPPT (Максималдуу Power Point Tracking) |
| Конверсиянын эффективдүүлүгү | 98% чейин |
| USB чыгышы | Dual 5V 1A ports |
| DC Output | 2A |
| Иштөө температурасы | 0°Cден 60°Cге чейин |
| Өлчөмдөрү (болжол менен) | 19.5 см x 18.3 см x 6.8 см (7.7 дюйм x 7.2 дюйм x 2.7 дюйм) |

10.1-сүрөт: Approximate dimensions of the solar charge controller.
11. Кепилдик жана колдоо
Кепилдик маалыматы, техникалык колдоо же тейлөө боюнча суроо үчүн, сатуучуга же өндүрүүчүгө түздөн-түз кайрылыңыз. Сатып алганыңыздын далили катары сатып алуу дүмүрчөгүңүздү сактаңыз.