1. Киришүү
This manual provides detailed instructions for the installation, operation, and management of your MokerLink 8-Port 10G Managed Ethernet Switch. This device is designed to enhance network performance and efficiency with its high-speed connectivity and advanced management features. Please read this manual thoroughly before using the product to ensure proper setup and functionality.
2. Продукт бүтүп калдыview
The MokerLink 8-Port 10G Managed Ethernet Switch features a robust design for high-bandwidth network environments. It includes 4x10Gbps Ethernet RJ45 ports and 4x10Gbps SFP+ slots, offering versatile connectivity options for various network devices. The switch supports a 160Gbps switching capacity and a packet forwarding rate of 119.04Mpps, ensuring non-blocking 10G line speed forwarding across all ports.
Негизги өзгөчөлүктөр төмөнкүлөрдү камтыйт:
- Жогорку ылдамдыктагы порттор: 4x10Gbps RJ45 ports (auto-adaptive 10G/5G/2.5G/1000M/100M) and 4x10Gbps SFP+ slots (compatible with 1G/10G optical modules).
- Жогорку өткөрүү жөндөмдүүлүгү: 160Gbps switching capacity and 119.04Mpps packet forwarding rate.
- L3 Management: колдойт Web and Command Line Interface (CLI) for comprehensive device and port configuration, including IPv4/IPv6 management and routing.
- Advanced Layer 2 Features: VLAN, ACL, QoS, Jumbo frame, DHCP, security, multicast, MAC address table, diagnosis, Statistics, MSTP/RSTP/STP.
- Security & Diagnosis: AAA/802.1X/MAC-Based authentication, DoS anti-attack, dynamic ARP inspection, DHCP Snooping, IP Source Guard, Port Security, Protected Ports, storm control, Console/RAM/Flash Logs, Port Mirroring, Ping, Traceroute, Port Tests, UDLD Protocol.
- Туруктуу дизайн: Metal case with industrial-grade fan for efficient heat dissipation, suitable for desktop or wall-mounting.
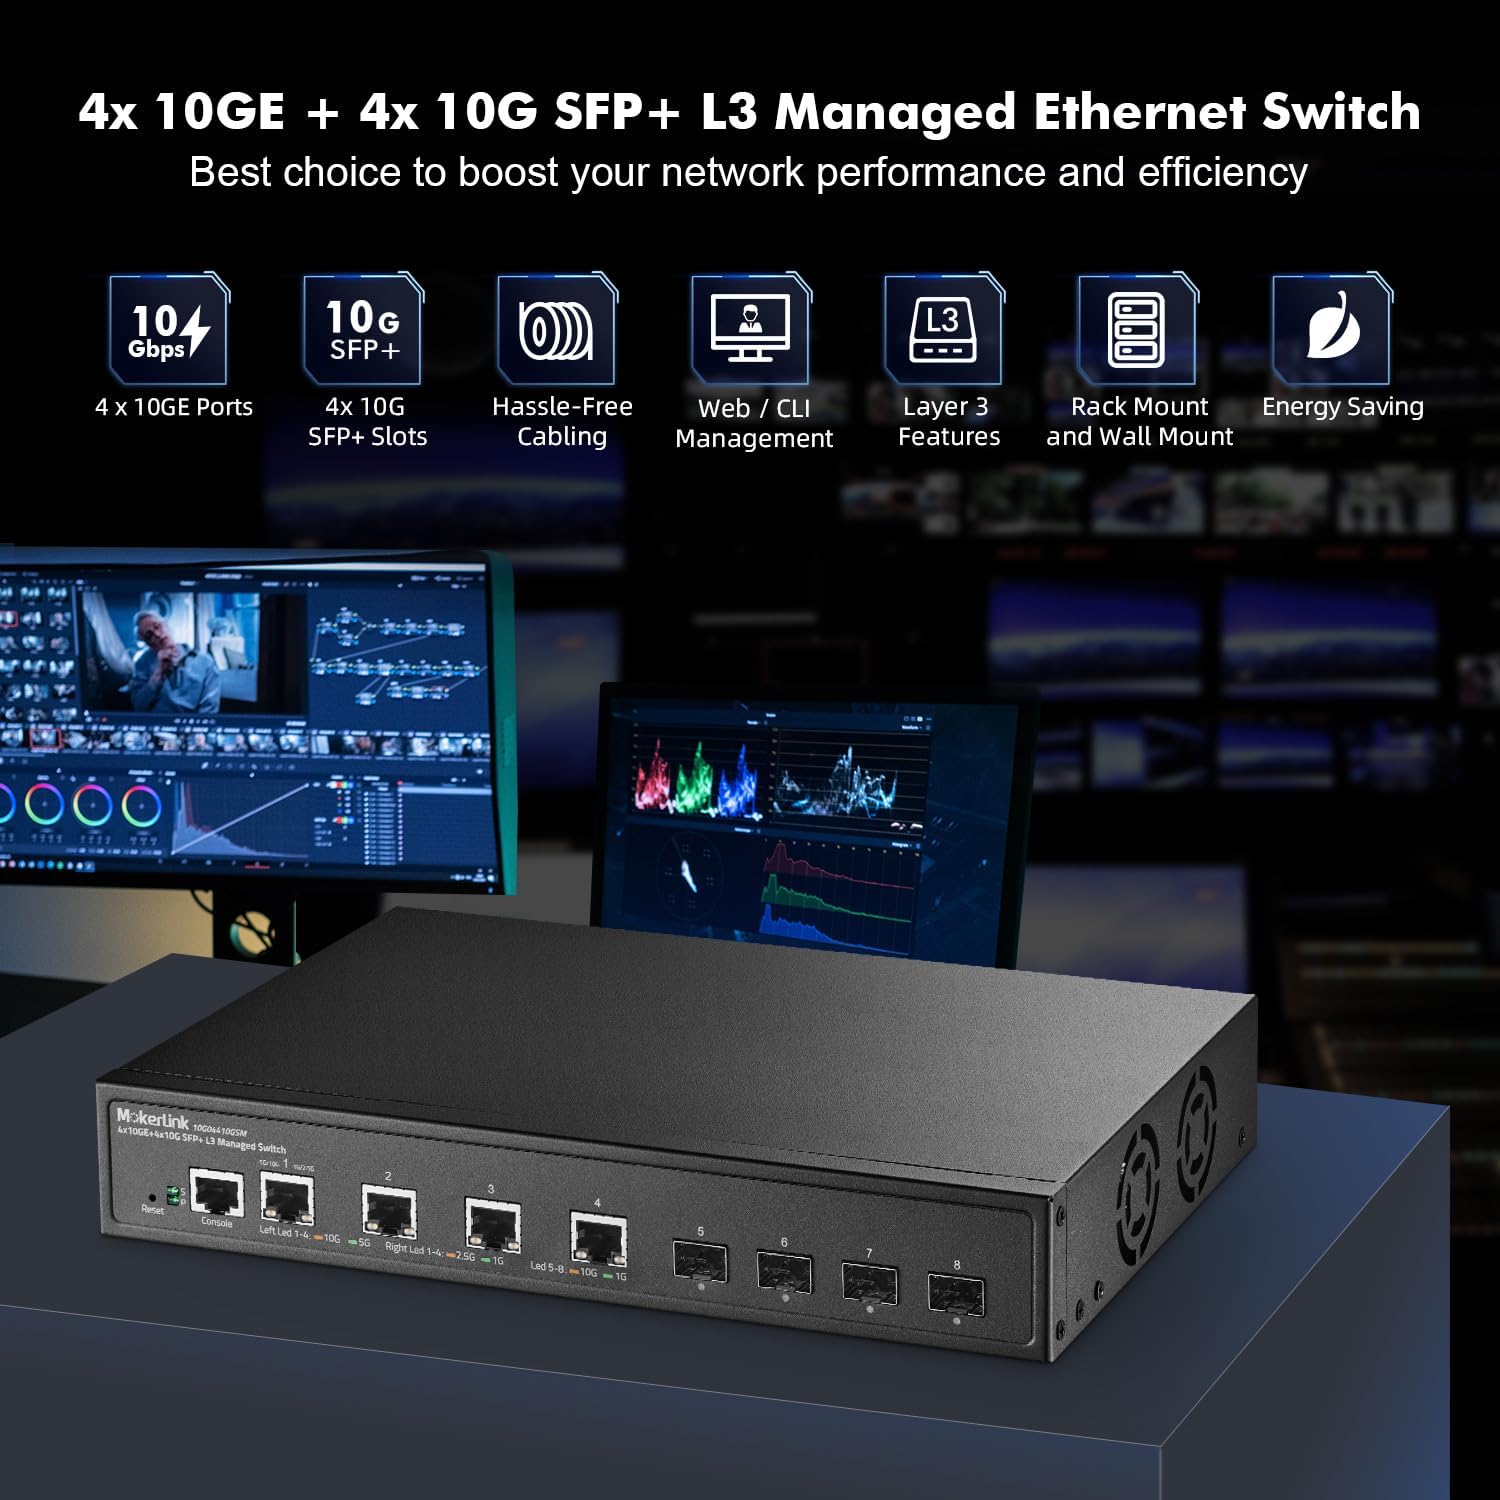
Figure 2.1: MokerLink 8-Port 10G Managed Ethernet Switch highlighting key features like 10G ports, SFP+ slots, Web/CLI management, L3 features, rack/wall mount, and energy saving.

Figure 2.2: Front and rear panel view of the switch, showing 4x10Gbps RJ45 ports, 4x10Gbps SFP+ slots, console port, reset button, power indicator, system indicator, and external power supply input.
3. Пакеттин мазмуну
Verify the contents of your package upon opening. If any items are missing or damaged, please contact your vendor.
- 1 x MokerLink 10G Managed Switch
- 1 х кубат адаптери
- 1 х Колдонуучунун колдонмосу (бул документ)
- Mounting Accessories (for desktop or wall-mount installation)
4. Орнотуу
4.1 Физикалык орнотуу
The MokerLink 8-Port 10G Managed Ethernet Switch is designed for flexible deployment, supporting both desktop and wall-mount installations.
- Иш тактада жайгаштыруу: Place the switch on a flat, stable surface, ensuring adequate ventilation around the device.
- Дубалга орнотуу: Use the provided mounting accessories to securely attach the switch to a wall. Ensure the mounting location is sturdy and allows for proper cable management and ventilation.
4.2 Тармактык түзүлүштөрдү туташтыруу
Connect your network devices (e.g., servers, workstations, NAS, WiFi 6/7 APs) to the switch's RJ45 or SFP+ ports.
- RJ45 порттору: Use appropriate Ethernet cables for optimal performance. For 10Gbps connections, Cat6a or Cat7 cables are recommended. For 2.5Gbps/5Gbps, Cat5e or Cat6 cables are suitable.
- SFP+ Slots: Insert compatible 1G or 10G SFP/SFP+ optical modules into the slots, then connect fiber optic cables to the modules.

Figure 4.1: The switch connected to various high-performance devices such as WiFi 6/7 AP, servers, workstations, NAS, and 4K/8K video systems, illustrating cable type recommendations for different speeds.
4.3 Күйгүзүү
Connect the provided power adapter to the switch's power input and then to a power outlet. The Power LED (P) on the front panel should illuminate, indicating the switch is receiving power. The System LED (S) will blink during startup and remain steady when the system is operational.
5. Иштөө нускамалары
5.1 LED көрсөткүчтөрү
Алдыңкы панелдин диоддору абал тууралуу маалымат берет:
- P (Power Indicator):
- Күйүк: Кубат берилет.
- Өчүк: кубат жок.
- S (System Indicator):
- On: The system is normal.
- Off: System startup or abnormality.
- RJ45 Port LEDs (Left/Right):
- Left LED (Link/Activity): Orange for 10Gbps, Green for 5Gbps, 2.5Gbps, 1Gbps, or 100Mbps. Blinks for activity.
- Right LED (Speed): Orange for 10Gbps, Green for 1Gbps.
- SFP+ порт LED'лери:
- Led: Orange for 10Gbps, Green for 1Gbps. Blinks for activity.
5.2 Initial Access to Management Interface
Коммутаторду төмөнкү аркылуу башкарууга болот Web-based interface or Command Line Interface (CLI).
- Web Интерфейс: Access the switch by entering its default IP address (typically 192.168.2.1) into a web browser. The default username is 'admin' and the default password is 'admin'.
- CLI: Connect to the console port using a console cable and a terminal emulator, or use Telnet/SSH for remote access.

Figure 5.1: Illustration of accessing the switch's management interfaces, including the web interface and command line interface, with default login credentials.
6. Башкаруу өзгөчөлүктөрү
The MokerLink 8-Port 10G Managed Ethernet Switch offers a comprehensive suite of Layer 2 and Layer 3 management features.
6.1 Layer 2 Switching Features
- VLAN (Virtual Local Area Network): Supports 802.1Q Tag-based VLANs to segment networks and improve security and performance.
- Шилтемелерди бириктирүү (LACP): Combines multiple physical links into a single logical link to increase bandwidth and provide link redundancy.
- QoS (Кызматтын сапаты): Prioritizes network traffic to ensure critical applications receive sufficient bandwidth and low latency.
- MSTP/RSTP/STP: Spanning Tree Protocols prevent network loops.
- Jumbo Frames: Supports larger Ethernet frames for increased data throughput.

6.1-сүрөт: Мисample of 802.1Q Tag-based VLANs segregating network traffic for different devices like cameras, servers, and IP phones.

Figure 6.2: Illustration of Link Aggregation (LACP) connecting the switch to another switch and a NAS for enhanced bandwidth and resilience.

Figure 6.3: QoS mechanism prioritizing audio, video, and data traffic to reduce packet loss and latency.
6.2 Layer 3 Routing Features
- IPv4/IPv6 башкаруу: Supports both IPv4 and IPv6 protocols for network addressing and routing.
- Статикалык маршруттар: Configurable static routes for directing traffic between different IP networks.
- ARP (даректи чечүү протоколу): Manages the mapping of IP addresses to MAC addresses.
- Loopback Interface: A virtual interface used for management and routing protocols.
6.3 Security and Diagnosis
- AAA/802.1X/MAC-Based Authentication: Provides robust user and device authentication.
- DoS Anti-Attack: Тейлөөдөн баш тартуу чабуулдарынан коргойт.
- DHCP Snooping & IP Source Guard: Prevents unauthorized DHCP servers and IP spoofing.
- Порт коопсуздугу: Limits the number of MAC addresses on a port to prevent unauthorized access.
- Бороонду көзөмөлдөө: Prevents network performance degradation due to excessive broadcast, multicast, or unknown unicast traffic.
- Порт чагылдыруу: Duplicates network traffic from one port to another for monitoring and analysis.
- Ping, Traceroute, Port Tests: Diagnostic tools for network connectivity and performance.
- UDLD Protocol: Unidirectional Link Detection protocol to detect and disable unidirectional links.
- Циклди аныктоо: Identifies and removes network loops to prevent traffic disruptions.

Figure 6.4: Loop detection feature identifying and preventing network loops between two switches, ensuring stable network operation.
7. Техникалык тейлөө
Regular maintenance ensures the longevity and optimal performance of your switch.
- Орнотулган программаны жаңыртуу: Periodically check the MokerLink official website for firmware updates to enhance features and improve security. Follow the provided instructions for a safe upgrade process.
- Configuration Backup/Restore: Regularly back up your switch configuration to prevent data loss. This allows for quick restoration in case of misconfiguration or device replacement.
- Экологиялык шарттар: Ensure the switch operates within recommended temperature and humidity ranges. Maintain clear airflow around the device to facilitate heat dissipation by the industrial-grade fan.
- Тазалоо: Коммутаторду таза жана чаңсыз кармаңыз. Тазалоо үчүн жумшак, кургак чүпүрөк колдонуңуз.
8. Кыйынчылыктарды
Бул бөлүм сиз кабылышы мүмкүн болгон жалпы көйгөйлөрдү карайт.
8.1 Күч жок
- Кубат адаптери өчүргүчкө жана иштеген электр розеткасына бекем туташып турганын текшериңиз.
- Башка аспапка сайып, розетка иштеп жатканын текшериңиз.
- Электр адаптеринде көрүнгөн зыяндын бар-жоктугун текшериңиз.
8.2 Портто шилтеме жок
- Check the Ethernet or fiber cable connection at both ends. Ensure cables are not damaged.
- Туташкан аппараттын күйгүзүлгөнүн жана туура иштеп жатканын текшериңиз.
- Ensure the correct cable type is used for the speed (e.g., Cat6a/7 for 10G RJ45).
- Check the port status in the switch's management interface.
- Try connecting to a different port on the switch or using a different cable.
8.3 Кирүү мүмкүн эмес Web Интерфейс
- Ensure your computer's IP address is in the same subnet as the switch's default IP (192.168.2.x, with subnet mask 255.255.255.0).
- Verify the switch's IP address has not been changed from the default (192.168.2.1).
- Браузериңиздин кэшин тазалаңыз же башка браузерди колдонуп көрүңүз.
- Компьютериңиздеги брандмауэрди же антивирустук программаларды убактылуу өчүрүңүз.
8.4 Заводдук жөндөөлөргө кайтаруу
If you forget the password or encounter persistent issues, you can restore the switch to its factory default settings.
- With the switch powered on, locate the Калыбына келтирүү алдыңкы панелиндеги баскыч.
- Кайталоо баскычын болжол менен 6 секунд басып кармап туруу үчүн клипти же окшош учтуу нерсени колдонуңуз.
- Release the button. The switch will reboot with factory default settings.
9. Техникалык шарттар
| Өзгөчөлүк | Description |
|---|---|
| Бренд | MokerLink |
| Модель номери | 4x10G + 4x10G SFP Managed |
| Порттардын саны | 9 (4x10Gbps RJ45, 4x10Gbps SFP+, 1xConsole) |
| Камтылган компоненттер | 10G Managed Switch |
| Түс | Кара |
| Шайкеш түзмөктөр | Иш такта |
| Интерфейс | RJ45, SFP+ |
| Маалыматтарды өткөрүү ылдамдыгы | 160 Гигабит/секунда (которуу жөндөмдүүлүгү) |
| Которуу түрү | Managed (L3) |
| MAC дарек столунун көлөмү | 16K |
| Пакетти жөнөтүү ылдамдыгы | 119.04 Mpps |
| Башкаруу | Web, CLI, Telnet, SSH, SNMP |
| Энергияны керектөө | Empty Load Power: <36W |
10. Кепилдик жана колдоо
10.1 Кепилдик маалыматы
The MokerLink 8-Port 10G Managed Ethernet Switch comes with a 1 жылдык Чектелген Кепилдик сатып алынган күндөн тартып. Бул кепилдик нормалдуу колдонуудагы материалдардагы жана жасалгадагы кемчиликтерди камтыйт. Бул туура эмес колдонуудан, кырсыктан, уруксатсыз өзгөртүүдөн же тышкы себептерден келип чыккан зыянды камтыбайт.
10.2 Техникалык колдоо
For technical assistance, troubleshooting, or warranty claims, please contact MokerLink customer support through the official website or your point of purchase. Please have your product model number and purchase information ready when contacting support.