
1. Киришүү
This manual provides detailed instructions for the assembly, operation, and maintenance of your Merax 50.7" Kitchen Island. Please read this manual thoroughly before assembly and use to ensure proper function and longevity of your product. Keep this manual for future reference.

Image: The Merax 50.7" Kitchen Island shown in a kitchen environment with its various storage compartments open, including drawers, a pull-out organizer, and a tilt-out trash can cabinet.
2. Коопсуздук маалыматы
- Чийип кетпеши үчүн, аппаратты дайыма жумшак, таза бетке чогултуңуз.
- Монтаждоону баштоодон мурун бардык бөлүктөрдүн бар экенин жана бузулбаганын текшериңиз.
- Do not overtighten screws during assembly to avoid damaging the engineered wood.
- Чогултуу учурунда кичинекей бөлүктөрүн балдардан алыс кармаңыз.
- "Техникалык мүнөздөмөлөр" бөлүмүндө көрсөтүлгөн максималдуу жүк көтөрүмдүүлүгүнөн ашпаңыз.
- Кокустан кыймылдап кетпеши үчүн арал кыймылсыз абалда турганда дөңгөлөктөрдү бекитиңиз.
3. Компоненттер жана бөлүктөр тизмеси
Чогултуудан мурун, төмөндө көрсөтүлгөн бардык компоненттер таңгагыңызда бар экенин текшериңиз. Эгерде кандайдыр бир тетиктер жок болсо же бузулган болсо, кардарларды колдоо кызматына кайрылыңыз.
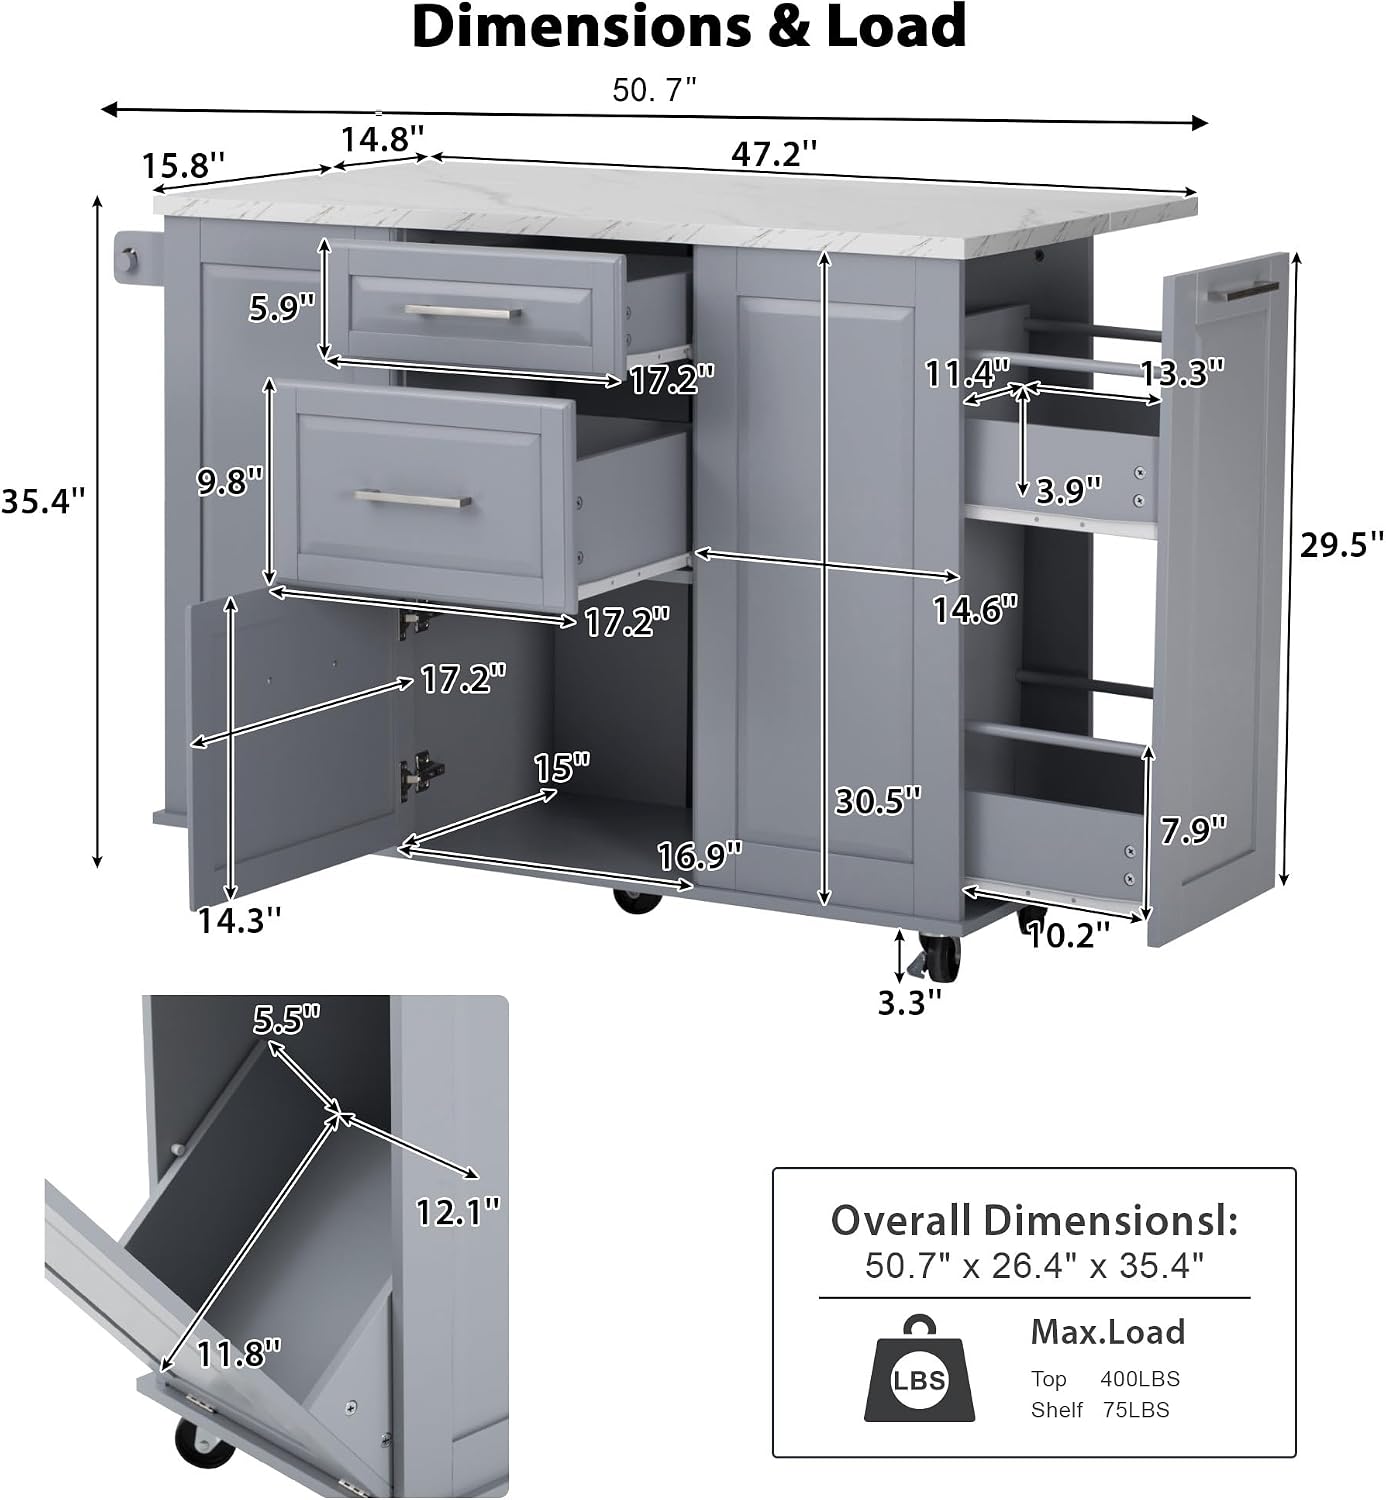
Image: Detailed diagram illustrating the dimensions of each section of the kitchen island, including drawers, cabinets, and the tilt-out trash can compartment, along with maximum load capacities for the top and shelves.
The product includes an installation kit and tools. Refer to the separate assembly instructions provided in your package for a detailed step-by-step guide.
4. Орнотуу жана чогултуу
Your Merax Kitchen Island requires assembly. A detailed assembly instruction manual with diagrams is included in your product packaging. Please follow these instructions carefully.
4.1 Чогултууга чейинки текшерүү тизмеси
- Бардык компоненттерди таңгактан чыгарып, зыян келтирбөө үчүн таза, жумшак бетке жаткызыңыз.
- Verify all parts against the parts list in the assembly manual.
- Ensure you have the necessary tools (included in the kit).
4.2 Чогултуу кадамдары
Refer to the dedicated assembly manual for step-by-step instructions. General steps typically include:
- Assembling the main frame.
- Attaching the side panels and back panel.
- Тартмаларды жана тартма слайддарын орнотуу.
- Mounting cabinet doors and hinges.
- Assembling the tilt trash can mechanism.
- Attaching the pull-out cabinet organizer.
- Securing the tabletop and drop leaf.
- Installing the wheels and towel rack.


Images: Details of the towel rack and metal hinges, which are components installed during assembly.
5. Иштөө нускамалары
5.1 Using the Drop Leaf Countertop
The kitchen island features a foldable drop leaf on one side, allowing for extended workspace or compact storage. To extend, gently lift the drop leaf until it is level with the main countertop. To fold, support the leaf and release the locking mechanism (if present) to lower it. Ensure the leaf is fully supported when extending or folding.

Сүрөт: үстүнкү view of the kitchen island, demonstrating the drop leaf in its extended position, providing additional counter space.
5.2 Tilt Trash Can Cabinet
The concealed tilt trash can cabinet is designed to hold a 9-gallon trash can (not included). To access, pull the cabinet door outwards from the top, allowing the inner bin holder to tilt forward. Insert or remove the trash can. Push the door back into place to conceal the trash can and help contain odors.

Image: The kitchen island with its tilt-out trash can cabinet open, revealing a trash bag inside and illustrating the mechanism for concealing waste.
5.3 Pull-Out Cabinet Organizer
The kitchen island includes a 2-tier pull-out cabinet organizer. To use, simply pull the cabinet door open and then slide the organizer shelves outwards. This allows for easy access to items stored at the back. Push the shelves back in and close the door when finished.

Сүрөт: жакын план view of the two-tier pull-out cabinet organizer, showing its functionality for storing various kitchen items.
5.4 Drawers and Storage Cabinet
The island features two drawers and an additional storage cabinet. The center drawer includes divider bars for flexible organization of kitchen items. Pull drawers and open cabinet doors gently. Avoid overloading to ensure smooth operation.

Сүрөт: бир тарап view of the kitchen island with its drawers and cabinet doors open, showcasing - ички сактагычтын сыйымдуулугу.
5.5 Locking Wheels
The kitchen island is equipped with 5 wheels, two of which are lockable. To lock a wheel, press down on the lever located on the wheel. To unlock, lift the lever. Always lock the wheels when the island is in a desired stationary position to prevent accidental movement.

Сүрөт: деталдуу view of the kitchen island's wheels, highlighting the locking mechanism on two of them for stability.
6. Кароо жана тейлөө
6.1 Бетти тазалоо
- Engineered Wood Surfaces: жумшак менен сүртүп, гamp cloth. Avoid abrasive cleaners or harsh chemicals that can damage the finish. Dry immediately with a clean cloth.
- Faux Marble Top: Clean spills immediately. Use a mild soap and water solution with a soft cloth. Do not use acidic cleaners, as they can etch the surface.
6.2 Аппараттык камсыздоону тейлөө
- Periodically check all screws and fasteners to ensure they are tight. Retighten as necessary, but do not overtighten.
- Lubricate drawer slides and wheel mechanisms if they become stiff over time.
6.3 Жалпы кам көрүү
- Ысык буюмдарды коргоочу каражатсыз түз эле столдун үстүнө коюудан алыс болуңуз.
- Аралды узак убакыт бою ашыкча нымдуулукка же түз күн нуруна дуушар кылбаңыз.
7. Кыйынчылыктарды
| Көйгөй | Мүмкүн себеп | Чечим |
|---|---|---|
| Тарткычтар жабышып калат же жылмакай жылбайт. | Overloaded drawer, misaligned slides, or debris in slides. | Reduce weight in the drawer. Check alignment of slides and clear any obstructions. Lubricate slides if necessary. |
| Wheels do not lock or roll freely. | Locking mechanism engaged incorrectly or debris in wheel. | Ensure the locking lever is fully engaged or disengaged. Clean any debris from the wheel and axle. |
| Drop leaf does not stay extended or fold properly. | Support mechanism not engaged or damaged. | Check that the support mechanism is fully extended and locked into place. Inspect for any damage to the hinges or supports. |
| Кабинеттин эшиктери туура эмес жайгаштырылган. | Илниктер бош же туура эмес туураланган. | Шарнир бурамаларын тартыңыз. Эшиктерди тегиздөө үчүн монтаждоо нускамаларына ылайык илмектерди тууралаңыз. |
8. Техникалык шарттар
| Өзгөчөлүк | Деталь |
|---|---|
| Бренд | Merax |
| Модель номери | JY00845 |
| Жалпы өлчөмдөрү (D x W x Y) | 26.4" x 50.7" x 35.4" |
| Материал | Инженердик жыгач |
| Жогорку Материал түрү | Engineered Wood (Faux Marble Veined) |
| Түс | Grey+Blue |
| Элемент Салмагы | 80 фунт |
| Тартмалардын саны | 2 |
| Эшиктердин саны | 1 (for main cabinet) + 1 (for tilt trash can) |
| Текчелердин саны | 2 (in pull-out organizer) |
| Tilt Trash Can Capacity | Accommodates 9-gallon trash can (not included) |
| Max Load Capacity (Top) | 400 LBS |
| Max Load Capacity (Shelf) | 75 LBS |
| Wheels | 5 wheels, 2 lockable |
| Кошумча функциялар | Drop Leaf Design, Pull-Out Cabinet Organizer, Towel Rack |
9. Кепилдик жана колдоо
9.1 Кайтаруу саясаты
This product is subject to a 30-day return policy for refund or replacement. Please refer to your purchase documentation or retailer's website for specific terms and conditions regarding returns.
9.2 Product Protection Plans
Extended protection plans may be available for purchase separately. These plans typically cover repairs or replacements beyond the standard return period. Consult your retailer for details on available 2-Year or 3-Year protection plans.
9.3 Кардарларды колдоо
For any questions regarding assembly, missing parts, or product issues not covered in this manual, please contact Merax customer support. Refer to your purchase receipt or the Merax official webбайланыш маалыматы үчүн сайт.
10. Продукт видеолору
Бул товар үчүн сатуучунун расмий видеолору табылган жок.