
Introduction
This manual provides instructions for the safe and effective use of your SEAOURA 2-in-1 Aquarium Magnetic Cleaner with Thermometer and Aquarium Vacuum Cleaner. This product combines two essential tools for maintaining a clean and healthy aquarium environment: a magnetic cleaner for algae and scale removal, and a vacuum cleaner for substrate cleaning and water changes.
Продукт компоненттери
Familiarize yourself with the components of your aquarium vacuum cleaner:

Сүрөт: жарылды view of the aquarium vacuum cleaner components. This image illustrates the Water Inlet Connector, Filter Basket, Air Pressing Button, Flow Control Valve, Water Inlet Pipe (25cm/9.84in x 1, 12.5cm/4.9in x 1), Fixed Suction Cup, Water Inlet Pipe Connector, Aquarium Algae Scraper, Gravel Vacuum Tube, Water Outlet Connector, Soft Water Outlet Hose (200cm/79in), Hose Fixture Clamp, and Pump Connect. The total length is indicated as 58cm/22.8in.
- Aquarium Vacuum Cleaner: Main pump unit, water inlet pipes, gravel vacuum tube, filter basket, soft water outlet hose, flow control valve, hose fixture clamp.
- Aquarium Magnetic Cleaner: Inner magnetic cleaning pad, outer magnetic unit with digital thermometer.
Жайгашуу
1. Aquarium Vacuum Cleaner Assembly
- Connect the desired length of water inlet pipes to the main pump unit. For smaller tanks, use one pipe; for medium tanks, use two pipes.
- Attach the gravel vacuum tube to the end of the water inlet pipe assembly.
- Insert the filter basket into the main pump unit to prevent debris from entering the pump.
- Connect the soft water outlet hose to the water outlet connector on the pump unit. Secure it with the hose fixture clamp керек болсо.

Сүрөт: The aquarium vacuum cleaner configured for different tank sizes. For small fish tanks, one pipe is connected. For medium fish tanks, two pipes are connected. This demonstrates the modularity for various aquarium depths.
2. Magnetic Cleaner Placement
The magnetic cleaner is designed for glass tanks with a thickness of less than 1/2 inch. It is not suitable for acrylic or plastic fish tanks.
- Place the inner magnetic cleaning pad inside the aquarium, submerged in water.
- Align the outer magnetic unit (with the thermometer display) on the exterior of the aquarium glass, directly opposite the inner cleaning pad. The strong magnetic force will secure both parts together.

Сүрөт: The magnetic cleaner securely attached to the aquarium glass, demonstrating its strong magnetic force. The image highlights that it is suitable for glass with a thickness of less than 1/2 inch and effectively cleans both sides of the tank.

Сүрөт: Dimensions of the magnetic cleaner, indicating its ultra-mini and space-saving design. The outer unit measures approximately 50mm (1.97in) in height and 40mm (1.57in) in width, with a thickness of 20mm (0.79in). The inner pad measures 40mm (1.57in) in height and width, with a thickness of 32mm (1.26in). A note specifies it is not suitable for acrylic or plastic fish tanks.
Иштөө нускамалары
1. Aquarium Vacuum Cleaner Operation
- Place the gravel vacuum tube into the aquarium, ensuring it reaches the substrate.
- Position the soft water outlet hose into a bucket or drain outside the aquarium.
- Press the Air Pressing Button repeatedly to initiate the siphon action. Water will begin to flow out of the aquarium.
- Move the gravel vacuum tube through the substrate to remove fish waste and debris.
- Use the Flow Control Valve to adjust the water flow rate as needed. Turn the dial to increase or decrease the flow.
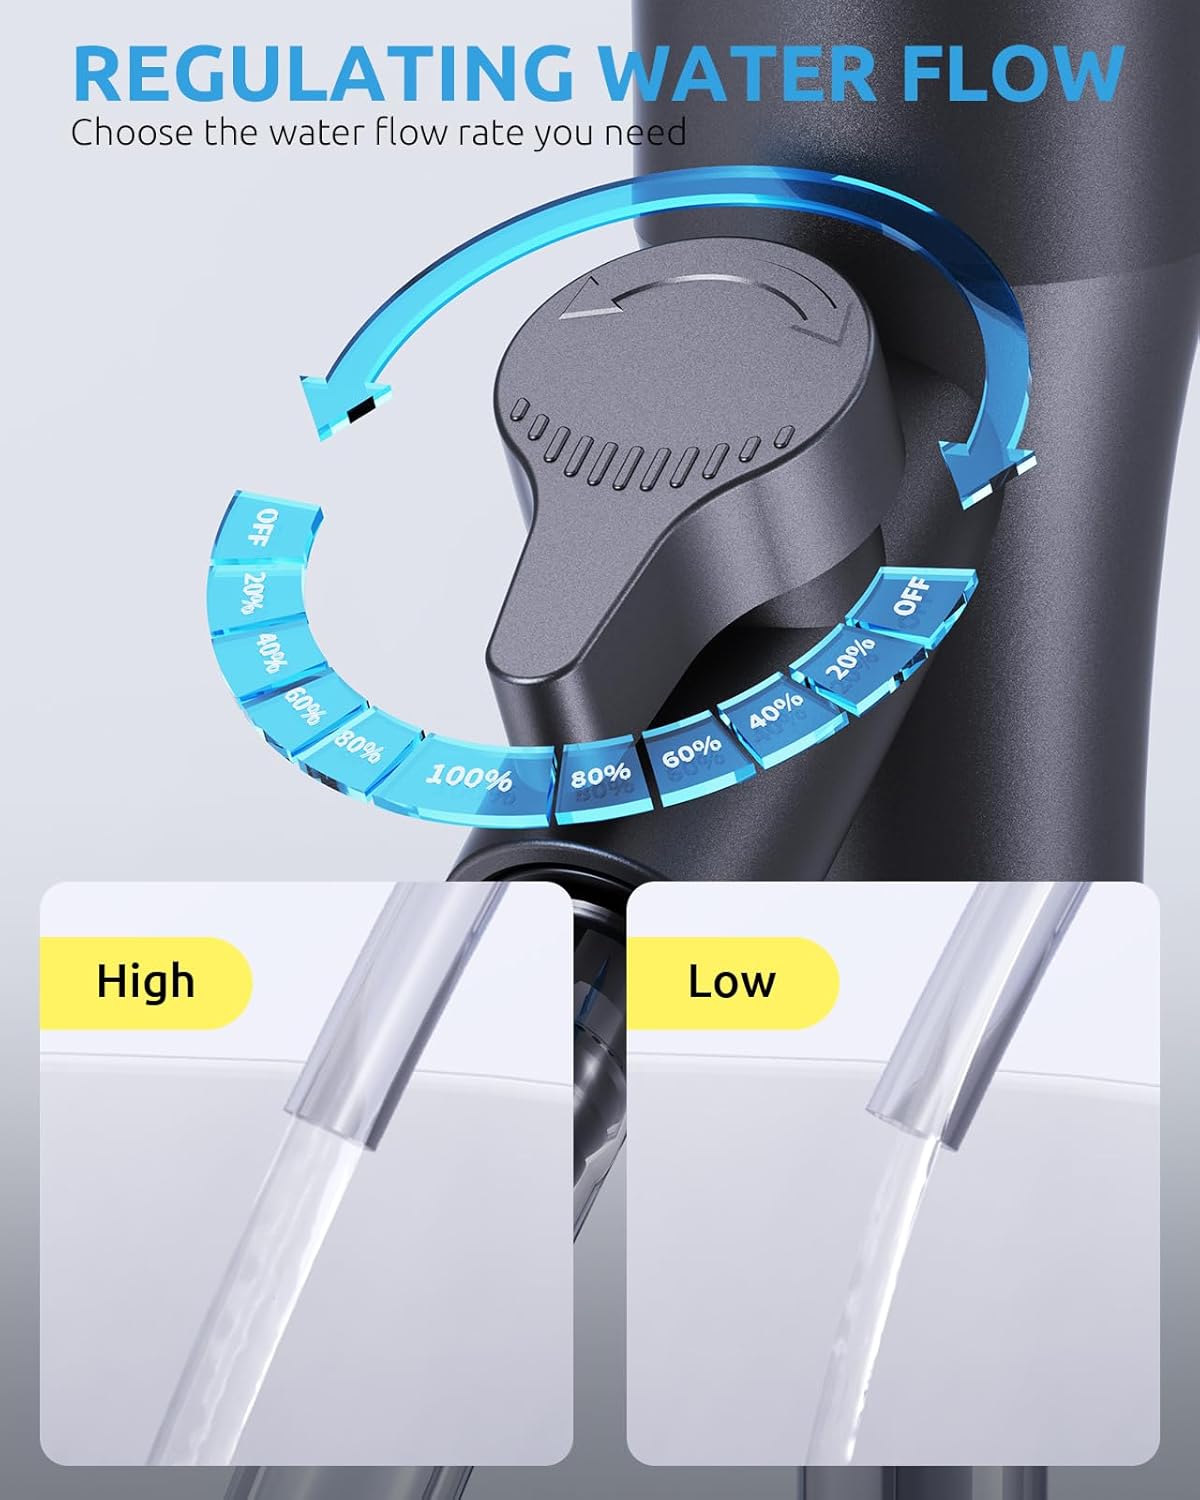
Сүрөт: The flow control valve, illustrating how to regulate the water flow rate from OFF to 100%. Examples of high and low water flow are shown, demonstrating the adjustable output.
2. Magnetic Cleaner Operation
- Once the magnetic cleaner is securely attached to the tank glass, gently move the outer magnetic unit across the exterior surface. The inner cleaning pad will mirror its movement, scraping algae and scale from the interior.
- The integrated thermometer on the outer unit displays the water temperature in real-time. The temperature range is 0-99°F with an accuracy of ±0.9°F.
- Monitor the temperature during water changes to avoid sudden temperature fluctuations that could stress aquatic life.

Сүрөт: The magnetic cleaner's thermometer displaying its temperature range of 0-99°F and an accuracy of ±0.9°F. A backside temperature sensor is indicated as the measurement point.

Сүрөт: Features of the magnetic cleaner, including Thorough Cleaning, Scratch-free operation, Easy to Move Around, and Temperature unit switching. The digital display shows 86.8°F.
Техникалык тейлөө
1. Cleaning the Vacuum Cleaner
- After each use, disassemble the water inlet pipes and gravel vacuum tube.
- Rinse all components thoroughly with clean water to remove any trapped debris or waste.
- Clean the filter basket to ensure optimal flow during future uses.
- Сактоодон мурун бардык бөлүктөрү кургак экенин текшериңиз.
2. Cleaning the Magnetic Cleaner
- Rinse both the inner and outer magnetic units with clean water.
- Wipe the cleaning surfaces to remove any algae residue.
- Ensure the thermometer display is clean and readable.
3. Сактоо
Proper storage helps prolong the life of your product.
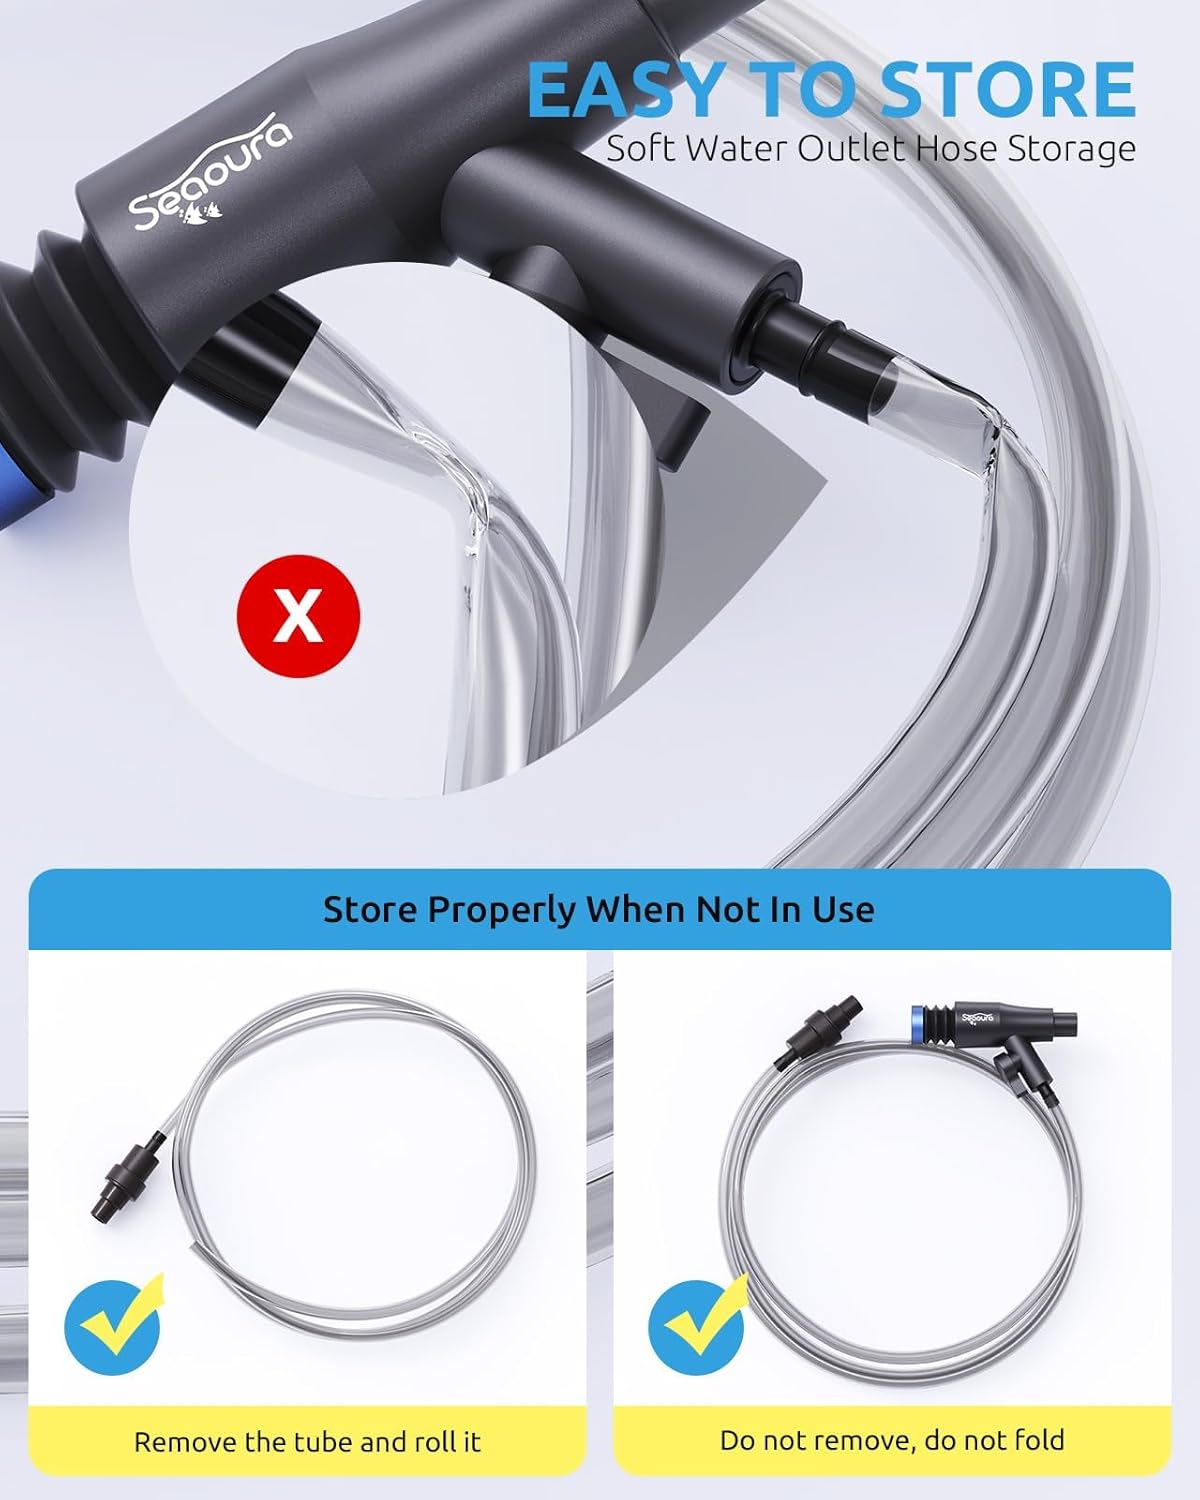
Сүрөт: Proper storage methods for the soft water outlet hose. It is recommended to remove the tube and roll it, or to keep it connected and roll it without folding. An incorrect method shows the hose sharply bent, which should be avoided.
- Store the vacuum cleaner hose by rolling it neatly. Avoid sharp bends or folds that could damage the material.
- Keep both the vacuum cleaner and magnetic cleaner in a dry, cool place away from direct sunlight.
Проблемаларды чечүү
| Көйгөй | Мүмкүн себеп | Чечим |
|---|---|---|
| Vacuum cleaner not siphoning | Air Pressing Button not pressed enough; outlet hose not lower than inlet; blockage in tube. | Press the Air Pressing Button repeatedly until flow starts. Ensure the outlet hose is positioned lower than the water level in the tank. Check for and clear any blockages in the pipes or filter basket. |
| Weak water flow from vacuum cleaner | Filter basket clogged; flow control valve partially closed; hose kinked. | Clean the filter basket. Open the flow control valve fully. Straighten any kinks in the outlet hose. |
| Magnetic cleaner not adhering strongly | Tank glass too thick; foreign object between magnets. | Ensure tank glass is less than 1/2 inch thick. Remove any debris or objects between the magnetic units. |
| Thermometer display not working | Battery depleted (if applicable); sensor not fully submerged. | Check if the thermometer requires a battery and replace if necessary. Ensure the inner magnetic unit with the sensor is fully submerged in water. |
Техникалык шарттар
- Бренд аты: SEAOURA
- Модел: B0FYPXGVV2
- Magnetic Cleaner Compatibility: Glass tanks less than 1/2 inch thick (not for acrylic/plastic)
- Magnetic Cleaner Thermometer Range: 0-99°F
- Magnetic Cleaner Thermometer Accuracy: ±0.9°F
- Vacuum Cleaner Hose Length: 200 см (79 дюйм)
- Vacuum Cleaner Total Length (assembled): 58 см (22.8 дюйм)
- Сунушталган танк көлөмү: 10-30 галлон
- Биринчи жеткиликтүү: 19-октябрь, 2025-жыл