
1. Киришүү
Thank you for choosing the iScooter i14 Electric Scooter with Seat. This manual provides essential information for the safe assembly, operation, and maintenance of your new electric scooter. Please read it thoroughly before your first ride and keep it for future reference. Proper use and care will ensure optimal performance and longevity of your scooter.
2. Коопсуздук маалыматы
Your safety is paramount. Always wear a helmet and appropriate protective gear (knee pads, elbow pads) when riding. Familiarize yourself with local laws and regulations regarding electric scooter use. Do not ride in adverse weather conditions or on slippery surfaces. Avoid riding under the influence of alcohol or drugs. Regular maintenance checks are crucial for safe operation.
- Ар дайым каска жана коргоочу шаймандарды кийиңиз.
- Check brakes, tires, and all fasteners before each ride.
- Жергиликтүү жол мыйзамдарын жана эрежелерин сактаңыз.
- 264 LBS максималдуу салмагы кубаттуулугу ашпагыла.
- Avoid riding in heavy rain, snow, or on icy roads.
3. Пакеттин мазмуну
Кутучаны ачканда, бардык компоненттердин бар экендигин текшериңиз:
- i14 Электр Скутери
- Заряддагыч
- Колдонуучунун Колдонмосу (бул документ)
- Tool Kit
4. Орнотуу жана чогултуу
Follow these steps to assemble your iScooter i14 Electric Scooter. A detailed assembly video is provided below for visual guidance.
4.1 Кутудан чыгаруу жана алгачкы текшерүү
Carefully remove all components from the packaging. Inspect for any damage that may have occurred during shipping.

Figure 4.1: The iScooter i14 Electric Scooter with Seat.
4.2 Front Wheel and Fender Installation
Attach the front wheel and fender to the scooter's fork using the provided tools. Ensure all bolts are securely tightened.
4.3 Рулдун монтажы
Insert the handlebar stem into the main frame and secure it. Adjust the handlebar height to your preference and tighten the quick-release clamp. Attach the handlebar to the stem and secure it with the provided screws.

Figure 4.2: Adjusting the height of the handlebar for comfortable riding.
4.4 Орундук орнотуу
Insert the seat post into the designated slot on the scooter frame. Adjust the seat height for comfortable riding and secure it with the quick-release lever. Ensure the seat is firmly in place.

Figure 4.3: Adjusting the seat height to suit individual rider preferences.
4.5 Rear Basket Attachment
Secure the rear storage basket to the designated mounting points on the scooter's rear rack using the provided hardware. Ensure it is stable and can safely carry items.

Figure 4.4: The spacious rear basket for carrying personal belongings.
4.6 Чогултуу боюнча видео көрсөтмө
Video 4.1: This video demonstrates the assembly process for the iScooter i14 Electric Scooter with Seat, including unboxing, attaching the front wheel, handlebar, seat, and rear basket.
5. Иштөө нускамалары
Understand the controls and features of your iScooter i14 for a safe and enjoyable ride.
5.1 Power On/Off and Key Ignition
Insert the mechanical key into the ignition slot and turn it to the 'ON' position to power on the scooter. The LCD display will illuminate. Turn the key to 'OFF' to power down.
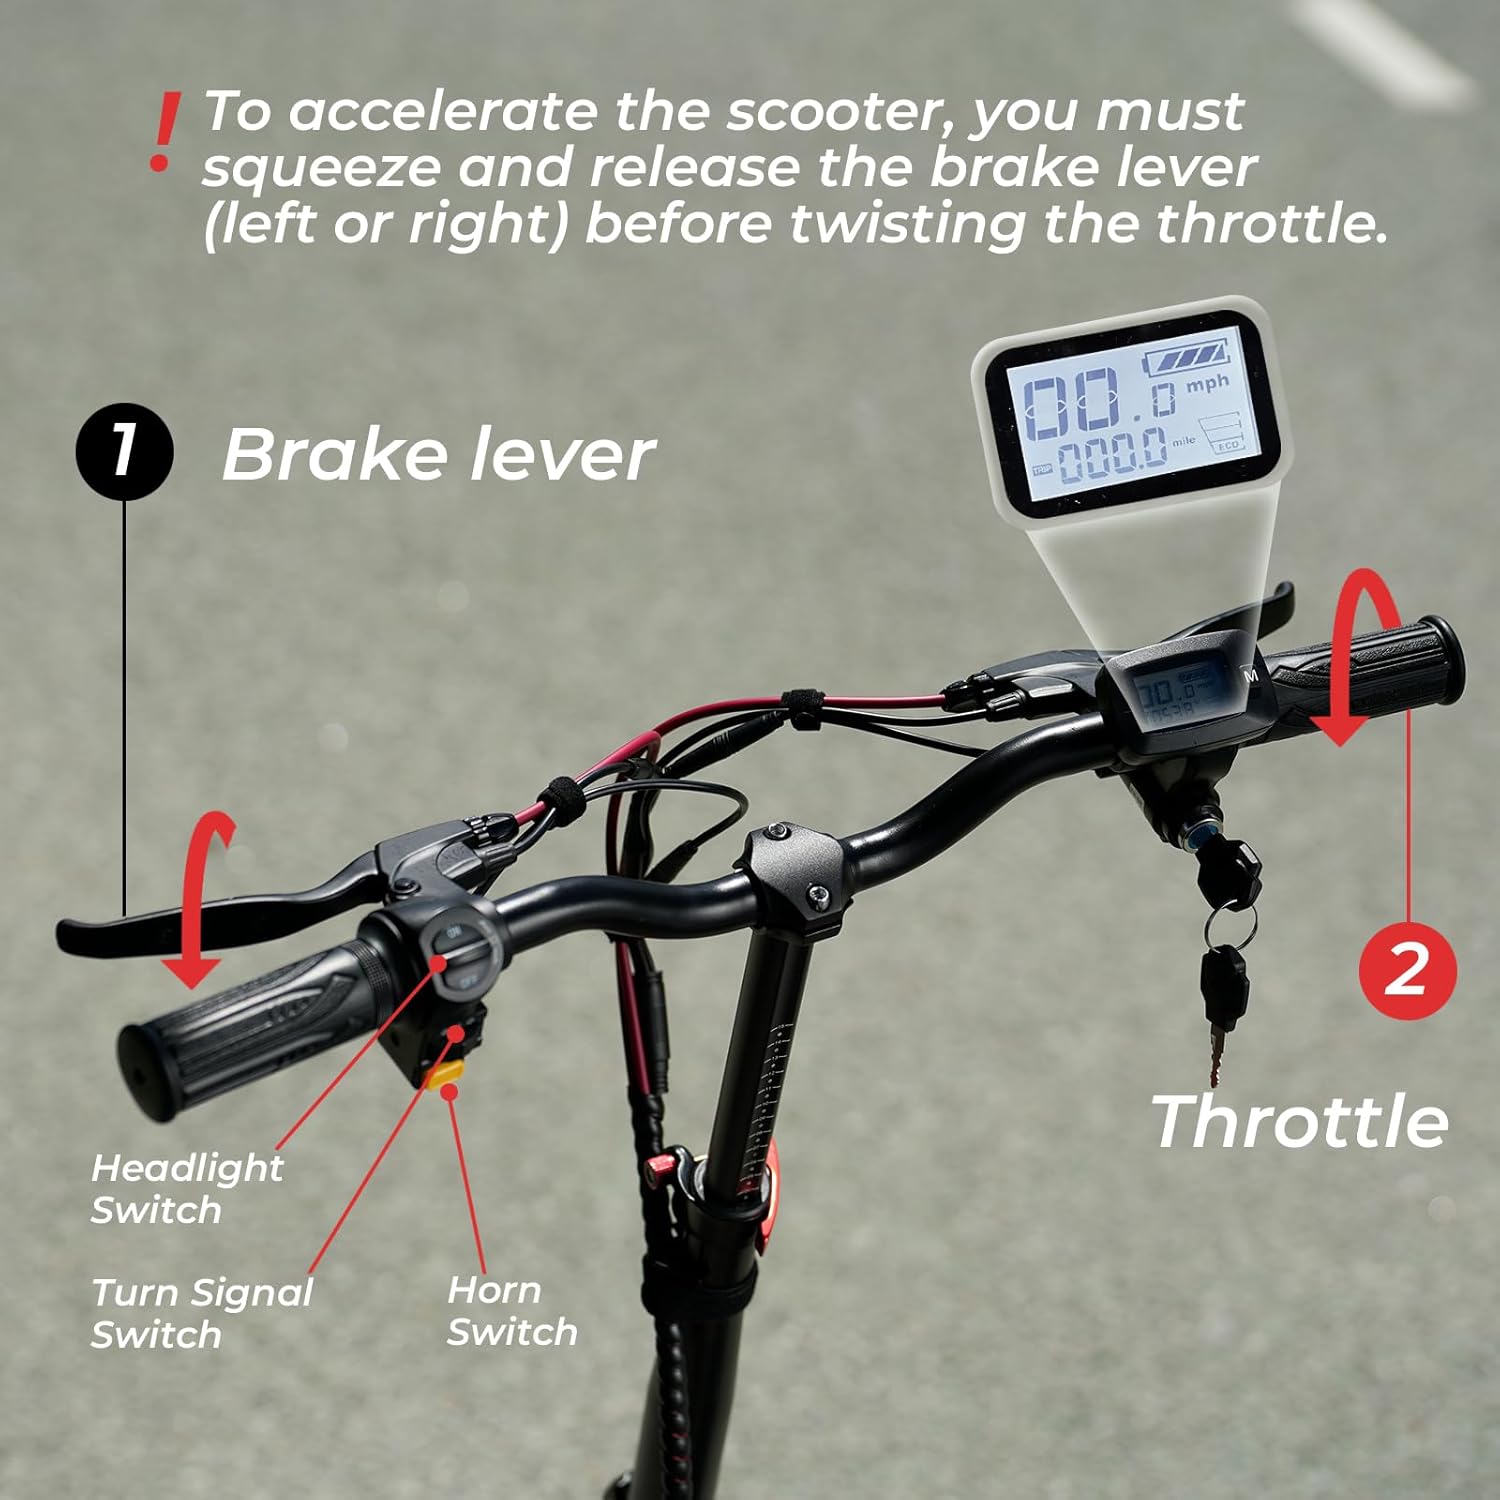
Figure 5.1: ашыкview of the handlebar controls, including the LCD display, key ignition, and switches.
5.2 Ылдамдык режимдери
The iScooter i14 offers 3 adjustable speed modes: 9 MPH, 21 MPH, and 28 MPH. To switch between modes, press the 'M' button on the display twice. Select the appropriate speed mode based on your riding environment and experience level.
5.3 Дроссельдин иштеши
To accelerate, you must first squeeze and release either the left or right brake lever before twisting the throttle. This safety feature prevents accidental acceleration. Twist the throttle gently to control your speed.
5.4 Lights, Horn, and Turn Signals
Use the dedicated switches on the handlebar to activate the front and rear LED lights for visibility, the horn for alerts, and the turn signals to indicate your direction to others.

Figure 5.2: The bright front LED light enhances visibility during low-light conditions.

Figure 5.3: The rear LED light ensures you are seen from behind, improving safety.
5.5 Тормоздоо системасы
The scooter is equipped with front and rear disc brakes, along with an electric lock system, for powerful and reliable stopping performance. Apply both brake levers gently and evenly to slow down or stop. Avoid sudden, harsh braking, especially at high speeds.

Figure 5.4: The robust disc brake system provides effective stopping power.
6. Заряддоо операциясы
To charge your iScooter i14, locate the charging port on the scooter's deck. Connect the charger to the port, then plug the charger into a standard wall outlet. The indicator light on the charger will typically turn red during charging and green when fully charged. A full charge takes approximately 8 hours.
Video 6.1: This video demonstrates the charging process for the iScooter i14 Electric Scooter.
7. Техникалык тейлөө
Үзгүлтүксүз техникалык тейлөө скутериңиздин узак жана коопсуз иштешин камсыздайт.
- Шина басымы: Check the pressure of the 14-inch pneumatic tires regularly. Maintain the recommended PSI as indicated on the tire sidewall for optimal ride comfort and range.
- Тормозду текшерүү: Periodically inspect the front and rear disc brakes for wear and proper function. Adjust brake cables if necessary to ensure responsive braking.
- Тазалоо: Скутерди жарнама менен тазалаңызamp кездеме. Жогорку басымдагы суу агымдарын түздөн-түз электрдик тетиктерге колдонуудан алыс болуңуз.
- Батареяга кам көрүү: Скутерди салкын, кургак жерде сактаңыз. Эгер узак убакытка сактасаңыз, батареяны болжол менен 50-70% га чейин заряддап, терең разряддын алдын алуу үчүн ар бир 1-2 ай сайын заряддап туруңуз.
- бекиткичтер: Regularly check all screws, bolts, and quick-release mechanisms to ensure they are tight and secure.
8. Кыйынчылыктарды
Бул жерде кээ бир жалпы маселелер жана алардын мүмкүн болуучу чечимдери:
| Көйгөй | Мүмкүн себеп | Чечим |
|---|---|---|
| Скутер күйбөйт | Low battery; Key not fully turned; Loose connections | Charge battery; Ensure key is in 'ON' position; Check all visible cable connections. |
| Мотор иштебей жатат | Brake lever not released before throttle; Faulty throttle; Motor issue | Ensure brake lever is released; Contact customer support if issue persists. |
| Тормоз алсыз сезилет | Эскирген тормоз колодкалары; Бошоң тормоз тросу; Гидравликалык системадагы аба (эгер бар болсо) | Inspect brake pads for wear and replace if needed; Adjust brake cable tension; Consult a professional for hydraulic brake issues. |
| Иш учурунда адаттан тыш үндөр | Бош калган тетиктер; Дөңгөлөктөрдөгү/тормоздордогу калдыктар; Мотордогу көйгөй | Check all fasteners; Inspect wheels and brakes for obstructions; Contact customer support. |
9. Техникалык шарттар
| Өзгөчөлүк | Спецификация |
|---|---|
| Бренд | iScooter |
| Модель аты | i14 |
| Мотор күчү | 800 Вт |
| Эң жогорку ылдамдык | 28 миль/саат |
| Максималдуу аралык диапазону | 34 миль |
| Батарея | 48V 10.4Ah |
| Заряддоо убактысы | 8 саат |
| Тир өлчөмү | 14 дюйм |
| Тирдин түрү | Пневматикалык |
| Суспензия түрү | Кош асма системасы (алдыңкы жана арткы) |
| Тормоз стили | Double Disc Brakes & EABS Braking Systems |
| Салмагы Limit | 264 фунт |
| Элемент Салмагы | 72 фунт |
| Продукциянын өлчөмдөрү (LxWxH) | 43"L x 17"W x 45"H |
| Frame Material | Алюминий |
| Өзгөчөлүктөр | 800W Motor, 28MPH Top Speed, 34MILES Long Range, Dual Suspension, Adjustable Height, Adjustable Seat |
| Сунушталган Колдонуулар | Жумуштан жумушка баруу |
10. Кепилдик жана колдоо
10.1 Кепилдик маалыматы
iScooter offers a 12-month or 180-day warranty on different components of your product. Please refer to the specific warranty terms provided with your purchase for detailed coverage.
10.2 Кардарларды колдоо
For any questions, concerns, or assistance with your iScooter i14, please contact our customer support team:
- Call Center: +1 (855) 916-2366
- Түз баарлашуу/Электрондук почта: support@iscooterglobal.com
Our customer support team is available to assist you.

Figure 10.1: iScooter customer support details for assistance.