1. Коопсуздук маалыматы
Please read this manual carefully before installation and operation. Keep it for future reference.
- Кесиптик орнотуу сунушталат: Due to the complexity of car audio systems, professional installation is highly recommended to avoid damage to the vehicle or the product.
- Унаа шайкештиги: This car radio is designed for Toyota Corolla models from 2009 to 2013. It is туура келбейт with cars equipped with J.B.L/B.O.S.E premium audio systems or large screens. If your car has a clock above the air vent, it may not be retained when using this product.
- Электр коопсуздугу: Ensure the vehicle's power is disconnected before installation to prevent electrical shorts or damage.
- Айдоо коопсуздугу: Аппаратты айдоодон алаксыта тургандай иштетпеңиз. Ар дайым жол коопсуздугун биринчи орунга коюу.
- Температура: Аппаратты экстремалдык температурага же түз күн нуруна узак убакытка калтыруудан сактаңыз.
2. Пакеттин мазмуну
Пакетте бардык буюмдар бар экенин текшериңиз:
- Leadfan 13.1" 2K Car Radio Unit
- Камера
- Full Set of Wiring Harness
- Frame Accessories
- GPS антеннасы
- Микрофон (МИК)
- USB кабелдери (x2)
- RCA кабели
- Manual
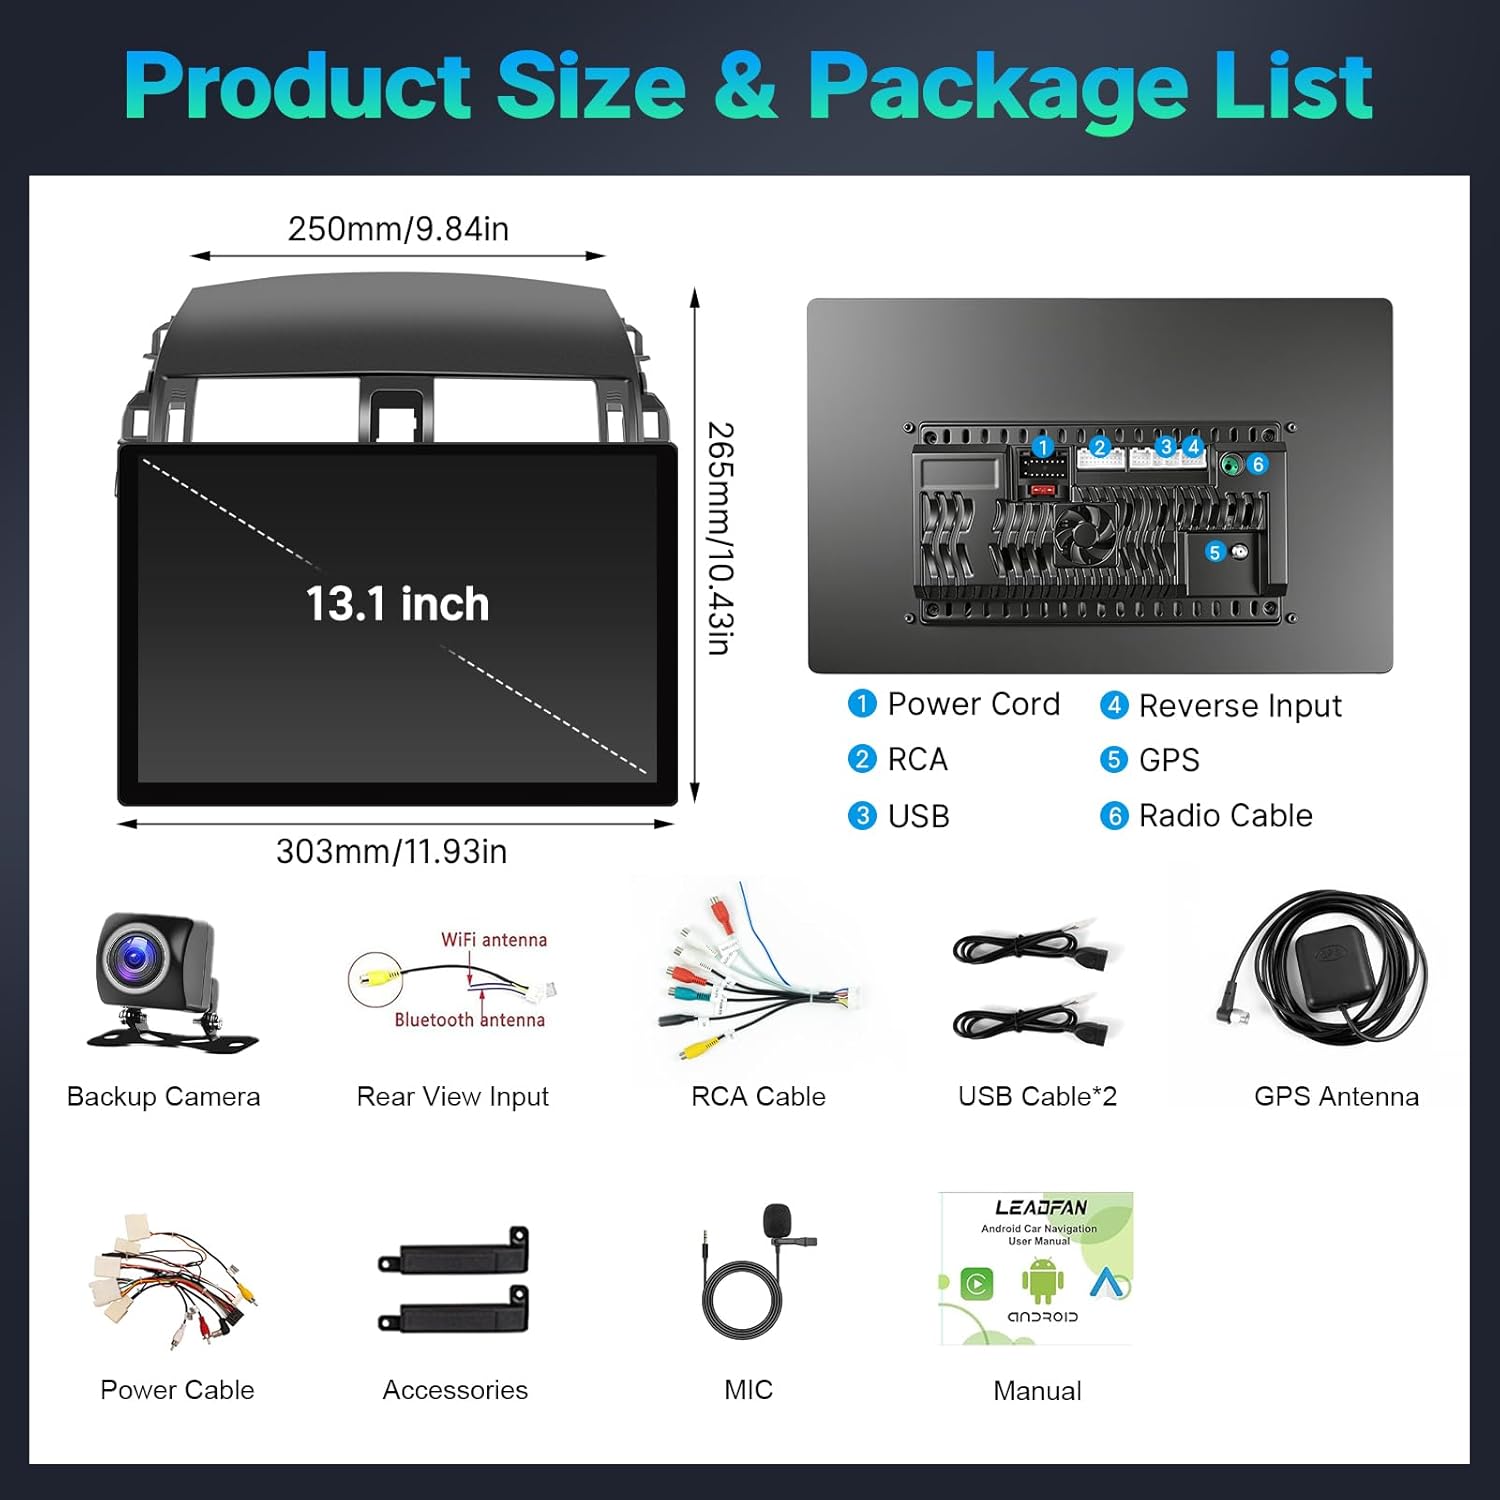
Сүрөт: деталдуу view of all components included in the product package, such as the main unit, various cables, backup camera, GPS antenna, and microphone.
3. Техникалык шарттар
| Бренд | Leadfan |
| Модель номери | SW380A-13.1-1 |
| Шайкеш унаалар | Toyota Corolla 2009-2013 |
| Screen Size | 13.1 дюйм |
| Дисплей түрү | 2K Touch Screen (Capacitive) |
| Операция системасы | Android 13 |
| Эс | 4 ГБ RAM + 64 ГБ ROM |
| Байланыш | Bluetooth 5.1, USB, Wi-Fi (5G) |
| Навигация | GPS (Offline/Online Maps) |
| Башкаруу ыкмасы | Тийүү, Үн |
| Өзгөчөлүктөр | Wireless CarPlay, Android Auto, MirrorLink, FM Radio, AHD Backup Camera, Steering Wheel Control (SWC), Split Screen, EQ/DSP |
4. Орнотуу жана орнотуу
Professional installation is highly recommended. Ensure the vehicle's power is disconnected before starting.
4.1. Орнотуу кадамдары
- Remove Decorative Panels: Carefully remove the long decorative panels from the dashboard using a pry tool.
- Remove Air Conditioning Outlet: Detach the air conditioning outlet from the dashboard.
- Remove Fixing Screws: Unscrew the screws holding the original car radio in place.
- Take Out Original Player: Gently pull out the original car radio unit.
- Disconnect Plugs: Disconnect all plugs and wiring harnesses from the back of the original player.
- Remove Decorative Frame from AC Outlet: If necessary, remove the decorative frame from the air conditioner outlet.
- Remove Clips: Carefully remove any clips from the original components that need to be transferred to the new player.
- Install Clips onto New Player: Attach the removed clips onto the new Leadfan car radio unit.
- Install AC Vent to New Player: Install the air conditioning vent into the new player's frame.
- Зымдарды туташтыруу: Connect the new wiring harness plugs to the corresponding sockets on the back of the new player. Ensure all necessary connections (power, USB, RCA, GPS antenna, microphone, backup camera) are made.
- Restore Time Display Screen: Reinstall the time display screen component.
- Install New Player: Carefully install the new player into the center console.
- Attach Decorative Frame: Attach the long decorative frame to the new player first, then install it together onto the center console.
Video: A detailed DIY installation guide for Toyota Corolla 2008-2013, demonstrating the removal of original components and installation of the new head unit.
4.2. Электр схемасы

Image: A comprehensive wiring diagram illustrating connections for the car stereo, backup camera, power cords, RCA cables, USB, GPS, and radio cables.
5. Иштөө нускамалары
5.1. Basic Operations & Screen Calibration
The device features touch-sensitive side buttons for common functions. These buttons may require calibration for optimal response.
- Side Button Learning: багыттоо Settings > Car Settings > Factory Settings. Enter the password (six zeros: 000000). Select Touch Learning. Follow the on-screen prompts to tap each function (Power, Home, Back, Volume+, Volume-) on the screen and then press the corresponding physical button on the unit.
- Экранды калибрлөө: In Touch Learning, таптаңыз
Тектеш документтер - SW380A-13.1-1

LEADFAN 7-Inch HD Car Stereo User Manual: Wireless CarPlay, Android Auto, MirrorLink
Comprehensive user manual for the LEADFAN 7-inch HD Car Stereo, detailing features like Wireless CarPlay, Android Auto, MirrorLink, Bluetooth, rearview camera integration, installation, system settings, and troubleshooting.
LEADFAN CarPlay MP5 Player колдонмосу
LEADFAN CarPlay MP5 Player үчүн комплекстүү колдонуучу колдонмосу, орнотууну, мүмкүнчүлүктөрдү жана унаадагы жакшыртылган көңүл ачуу үчүн көйгөйлөрдү чечүүнүн чоо-жайы.
LEADFAN CarPlay/Android Auto Car Stereo Колдонуучунун колдонмосу
LEADFAN CarPlay/Android Auto Car Stereo үчүн комплекстүү колдонуучу колдонмосу, орнотууну, функцияларды, көйгөйлөрдү чечүү жана негизги параметрлерди камтыйт. Смартфонуңузду кантип туташтырууну, Bluetooth, радиону, музыканы ойнотууну жана башкаларды кантип колдонууну үйрөнүңүз.
LEADFAN Car Stereo 7 дюймдук HD сенсордук экран Колдонуучунун колдонмосу
LEADFAN 7 дюймдук HD сенсордук дисплей унаа стерео үчүн комплекстүү колдонуучу нускама, орнотууну, Apple CarPlay, Android Auto, MirrorLink, Bluetooth, радио функциялары жана көйгөйлөрдү чечүү сыяктуу функцияларды камтыйт.
LEADFAN 7 дюймдук HD сенсордук экраны Wireless CarPlay жана Android Auto менен унаа стерео - Колдонуучунун колдонмосу
LEADFAN 7 дюймдук HD сенсордук экран унаа стерео үчүн комплекстүү колдонуучу колдонмосу, орнотуунун чоо-жайы, Wireless CarPlay, Android Auto, MirrorLink, Bluetooth, радио, USB ойнотуу, бузулууларды оңдоо жана системанын жөндөөлөрү.
LEADFAN Single Din Car Stereo User Manual
LEADFAN Single Din Car Stereo үчүн комплекстүү колдонуучу колдонмосу, орнотууну, иштетүүнү, Bluetooth'ду, бузулууларды аныктоону жана спецификацияларды камтыйт. FM радиосу, кош USB, SD, AUX-ин жана үнсүз чалуу өзгөчөлүктөрү.Ask a question about this manual
Ask about setup, troubleshooting, compatibility, parts, safety, or missing instructions. Manuals+ will review the question and use this page’s manual context to help answer it.