1. Киришүү
Congratulations on your purchase of the Eachine P-51D Miss Helen RC Airplane. This model is designed for both beginners and experienced pilots, offering stable flight characteristics with its XPilot stabilization system and exciting one-key aerobatic capabilities. Crafted from durable EPP foam and powered by a brushless motor, it promises a fun and engaging flying experience. This manual provides essential information for safe operation, setup, maintenance, and troubleshooting.
2. Коопсуздук маалыматы
- Жаш чектөө: Not suitable for children under 14 years of age. Adult supervision is recommended for younger users.
- Учуу чөйрөсү: Always fly in open, clear areas away from people, buildings, trees, and power lines. Avoid flying near airports or restricted airspace.
- Аба ырайы шарттары: Do not fly in strong winds, rain, or lightning. Optimal conditions are calm or light breeze.
- Учуу алдында текшерүү: Before each flight, ensure all components are securely attached, batteries are fully charged, and the remote control is functioning correctly.
- Батареянын коопсуздугу: Use only the specified batteries and charging equipment. Do not overcharge or short-circuit batteries. Store batteries in a safe place away from flammable materials.
- Пропеллердин коопсуздугу: Keep hands, face, and loose clothing away from the rotating propeller. Always disconnect the battery when not flying or performing maintenance.
- Көрүү сызыгы: Always maintain visual line of sight with your aircraft during flight.
3. Пакеттин мазмуну
Келгенде посылкаңыздын ичиндегисин текшериңиз. Стандарттык посылкага төмөнкүлөр кирет:
- 1 x RC Airplane Main Body (P-51D Miss Helen)
- 2 or 3 x Battery (7.4V-400MAH, quantity depends on selected version)
- 1 x Remote Controller (Note: BNF Version does not include a remote control)
- 1 Белек Box х
- 1 x Twin-blade Propeller
- 1 x заряддоо кабели
Note: Remote control batteries and glue are not included and must be purchased separately.

Image: Eachine P-51D Miss Helen RC Airplane with its packaging, indicating 'PRE-ASSEMBLED OUT OF BOX'.
4. Техникалык шарттар
| Өзгөчөлүк | Деталь |
|---|---|
| Модель номери | P-51D Miss Helen |
| Материал | EPP Foam, Metal, Plastic |
| Канат жайган | 500мм |
| Узундук | 317мм |
| Мотор | Brushless |
| ESC | Brushless |
| Батарея | 7.4V-400MAH Lithium battery |
| Башкаруу каналдары | 4 канал |
| Remote Distance | 200-300m in the air |
| Учуу убактысы | 10~20 мүнөт |
| Power Source | Электр |
| Оператордун чеберчилик деңгээли | Beginner |
| Ички/тышкы колдонуу | Сыртта |
| Сертификация | CE |
| Сунушталган Жаш | 14+ жыл |
| Controller Mode | MODE2 |
| Batteries Included (Aircraft) | Ооба |
| Контроллердин батареясы | камтылган эмес |
| Аэрофотосүрөт | Жок |

Сүрөт: бүттүview of product specifications and key features.
5. Орнотуу
The Eachine P-51D Miss Helen RC Airplane comes largely pre-assembled, making it beginner-friendly and quick to get airborne. Follow these steps to prepare for your first flight:
5.1. Учактын аккумуляторун кубаттоо
- Connect the provided charging cable to the aircraft battery.
- Кубаттоочу кабелдин экинчи учун ылайыктуу USB кубат булагына (мисалы, компьютердин USB портуна, USB дубал адаптерине) сайыңыз.
- Батареянын толук заряддалышына мүмкүнчүлүк бериңиз. Заряддоо абалын билүү үчүн заряддоочу түзүлүштүн индикатор жарыгын караңыз (адатта, заряддоо үчүн кызыл, толук заряддалган үчүн жашыл).
- Заряддоо учурунда батареяларды эч качан кароосуз калтырбаңыз.
5.2. Installing Remote Control Batteries (RTF Version Only)
- Пульттун артындагы батарея бөлүкчөсүн ачыңыз.
- Insert the required number of AA batteries (not included), ensuring correct polarity (+/-).
- Батарея отсегин бекем жабыңыз.
5.3. Propeller Installation (If not pre-installed)
The propeller saver design allows the propeller to detach upon impact to prevent damage. If the propeller needs to be installed or re-attached:
- Align the propeller with the motor shaft.
- Gently push the propeller onto the shaft until it clicks into place. Ensure it is secure but can still 'flick out' if needed.
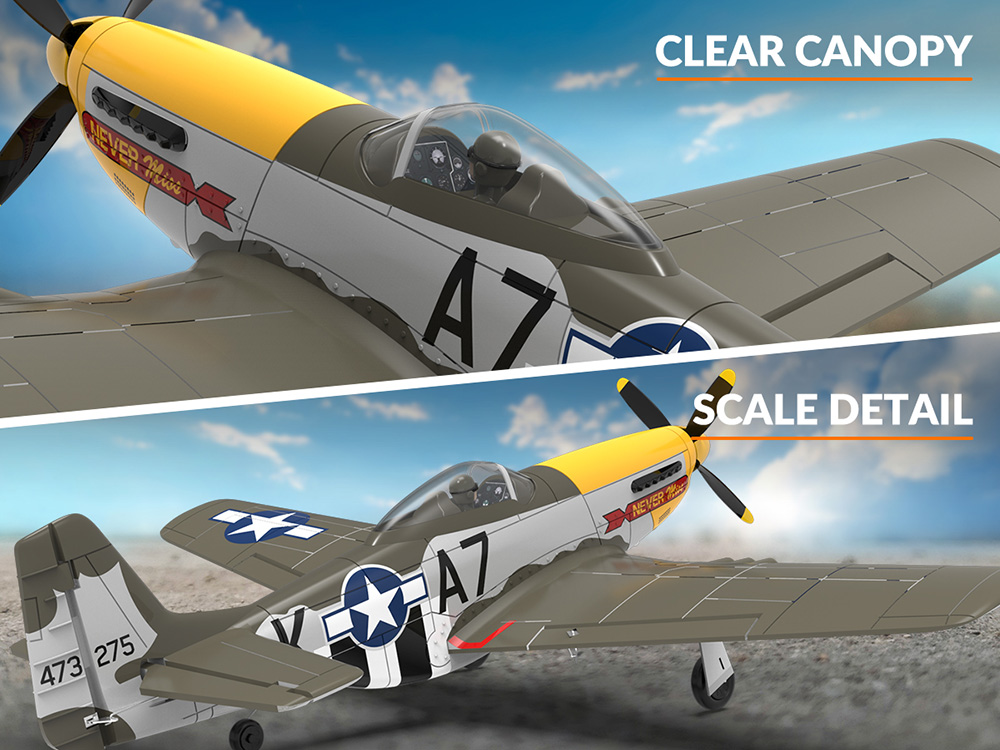
Image: Illustration of the Propeller Saver mechanism, showing how the propeller detaches upon impact.
5.4. Binding the Remote Control (RTF Version Only)
For RTF (Ready-To-Fly) versions, the aircraft and remote control are usually pre-bound. If re-binding is necessary, consult the specific instructions provided with your remote control or contact support. Generally, the process involves powering on the aircraft, then the remote, and initiating a binding sequence.
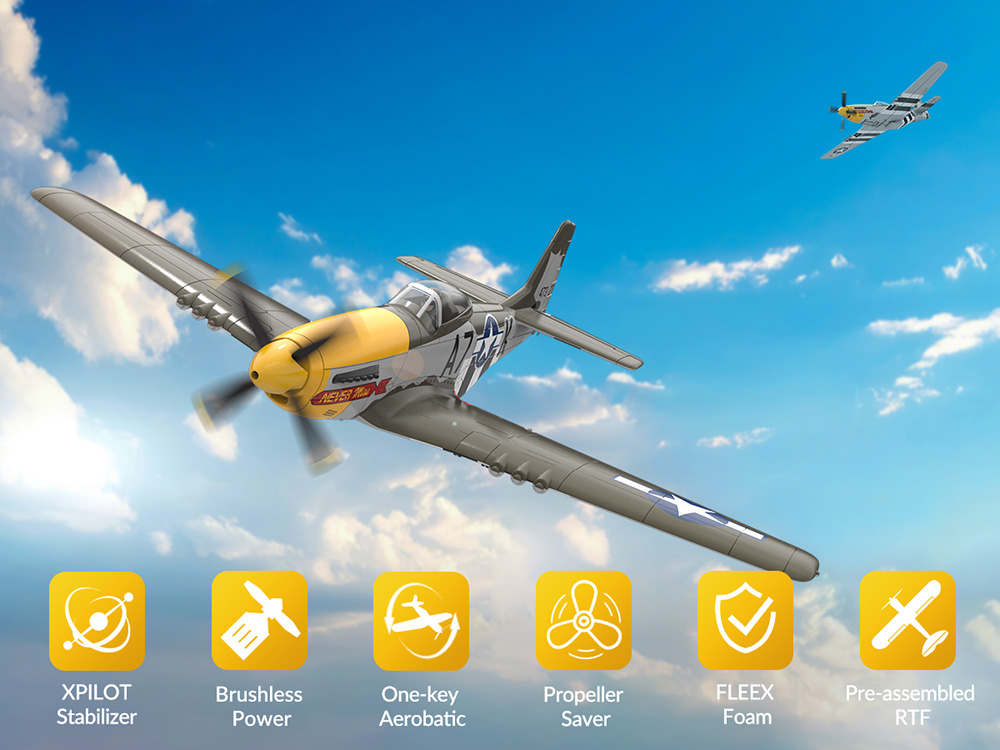
Image: The Eachine P-51D Miss Helen RC Airplane, highlighting its pre-assembled state.
6. Иштөө нускамалары
6.1. Учуу алдындагы текшерүүлөр
- Ensure aircraft battery is fully charged.
- Ensure remote control batteries are installed and have sufficient power.
- Check that all control surfaces (ailerons, elevator, rudder) move freely and correctly in response to remote control inputs.
- Confirm propeller is securely attached.
6.2. Taking Off
The P-51D Miss Helen features a 'One Key Takeoff' function for ease of use:
- Place the aircraft on a flat surface or hold it securely for a hand launch.
- Press the designated 'TAKE OFF' button on your remote control. The aircraft will automatically ascend to a certain altitude.
- Alternatively, manually increase throttle gradually and gently launch the aircraft into the wind.
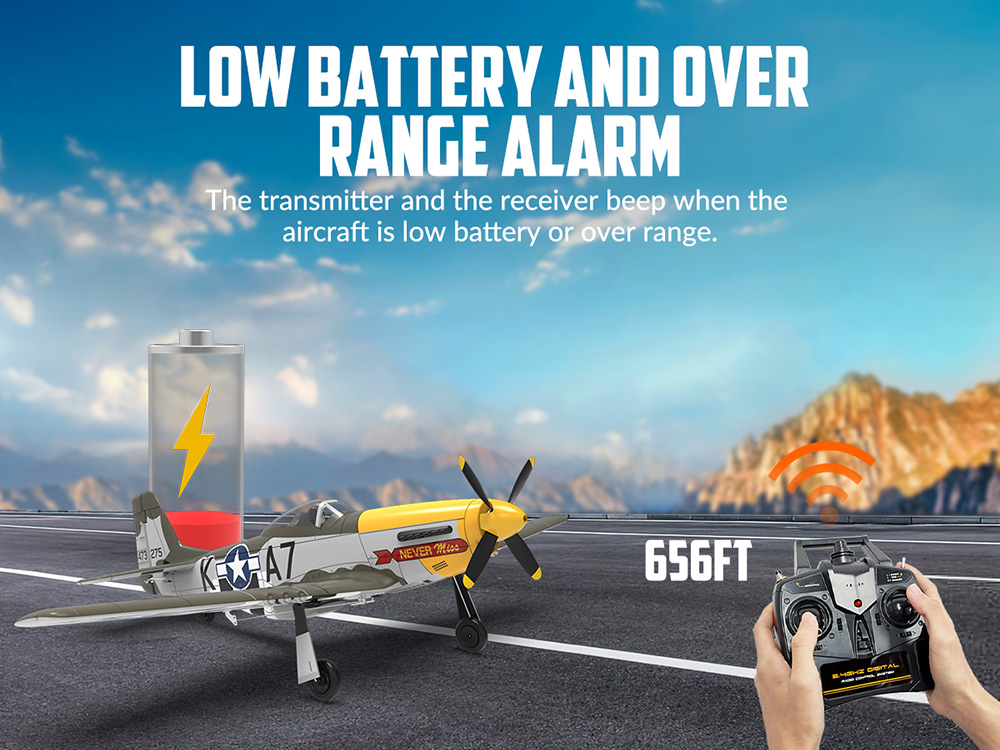
Image: Illustration of the 'One Key Takeoff' feature, showing a hand launch.
6.3. Учууну башкаруу элементтери
The 4-channel remote control allows for precise maneuvering:
- Муунткуч: Controls motor speed and altitude (usually left stick up/down).
- Руль: Controls yaw (left/right turning) (usually left stick left/right).
- Лифт: Controls pitch (nose up/down) (usually right stick up/down).
- Айлрондор: Controls roll (wing tilt) (usually right stick left/right).
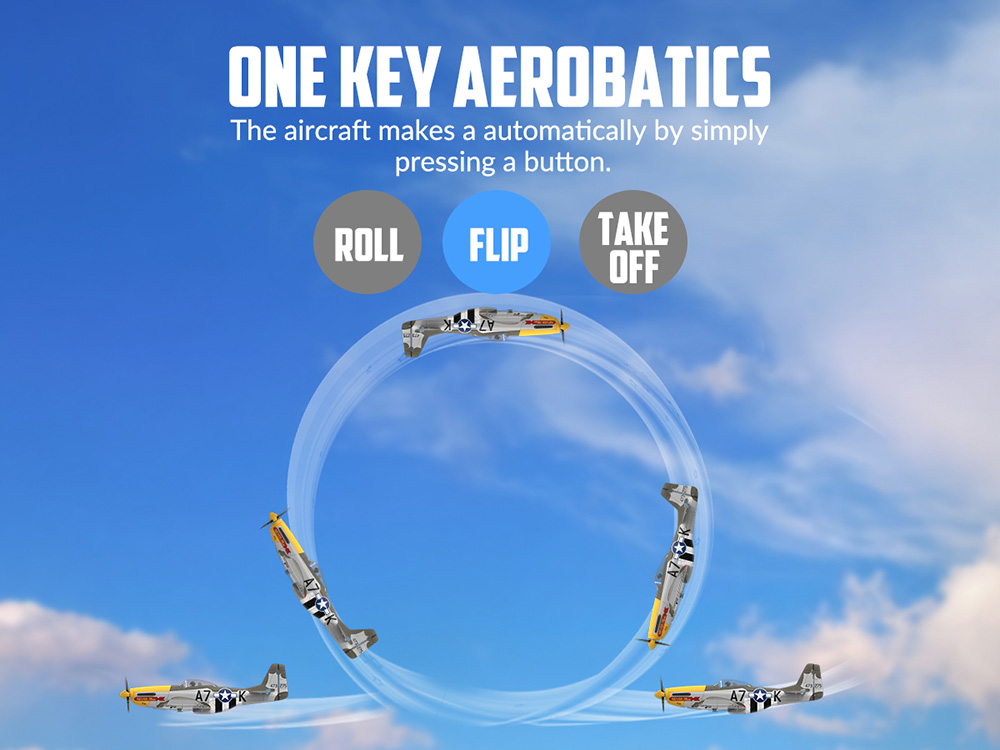
Image: Two hands holding 2.4GHz remote controls, illustrating multi-pilot capability with less interference.
6.4. XPilot Stabilization System
The integrated XPilot Gyro Stabilizer helps maintain stable flight, making it easier for beginners to learn and control the aircraft. This system automatically corrects for turbulence and helps keep the plane level.

Image: The XPilot Stabilization System (Gyro Stabilizer) ensuring stable flight for easy learning.
6.5 Бир ачкычтуу аэробатика
Perform thrilling stunts with a single button press:
- Ролл: Press the 'ROLL' button to execute an automatic roll maneuver.
- Оодаруу: Press the 'FLIP' button to perform an automatic flip.
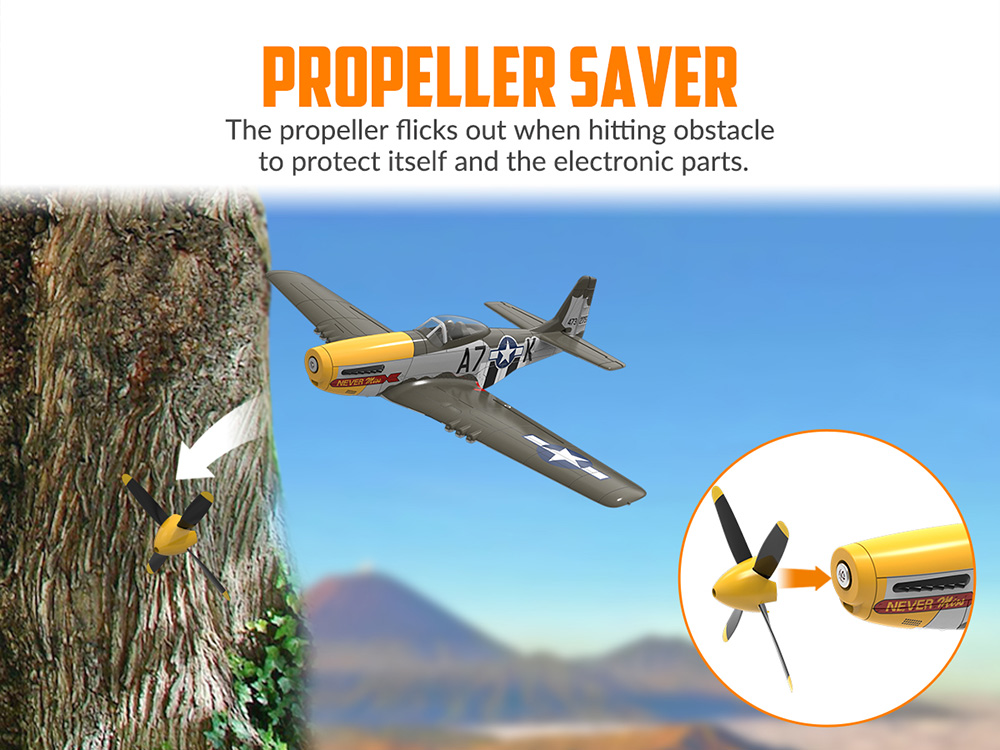
Image: The P-51D Miss Helen performing an automatic flip using the one-key aerobatics feature.
6.6. Конуу
To land the aircraft, reduce throttle gradually and guide the plane towards a clear, open landing area. Maintain a slight nose-up attitude to slow down and touch down gently on its landing gear.
7. Техникалык тейлөө
7.1. Тазалоо
Wipe the aircraft body with a soft, dry cloth after each flight to remove dirt or debris. Avoid using harsh chemicals or solvents.
7.2. Пропеллерди алмаштыруу
If the propeller becomes damaged or bent, replace it with a new one. The propeller saver design makes replacement easy: simply pull off the old propeller and push on the new one, ensuring it's securely seated.
7.3. Батареяга кам көрүү жана сактоо
- Always disconnect the battery from the aircraft when not in use.
- Батареяларды салкын, кургак жерде, түз күндүн нурунан жана экстремалдык температурадан алыс сактаңыз.
- Узак мөөнөттүү сактоо үчүн, батарейкаларды болжол менен 50% сыйымдуулугуна чейин заряддаңыз.
- Inspect batteries regularly for any signs of damage or swelling. Discontinue use immediately if damage is observed.
7.4. Жалпы текшерүү
Periodically check all control linkages, hinges, and structural components for wear or damage. Ensure all screws are tight and no parts are loose.
8. Кыйынчылыктарды
| Көйгөй | Мүмкүн себеп | Чечим |
|---|---|---|
| Aircraft does not respond to remote control. | Low battery in aircraft or remote control; not bound; interference. | Charge/replace batteries; re-bind aircraft and remote; move to an area with less interference. |
| Кыска учуу убактысы. | Battery not fully charged; old/damaged battery. | Ensure battery is fully charged; replace with a new battery if necessary. |
| Aircraft flies erratically or is difficult to control. | Damaged propeller; control surface damage; strong winds; XPilot system malfunction. | Check/replace propeller; inspect control surfaces; avoid flying in strong winds; recalibrate XPilot system if possible (refer to specific remote instructions). |
| Алыстан башкаруу пульту тынымсыз сигнал берип жатат. | Low battery alarm (aircraft or remote); over range alarm. | Check aircraft and remote control battery levels; bring aircraft closer to the remote control. |
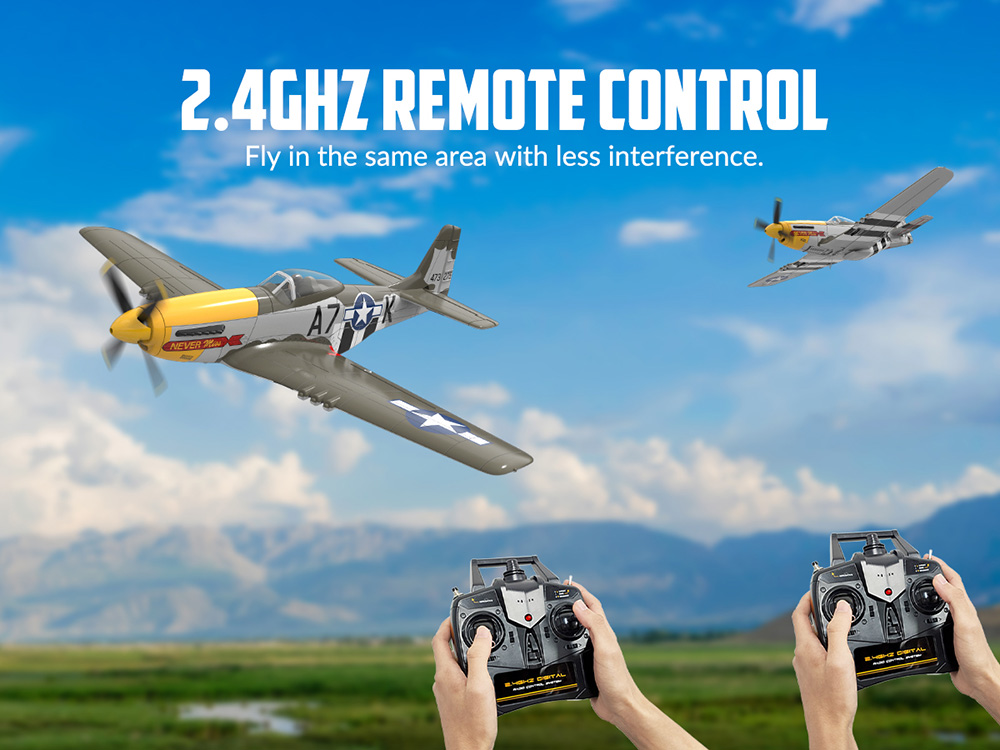
Image: Illustration of the low battery and over range alarm system, indicating when the transmitter and receiver beep.
9. Колдонуучунун кеңештери
- Тынч шарттарда машыгуу: For beginners, start flying in very calm weather to get accustomed to the controls.
- Жумшак башкаруу элементтери: RC airplanes respond best to smooth, gentle control inputs. Avoid sudden or jerky movements.
- Батарея башкаруу: Always carry spare charged batteries for extended flying sessions. Allow batteries to cool down before recharging.
- Visual Orientation: Keep track of the aircraft's orientation in the air, especially when it's flying towards you, as controls can feel reversed.
- Learn from Others: Watching experienced RC pilots or online tutorials can provide valuable insights and tips.
10. Кепилдик жана колдоо
Eachine products are manufactured to high-quality standards. For any issues, please refer to the troubleshooting section first. If problems persist, contact the retailer or manufacturer's customer support for assistance. Keep your proof of purchase for warranty claims.


