1. Киришүү
This manual provides detailed instructions for the installation, operation, and maintenance of your Scosche E400 400-Watt Single Amplifier Kit. Please read this manual thoroughly before attempting installation or use to ensure proper functionality and safety.
2. Коопсуздук маалыматы
Жабдууларыңызга зыян келтирбөө же жаракат албоо үчүн ар дайым төмөнкү коопсуздук чараларын сактаңыз:
- Орнотууну баштоодон мурун, унаанын терс батарея терминалын ажыратыңыз.
- Кыска туташуунун алдын алуу үчүн бардык туташуулардын коопсуз жана туура изоляцияланганын текшериңиз.
- Route cables away from moving parts, sharp edges, and excessive heat sources.
- Туура жер amplifier to a clean, unpainted metal surface on the vehicle chassis.
- Орнотуу кадамдарына ишенбесеңиз, квалификациялуу адиске кайрылыңыз.
3. Пакеттин мазмуну
Verify that all components listed below are present in your Scosche E400 kit:
- 17 ft 6.5mm HEX clear Blue power cable
- 6 ft 6.5mm HEX clear Silver ground cable
- 17ft Twisted Pair HEX audio cables (RCA cables)
- Speaker Wire
- Single AGU Fuse holder
- All necessary installation hardware (e.g., ring terminals, spade terminals, cable ties)
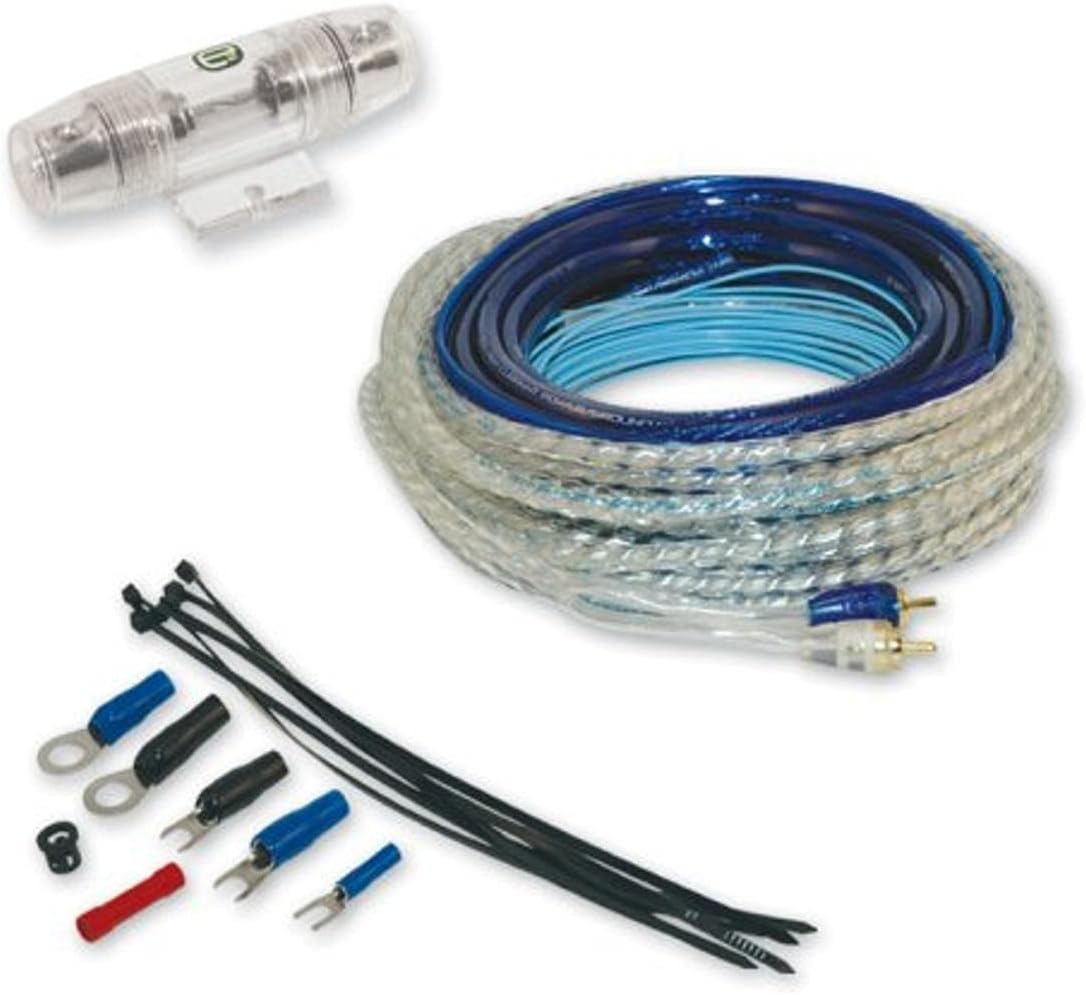
This image displays the complete contents of the Scosche E400 amplifier kit, featuring the clear blue power cable, clear silver ground cable, twisted pair RCA audio cables, an AGU fuse holder, speaker wire, and a selection of connectors and cable management accessories.
4. Орнотуу жана орнотуу
Follow these steps carefully for a successful installation:
- Батареяны ажыратыңыз: Ишке кирүүдөн мурун унааңыздын аккумуляторунун терс терминалын электр зымдарынын трикотажын алдын алуу үчүн ажыратыңыз.
- Маршруттук электр кабели: Route the 17 ft blue power cable from the battery location through the firewall into the vehicle's interior to the planned amplifier mounting location. Ensure the cable is protected from sharp edges and heat sources.
- Сактагыч кармагычты орнотуу: Install the AGU fuse holder within 18 inches (45 cm) of the battery's positive terminal. Connect one end of the power cable to one side of the fuse holder and a short length of power cable from the other side of the fuse holder to the battery's positive terminal. Do not insert the fuse into the holder yet.
- Route Ground Cable: Connect the 6 ft silver ground cable from the amplifier mounting location to a clean, unpainted metal surface on the vehicle chassis. Ensure a secure, low-resistance connection.
- Route RCA Cables: Route the 17 ft twisted pair HEX audio cables (RCA cables) from your head unit (source unit) to the amplifier. To minimize noise, route these cables on the opposite side of the vehicle from the power cable.
- Динамиктин зымын туташтыруу: Динамиктин зымын туташтырыңыз amplifier's output terminals to your subwoofer or speakers. Pay close attention to correct polarity (+ to + and - to -).
- Connect Remote Turn-On Wire: Эгерде сиздин amplifier requires a remote turn-on signal, connect a remote turn-on wire (typically a thin blue wire, not explicitly listed in this kit but standard for amplifier installations) from your head unit's remote output to the ampкөтөргүчтүн алыстан киргизүүсү.
- Финал Ampкөтөргүчтөрдүн туташуулары: Securely connect the power, ground, RCA, and remote turn-on wires to their respective terminals on the ampөмүрлүү.
- Insert Fuse and Reconnect Battery: Once all connections are verified, insert the fuse into the AGU fuse holder. Reconnect the negative terminal of the vehicle's battery.
- Сыноо системасы: Power on your vehicle's head unit and amplifier to test the audio system's functionality. Adjust ampзарыл болсо, көтөргүч орнотуулары.
5. Иштөө нускамалары
орнотулгандан кийин, amplifier kit facilitates the connection of your amplifier to your vehicle's audio system. The operation of the amplifier itself will depend on the specific amplifier model you are using. Generally, you will control the audio output through your vehicle's head unit. Adjustments such as gain, crossover frequencies, and bass boost are typically made directly on the amplifier unit or through the head unit's settings, if applicable.
6. Техникалык тейлөө
Үзгүлтүксүз тейлөө сиздин узак мөөнөттүү жана натыйжалуулугун камсыз кылууга жардам берет amplifier kit:
- Periodically inspect all cable connections for tightness and corrosion.
- Ensure cables are securely fastened and not rubbing against sharp edges or exposed to excessive heat.
- Check the fuse in the AGU fuse holder for any signs of damage or blowing. Replace with a fuse of the same rating if necessary.
- сактаңыз amplifier and surrounding area clean and free of debris.
7. Кыйынчылыктарды
Көйгөйгө туш болсоңуз, көйгөйлөрдү чечүүнүн төмөнкү жалпы кадамдарын карап көрүңүз:
- Эч кандай күч жок Ampөмүр берүүчү:
- Check the fuse in the AGU fuse holder.
- Verify the power cable connection at the battery and ampөмүрлүү.
- Ensure the ground cable has a solid connection to the chassis.
- Confirm the remote turn-on wire is connected and receiving a signal from the head unit.
- Үн чыгышы жок:
- Башкы блоктогу жана ampөмүрлүү.
- Динамик зымдарынын туташуусун жана полярдуулугун текшериңиз.
- камсыз кылуу amplifier's gain and crossover settings are correctly configured.
- Confirm the head unit is providing an audio signal.
- Бурмалоо же ызы-чуу:
- Ensure power and RCA cables are routed separately to avoid interference.
- Check for a proper ground connection; a poor ground can cause noise.
- Тууралоо ampкесилип кетүүнүн алдын алуу үчүн көтөргүчтүн күчөтүү жөндөөлөрү.
8. Техникалык шарттар
| Өзгөчөлүк | Спецификация |
|---|---|
| Бренд | Scosche |
| Модель номери | E400 |
| Элементтин өлчөмдөрү (L x W x Y) | 16 x 11.3 x 5.2 дюйм |
| Элемент Салмагы | 2.58 фунт |
| Монтаж түрү | Ground Cable (refers to ground cable component) |
| Каналдардын саны | 1 (for amplifier kit suitability) |
| Чыгуу күчү | 400 Watts (kit rating) |
| Материал | Silver (refers to ground cable material) |
| Өндүрүүчү | SCOSCHE |
9. Кепилдик жана колдоо
The Scosche E400 400-Watt Single Amplifier Kit comes with a warranty of NINETY DAYS сатып алынган күндөн тартып.
For technical support, warranty claims, or further assistance, please contact Scosche customer service. Refer to the official Scosche website for the most current contact information and support resources. Keeping your proof of purchase is recommended for warranty purposes.


