1. Киришүү
The ASUS M4A79XTD EVO is an ATX motherboard designed for AMD Socket AM3 processors, featuring the AMD 790X/SB750 chipset. This manual provides essential information for the proper installation, operation, and maintenance of your motherboard, ensuring optimal performance and longevity.
2. Негизги өзгөчөлүктөрү
- ASUS 8+2 Phase Power Design for AM3: Optimized for performance and power efficiency, ensuring stable overclocking capabilities.
- ASUS TurboV & Turbo Key: Utilities for real-time system tuning and overclocking directly from the operating system environment, alongside a one-button performance enhancement feature.
- ASUS Anti-surge Protection: Provides defense against over-voltage damage to motherboard components.
- ASUS Q-Slots: Designed for quick and easy installation and removal of expansion cards.
- Extreme Silent Thermal Solution: Engineered for effective and quiet heat dissipation across critical components.
3. Орнотуу жана орнотуу
Before beginning installation, ensure you have a clean, static-free workspace. It is recommended to wear an anti-static wrist strap to prevent damage to components. Gather necessary tools, including a Phillips head screwdriver.
3.1 Motherboard Layout
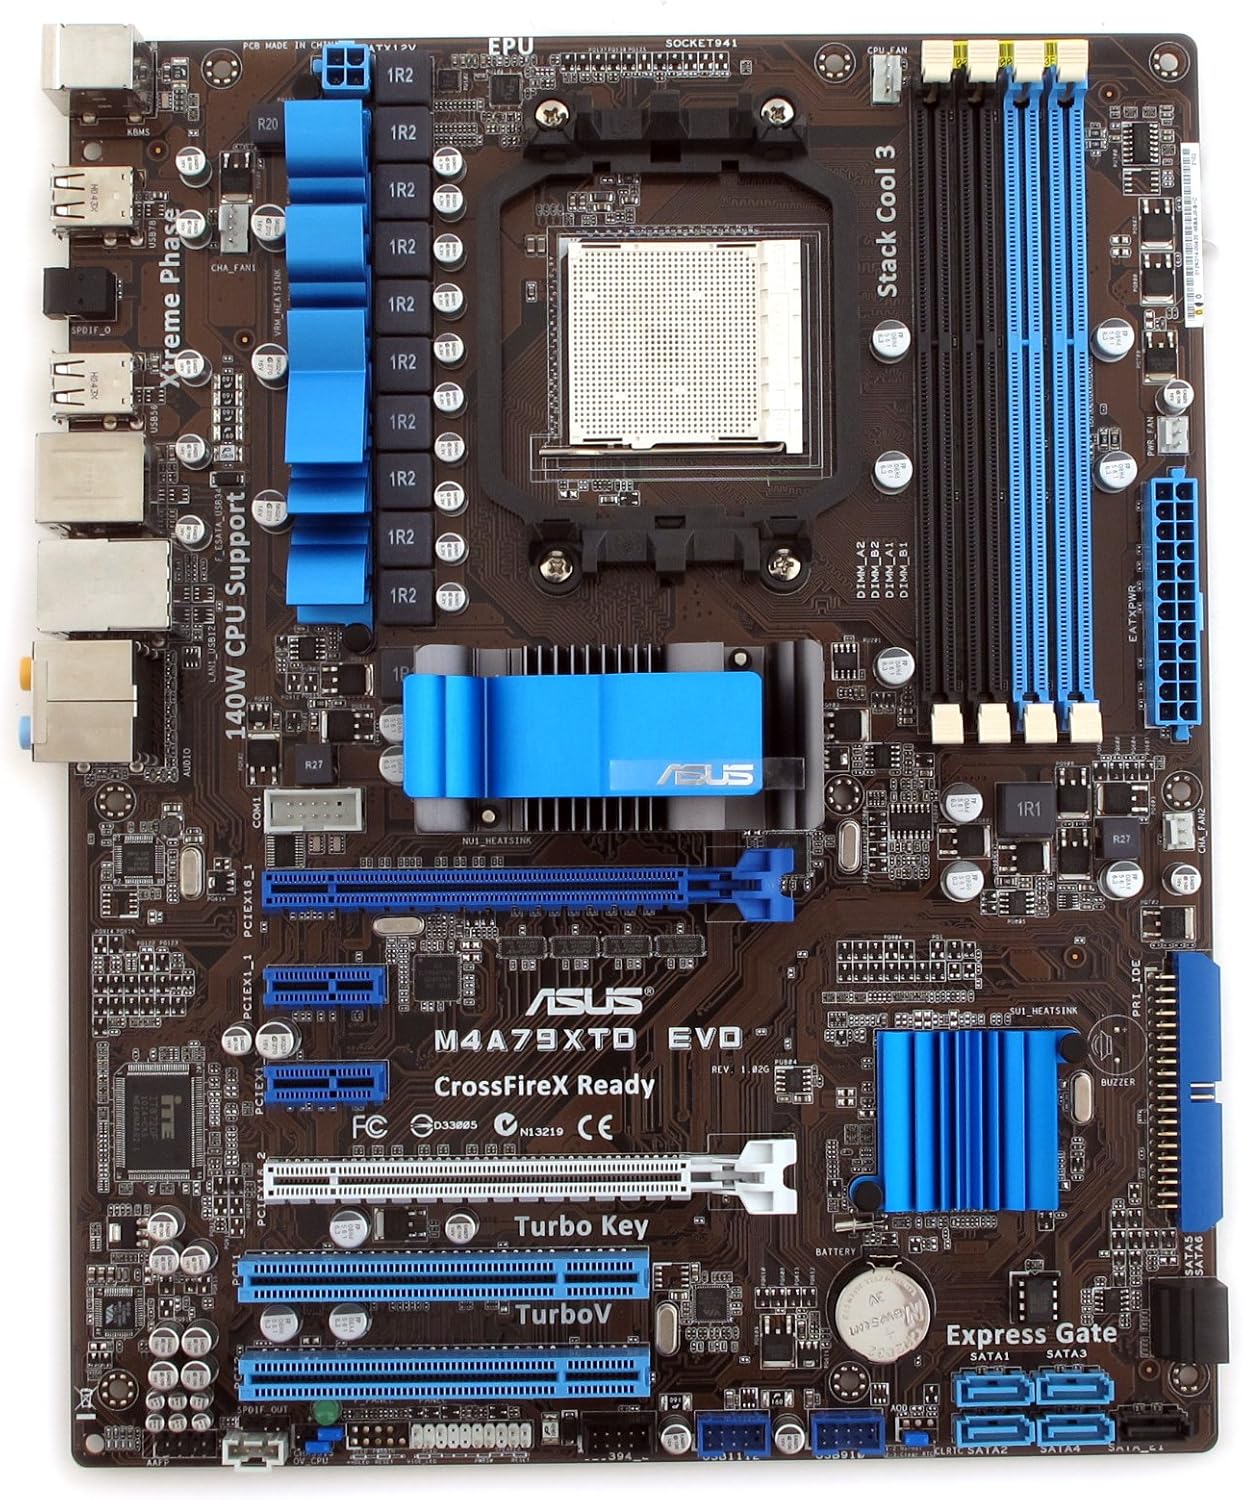
1-сүрөт: жогорудан ылдыйга view of the ASUS M4A79XTD EVO motherboard, illustrating the placement of the CPU socket, DDR3 DIMM slots, PCIe and PCI expansion slots, SATA ports, and various onboard headers.

2-сүрөт: Бурчтуу view of the ASUS M4A79XTD EVO motherboard, focusing on the rear I/O panel which includes PS/2 ports, USB ports, LAN, and audio jacks.
3.2 Орнотуу кадамдары
- CPU орнотуу: Carefully align your AMD Socket AM3 processor with the socket on the motherboard. Ensure the triangular marks on the CPU and socket match. Gently lower the CPU into the socket and secure it with the retention lever.
- CPU муздаткычын орнотуу: Apply thermal paste (if not pre-applied) and install the CPU cooler according to its manufacturer's instructions.
- Эстутум (RAM) орнотуу: Insert DDR3 memory modules into the DIMM slots. Ensure the notches on the modules align with the keys in the slots. Press down firmly on both ends until the retention clips snap into place. Refer to the motherboard layout for recommended dual-channel configurations.
- Motherboard орнотуу: Install the I/O shield into your computer case. Carefully place the motherboard into the case, aligning the screw holes with the standoffs. Secure the motherboard with screws.
- Кубат туташуулары: Connect the 24-pin ATX main power connector and the 8-pin (or 4-pin) ATX 12V power connector from your power supply to the motherboard.
- Сактагыч түзмөктүн туташуулары: Connect SATA data cables from your storage drives (HDDs, SSDs) to the SATA ports on the motherboard. Connect power cables from the power supply to your drives.
- Кеңейтүү картасын орнотуу: Install graphics cards and other PCI/PCIe expansion cards into the appropriate slots. Secure them with the case's retention mechanisms.
- Алдыңкы панелдин байланыштары: Connect the front panel headers (power button, reset button, USB ports, audio jacks, LED indicators) to the corresponding pins on the motherboard. Refer to the motherboard manual for specific pin assignments.
- Перифериялык байланыштар: Connect your keyboard, mouse, monitor, and other peripherals to the rear I/O ports.
4. Иштөө нускамалары
- Initial Boot and BIOS Setup: Upon first power-on, access the BIOS setup utility (typically by pressing the DEL or F2 key during startup) to configure basic settings, boot order, and system time.
- Драйверди орнотуу: After installing your operating system, install all necessary drivers from the ASUS support website or the included driver CD to ensure full functionality of all motherboard components.
- ASUS TurboV: This utility allows for real-time system tuning and overclocking directly from the operating system environment, providing granular control over performance parameters.
- ASUS Turbo Key: A hardware button or software function that provides an instant performance boost with a single press, optimizing system settings for enhanced speed.
5. Техникалык тейлөө
- Чаңды тазалоо: Regularly clean dust from the motherboard, CPU cooler, and case fans using compressed air to prevent overheating and maintain optimal performance.
- BIOS жаңыртуулары: Расмий ASUS колдоосун мезгил-мезгили менен текшерип туруңуз website for BIOS updates. Updating the BIOS can improve system stability, compatibility with new hardware, and overall performance. Always follow the update instructions carefully.
- Кабелдик башкаруу: Ensure internal cables are neatly routed to improve airflow within the case and prevent interference with components.
6. Кыйынчылыктарды
- Кубат жок: Verify all power connections (24-pin ATX, 8-pin ATX 12V) are securely seated. Check the power supply unit for proper operation.
- No Display (POST issues): Ensure the graphics card is properly seated in its PCIe slot and connected to power (if required). Check monitor connections and try reseating RAM modules.
- Системанын туруксуздугу/бузуулар: This can be caused by various factors including incompatible drivers, faulty memory, or overheating. Ensure all drivers are up to date. Check CPU and GPU temperatures using monitoring software.
- ASUS Anti-surge Protection Activation: If your system experiences unexpected shutdowns or power issues, the Anti-surge Protection may have activated to prevent damage. Check your power supply and electrical connections for stability.
- Consult ASUS Support: For persistent issues, refer to the comprehensive troubleshooting guide on the ASUS support website or contact ASUS technical support for further assistance.
7. Техникалык шарттар
| Өзгөчөлүк | Деталь |
|---|---|
| Продукциянын өлчөмдөрү | 2.36 x 13.8 x 14.4 дюйм |
| Элемент Салмагы | 2.8 фунт |
| Элемент моделинин номери | M4A79XTD EVO |
| Өндүрүүчү | ASUS Computer International Direct |
| Бренд | ASUS |
| CPU розетка | Розетка AM3 |
| Шайкеш түзмөктөр | Персоналдык компьютер |
| RAM эс технологиясы | DDR3 |
| Шайкеш процессорлор | AMD A Series |
| Чипсет түрү | AMD 790X |
| Платформа | Windows 10 |
| Эстутум сактоо сыйымдуулугу | 16 ГБ |
| Негизги электр туташтыргычынын түрү | 24-Pin |
| Дата биринчи жеткиликтүү | 18-август, 2009-жыл |
8. Кепилдик жана колдоо
Юридикалык баш тартуу: This product is sold AS IS.
For detailed warranty information, technical support, and access to the latest drivers and utilities, please visit the official ASUS support website. Support resources typically include driver downloads, frequently asked questions (FAQs), and contact information for technical assistance.
Көбүрөөк маалымат жана колдоо таба аласыз Amazonдагы ASUS дүкөнү.


