1. Киришүү
This manual provides detailed instructions for the installation, operation, and maintenance of your AZZA Solano 1000R CSAZ-1000R Full Tower Computer Case. Please read this manual thoroughly before beginning installation to ensure proper setup and to maximize the performance and longevity of your system components.
2. Продукциянын өзгөчөлүктөрү
- Оптималдуу жылуулук башкаруу: Features multiple fans for superior cooling, including a 230mm top fan, a 230mm side fan, two 140mm front fans, and a 120mm rear fan.
- Bottom-Mounted Power Supply: Designed for improved thermal separation and stability, allowing installation facing up or down.
- Өркүндөтүлгөн кабелдик башкаруу: Pre-drilled motherboard tray and ample space behind for organized cable routing, enhancing airflow and aesthetics.
- Tool-Less Design: Thumb screws for easy installation of optical drives and hard disk drives.
- Ыңгайлуу алдыңкы киргизүү/чыгаруу: USB and audio ports, along with an eSATA port, located on the top panel for easy access.
- Кең ички: Full tower design accommodates large components, including extended graphics cards and tall CPU coolers.
- Эстетикалык дизайн: Black exterior with a vibrant red painted interior and red LED fans.
3. Пакеттин мазмуну
Пакетиңизде бардык буюмдар бар экенин текшериңиз:
- AZZA Solano 1000R CSAZ-1000R Full Tower Case
- Кошумча кутуча (бурамаларды, тирөөчтөрдү, кабель байлагычтарды ж.б. камтыйт)
- Колдонуучунун Колдонмосу (бул документ)
4. Component Overview
4.1 Тышкы Views
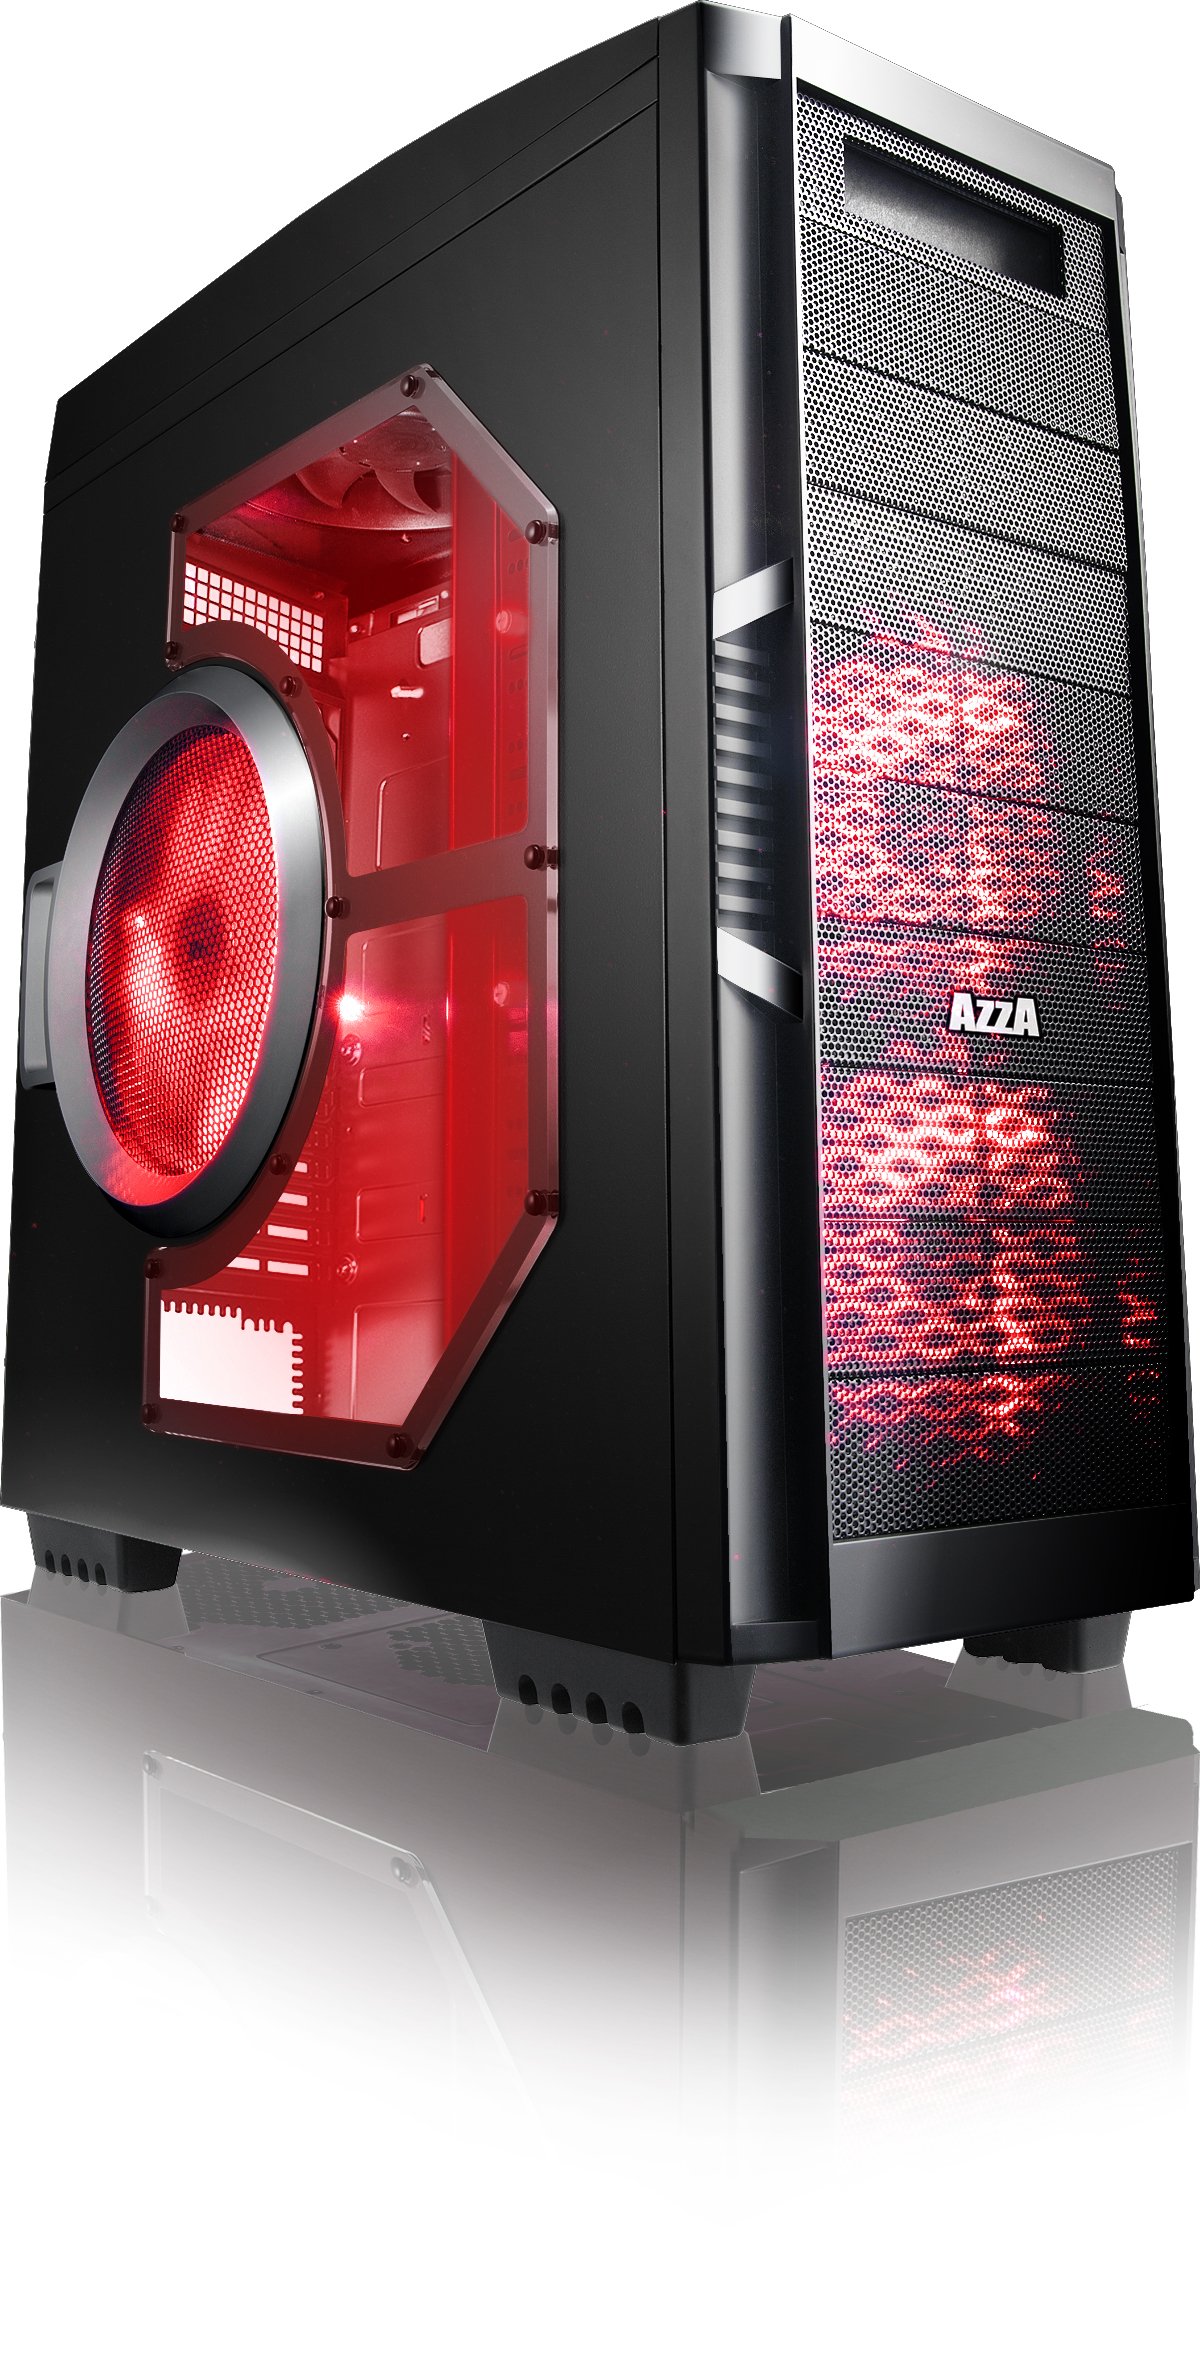
4.1-сүрөт: алдыңкы жагы view of the AZZA Solano 1000R case, showcasing the red LED fans on the front and side panel.

Сүрөт 4.2: Алдыңкы view of the AZZA Solano 1000R case, highlighting the two 140mm red LED intake fans behind the mesh panel.

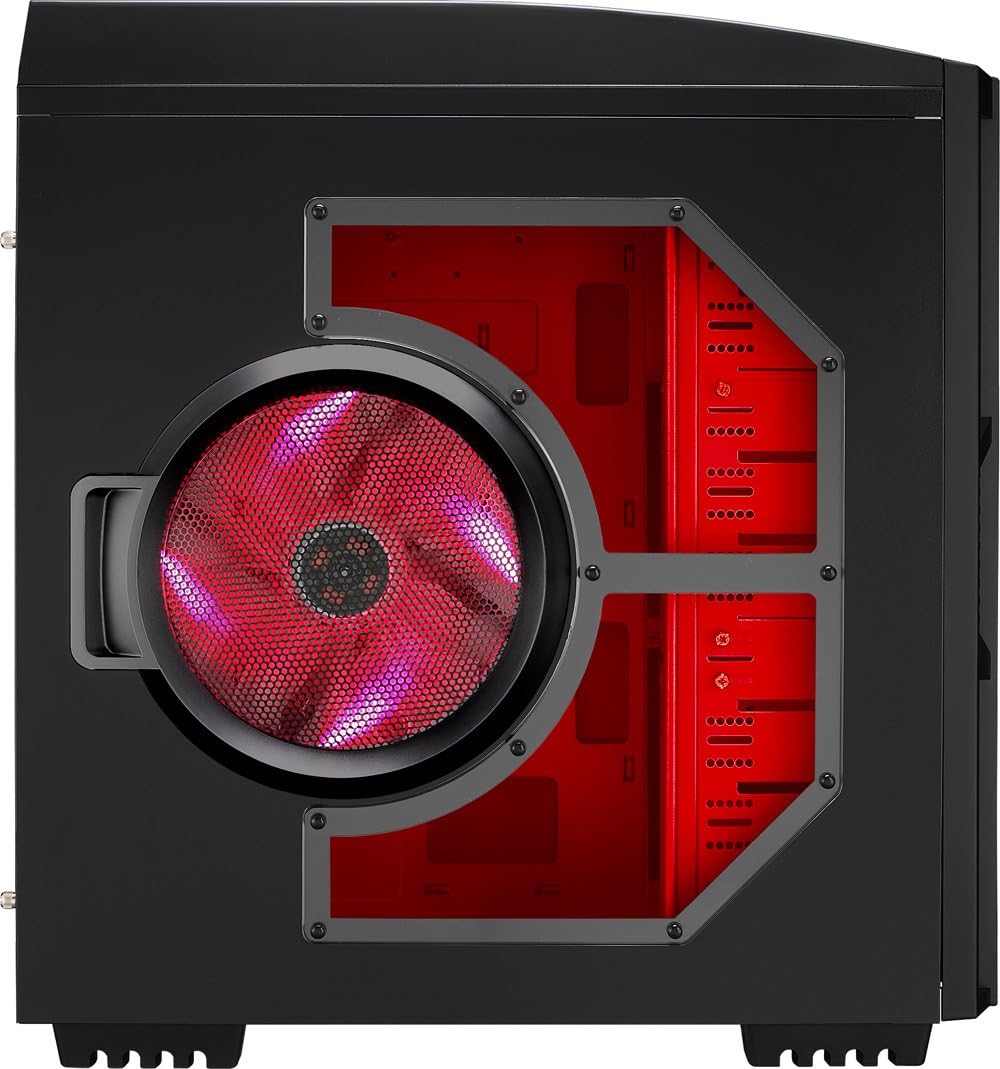
4.3-сүрөт: Каптал view of the AZZA Solano 1000R case, showing the large 230mm red LED side panel fan and the transparent window.

Figure 4.4: Top-front angled view of the AZZA Solano 1000R case, showing the top ventilation grille, front I/O panel with USB and audio ports, and power button.
4.5-сүрөт: Арткы бети view of the AZZA Solano 1000R case, displaying the red interior, rear exhaust fan, and expansion slots.
4.2 Ички Views

4.6-сүрөт: Интерьер view of the AZZA Solano 1000R case with the left side panel removed, revealing the red painted motherboard tray, drive bays, and cable routing cutouts.

4.7-сүрөт: Бурчтуу ички жасалга view of the AZZA Solano 1000R case, focusing on the multiple 5.25" and 3.5" drive bays.

4.8-сүрөт: Бурчтуу ички жасалга view of the AZZA Solano 1000R case, showing the rear 120mm exhaust fan, expansion slots, and the extensive drive bay structure.

4.9-сүрөт: Интерьер view of the AZZA Solano 1000R case with the right side panel removed, showing the space behind the motherboard tray for cable management.
5. Орнотуу боюнча колдонмо
Орнотууну баштаардан мурун, иш мейкиндигиңиз таза жана статикалык токтун жок экенин текшериңиз. Антистатикалык билек боону тагынуу сунушталат.
5.1 Ишти даярдоо
- Корпусту тегиз, туруктуу бетке коюңуз.
- Remove the side panels by unscrewing the thumb screws at the rear of the case and sliding the panels backward.
5.2 Motherboard орнотуу
- Энелик платаңыз менен кошо берилген киргизүү/чыгаруу калканын корпустун арткы жагындагы тешикке орнотуңуз.
- Align the motherboard with the pre-installed standoffs. If necessary, install additional standoffs according to your motherboard's form factor.
- Carefully place the motherboard onto the standoffs, ensuring the I/O ports align with the shield.
- Аксессуар кутучасынан тиешелүү бурамалар менен энелик тактаны бекитиңиз.
5.3 Электр менен камсыздоону орнотуу
- Position the power supply unit (PSU) in the bottom-rear compartment of the case. You can orient it with the fan facing up or down, depending on your cooling preference and PSU design.
- Кубат булагы менен кошо берилген бурамалар менен кубат булагын корпуска бекитиңиз.
5.4 Сактоочу дискти орнотуу (HDD/SSD)
- For 3.5" HDDs, slide the drive into an available drive bay until it clicks into place. Use the provided thumb screws for additional security if desired.
- For 2.5" SSDs, an adapter bracket (not included) may be required to fit into the 3.5" bays. Secure the SSD to the adapter, then install the adapter into a 3.5" bay.
- Connect the SATA data and power cables to your installed drives.
5.5 Optical Drive Installation
- Remove the desired 5.25" front bay cover from the case.
- Slide the optical drive into the bay from the front until it aligns with the screw holes.
- Secure the optical drive using the provided thumb screws.
- Connect the SATA data and power cables to the optical drive.
5.6 Кеңейтүү картасын орнотуу
- Корпустун арткы жагындагы керектүү кеңейтүү уячасынын капкактарын алып салыңыз.
- Insert your graphics card or other expansion card into the appropriate PCIe/PCI slot on your motherboard.
- Secure the card with the provided screw or tool-less latch mechanism.
5.7 Кабелди башкаруу
Utilize the cutouts and space behind the motherboard tray to route and organize your cables. This improves airflow and gives your build a cleaner appearance. Use cable ties from the accessory box to bundle cables.
5.8 Алдыңкы панелдин киргизүү/чыгаруу тутумун туташтыруу
Connect the front panel cables (USB, Audio, Power Switch, Reset Switch, Power LED, HDD LED) to the corresponding headers on your motherboard. Refer to your motherboard manual for exact header locations.
6. Операция
6.1 Күйгүзүү/өчүрүү
Press the power button located on the top panel to turn your system on or off. A power LED will illuminate when the system is active.
6.2 Fan Control
The case features a fan speed control switch (L/M/H) at the rear, primarily for the top, side, and rear fans. Adjust this switch to balance cooling performance and noise levels according to your preference.
7. Техникалык тейлөө
7.1 Тазалоо
Үзгүлтүксүз тазалоо оптималдуу аба агымын жана компоненттердин узак мөөнөттүү иштешин камсыз кылат.
- Сырткы: Сырткы беттерин жумшак менен сүртүңүз, гamp кездеме. Абразивдүү тазалагычтардан алыс болуңуз.
- Чаң чыпкалары: The case includes mesh filters at the bottom. Periodically remove and clean these filters to prevent dust buildup.
- Ички иштер: Use compressed air to remove dust from inside the case, especially from fans and heatsinks. Ensure the system is powered off and unplugged before cleaning the interior.
8. Кыйынчылыктарды
- Система күйбөй жатат: Ensure all power cables (24-pin ATX, 8-pin CPU, GPU power) are securely connected. Verify the PSU switch is in the 'ON' position. Check front panel power switch connection to the motherboard.
- Айланбаган күйөрмандар: Check fan power connections to the motherboard or fan controller. Ensure the fan speed switch is not set to 'Off' or 'Low' if fans are not spinning at all.
- Side Panel Not Closing: If a large CPU cooler or tall components prevent the side panel from closing, especially due to the side fan, consider relocating the side fan to the exterior of the panel if possible, or ensure your cooler fits within the case's clearance specifications.
- Cable Management Difficulty: If the rear panel bulges due to thick cables, try rerouting cables more efficiently or using flatter cables where possible.
9. Техникалык шарттар
| Өзгөчөлүк | Деталь |
|---|---|
| Модель номери | CSAZ-1000R |
| Иштин түрү | Толук мунара |
| Түс | Кара/Кызыл |
| Продукциянын өлчөмдөрү (L x W x Y) | 19.7 x 8.1 x 21.5 дюйм (500 x 206 x 546 мм) |
| Элемент Салмагы | 24 фунт (10.89 кг) |
| Муздатуу ыкмасы | Аба |
| Кубат менен камсыздоону орнотуу түрү | Төмөнкү тоо |
| Жалпы USB порттору | 2 (USB 2.0) + 1 (eSATA) |
| Hard Disk Form Factor Support | 3.5 дюйм |
| Камтылган күйөрмандар | 2x 230mm (Top, Side), 2x 140mm (Front), 1x 120mm (Rear) |
10. Кепилдик жана колдоо
For warranty information and technical support, please refer to the official AZZA webсайтына кириңиз же жергиликтүү сатуучуңузга кайрылыңыз. Кепилдик талаптары үчүн сатып алганыңызды тастыктаган документти сактап коюңуз.


