1. Киришүү
This manual provides detailed instructions for the installation, setup, operation, and maintenance of the Intermatic FM1D20A-24 Electronic 24-Hour/7-Day Timer Module. Please read this manual thoroughly before attempting to install or operate the device to ensure proper function and safety.
2. Коопсуздук маалыматы
ЭСКЕРТҮҮ: Risk of electric shock. Installation and servicing of this device should be performed by qualified personnel only. Disconnect power at the circuit breaker or fuse before installing or servicing. Follow all national and local electrical codes.
- Ensure the power supply matches the device's voltage рейтинги (24V).
- 16А номиналдык максималдуу ток күчүнөн ашпаңыз.
- Аппаратты нымдуулуктан жана экстремалдык температурадан алыс кармаңыз.
- Аппаратты өзүңүз ачууга же оңдоого аракет кылбаңыз. Квалификациялуу тейлөө кызматкерлерине кайрылыңыз.
3. Пакеттин мазмуну
Таңгактан чыгарууда бардык компоненттер бар экенин текшериңиз:
- 1 x Intermatic FM1D20A-24 Electronic 24-Hour/7-Day Timer Module
4. Продукт бүтүп калдыview
The Intermatic FM1D20A-24 is an electronic timer module designed for precise 24-hour and 7-day scheduling. It features a digital display and intuitive controls for programming up to 20 ON/OFF operations.
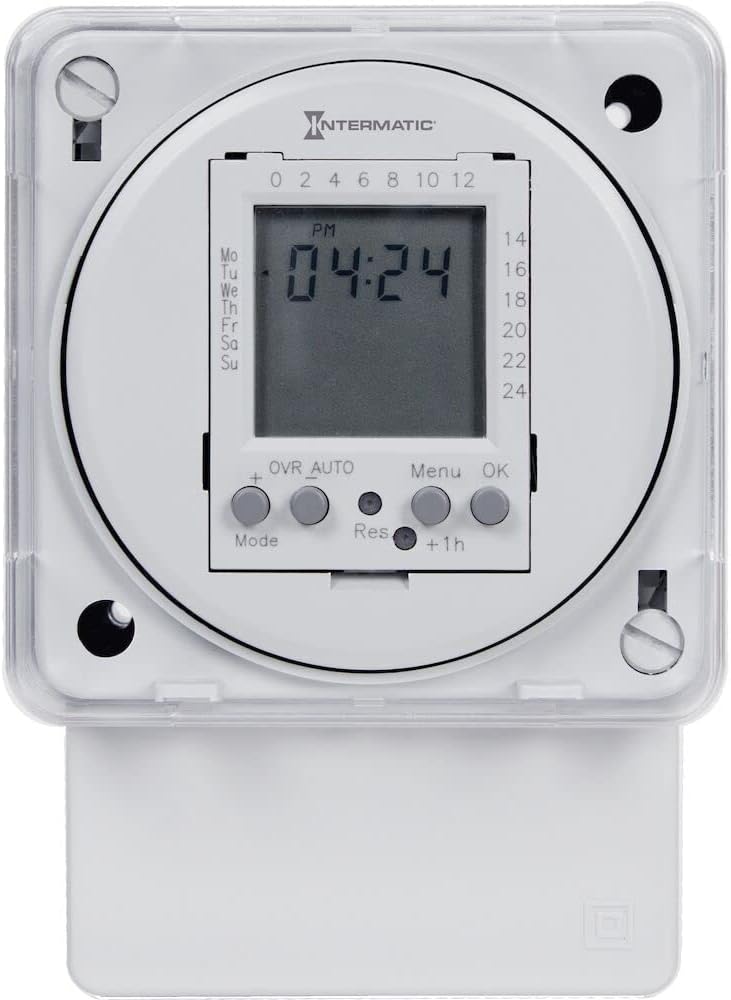
1-сүрөт: Фронт view of the Intermatic FM1D20A-24 Timer Module, showing the digital display and control buttons.

2-сүрөт: Жакын план view of the timer module's display, indicating current time and day, along with the 'Mode', '+', 'OVR AUTO', 'Res', 'Menu', 'OK', and '+1h' buttons.

3-сүрөт: Side view of the timer module, illustrating its compact design and potential mounting points for surface or DIN rail installation.
5. Орнотуу
The FM1D20A-24 timer module supports both surface and DIN rail mounting.
5.1 Монтаждоо
- Жер үстүндөгү орнотуу: Secure the module to a flat surface using appropriate screws through the designated mounting holes.
- DIN темир жол орнотуу: Attach the module to a standard DIN rail by snapping it into place.
5.2 Электр зымдары
МААНИЛҮҮ: All wiring must comply with local and national electrical codes. Ensure power is disconnected before wiring.
- Connect the 24V power supply to the designated input terminals.
- Connect the load (device to be controlled) to the output terminals. The timer module features an SPDT (Single Pole Double Throw) switch style.
- Кубатты калыбына келтирүүдөн мурун бардык туташуулар коопсуз экенин текшериңиз.
6. Орнотуу
6.1 Баштапкы кубаттуулук
Upon initial power-up, the display may be blank or show default settings. The internal clock will need to be set.
6.2 Учурдагы убакытты жана күндү орнотуу
- Press the 'Mode' button to enter the time setting mode.
- Use the '+' button to adjust the hour, minute, and day.
- Press 'OK' to confirm each setting and move to the next.
- Once the time and day are set, press 'OK' to exit the setting mode.
6.3 Иш-чараларды программалоону күйгүзүү/өчүрүү
The timer supports up to 20 ON/OFF operations.
- Press the 'Menu' button to access the programming menu.
- Navigate through the program slots (P1 ON, P1 OFF, P2 ON, P2 OFF, etc.) using the '+' button.
- For each program slot, press 'OK' to select it.
- Use the '+' button to set the desired time and day(s) for the ON or OFF event.
- Ар бир жөндөөнү ырастоо үчүн "OK" баскычын басыңыз.
- Бардык каалаган КҮЙГҮЗҮҮ/ӨЧҮРҮҮ окуялары үчүн кайталаңыз.
- Press 'Menu' to exit the programming mode.
7. Иштөө нускамалары
7.1 Manual Override (OVR AUTO)
The 'OVR AUTO' button allows for temporary manual control of the output, overriding the programmed schedule. Pressing it will toggle the output state (ON/OFF) and return to automatic operation at the next scheduled event.
7.2 Time Adjustment (+1h)
The '+1h' button can be used for quick adjustment of the current time, typically for daylight saving time changes. Pressing it will advance the current time by one hour.
7.3 Reset Function (Res)
The 'Res' (Reset) button is typically a recessed button that requires a pointed object (like a pen tip) to press. This button will reset the timer to its factory default settings, erasing all programmed events and resetting the clock. Use with caution.
8. Техникалык тейлөө
The Intermatic FM1D20A-24 timer module requires minimal maintenance.
- Тазалоо: Аппараттын сыртын жумшак, кургак чүпүрөк менен сүртүңүз. Абразивдүү тазалагычтарды же эриткичтерди колдонбоңуз.
- Батарея: This device does not require user-replaceable batteries for operation or memory retention.
- Текшерүү: Мезгил-мезгили менен зымдарды туташтыргычтын бекемдигин жана эскирүү же бузулуу белгилерин текшерип туруңуз.
9. Кыйынчылыктарды
9.1 Display is Blank
- Check if the power supply (24V) is connected and active.
- Бардык зымдарды туташтыруу коопсуз экенин текшериңиз.
9.2 Programmed Events Not Executing
- Учурдагы убакыт жана күн туура коюлганын текшериңиз.
- Check that the programmed ON/OFF times and days are accurate.
- Ensure the timer is not in manual override mode (check 'OVR AUTO' status).
- Confirm the load is properly connected and functional.
9.3 Түзмөк жооп бербей жатат
- Attempt a soft reset by pressing the 'Res' button with a pointed object. Note that this will erase all settings.
- If the issue persists, disconnect power for a few minutes and then restore it.
10. Техникалык шарттар
| Модель номери | FM1D20A-24 |
| Бренд | Intermatic |
| Type | Electronic 24-Hour/7-Day Timer Module |
| Тtage | 24V |
| Жыштык | 50/60 Гц |
| Учурдагы рейтинг | 16A |
| Операциялардын максималдуу саны | 20 (КҮЙГҮЗҮҮ/ӨЧҮРҮҮ) |
| Монтаж түрү | Surface, DIN Rail |
| Стилди которуу | SPDT |
| Материал | Пластик |
| Продукциянын өлчөмдөрү | 2.06"D x 83"W x 4"H |
| Элемент Салмагы | 0.01 унция |
| Сертификаттар | UL (Canada and US), CE |
11. Кепилдик жана колдоо
For warranty information, please refer to the manufacturer's description or contact Intermatic customer support directly. Technical assistance and further support can be obtained through the official Intermatic webсайт же ыйгарым укуктуу тейлөө борборлору.
Өндүрүүчү: Intermatic Incorporated
Webсайт: www.intermatic.com


