1. Киришүү
This manual provides comprehensive instructions for the installation, operation, and maintenance of your Jensen AWM965 AM/FM|CD|DVD|MP3/USB Wallmount Stereo. The AWM965 is a versatile 12-volt unit designed for wall mounting, featuring an AM/FM electronic tuner, CD and DVD player, and a front USB input for MP3, WMA, and JPEG file playback. It also includes three stereo high-level speaker output zones and a remote control for convenient operation.

Сүрөт 1.1: Алдыңкы view of the Jensen AWM965 Wallmount Stereo, showing the display, control knobs, and various buttons.
2. Коопсуздук маалыматы
Please read all safety instructions carefully before operating the unit. Failure to follow these instructions may result in injury or damage to the unit. Keep this manual for future reference.
- Электр камсыздоо: This unit operates on a 12V DC negative ground power supply. Ensure correct voltage and polarity during installation.
- Орнотуу: Professional installation is recommended. Ensure all wiring is secure and properly insulated to prevent short circuits.
- Нымдуулук: Өрт же электр тогуна урунуп калбаш үчүн аппаратты жамгырга же нымга тийгизбеңиз.
- Тазалоо: Тазалоо үчүн жумшак, кургак чүпүрөктү колдонуңуз. Абразивдүү тазалагычтардан же эриткичтерден качыңыз.
- Тейлөө: Do not attempt to service this unit yourself. Refer all servicing to qualified personnel.
3. Таңгактоо тизмеси
Орнотууну улантуудан мурун пакетте бардык элементтер бар экенин текшериңиз.
- Jensen AWM965 Wallmount Stereo Unit
- Батарея менен алыстан башкаруу
- 20-Pin Power/A/B Speaker Mating Pigtail
- Aux Audio/Video Cable
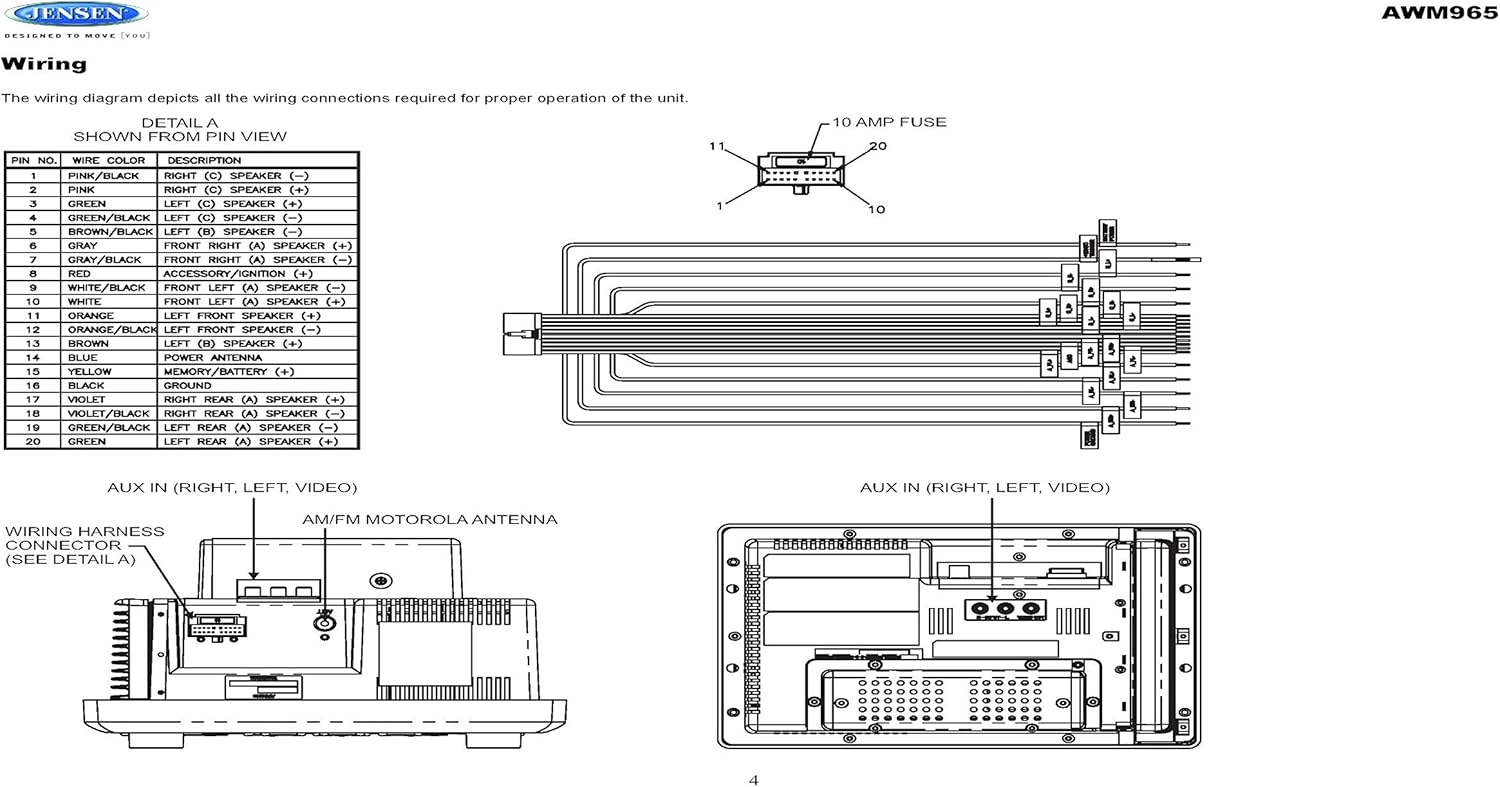
Figure 3.1: Diagram illustrating the components included in the Jensen AWM965 package, including the main unit, remote control, wiring harness, and auxiliary cables.

Figure 3.2: Image showing the included remote control, 20-pin wiring harness, and auxiliary audio/video cable.
4. Орнотуу
4.1 Монтаждоо ордун тандоо
It is important to select an appropriate mounting location for the AWM965 to ensure optimal performance and longevity. Consider the following:
- Avoid places exposed to heat-radiating appliances such as electric heaters.
- Do not mount adjacent to other equipment that radiates significant heat.
- Ensure the location is well-ventilated and not dusty.
- Нымдуу же нымдуу жерлерден алыс болуңуз.
4.2 Preparing the Opening
Use the provided mounting hole diagram to measure and cut an opening in the mounting surface. After cutting, mount the unit using four M3x20mm screws.
4.3 Радиону орнотуу
Route the power, speaker, and antenna cables through the hole. Connect them to the unit as outlined in the wiring diagram. After ensuring correct connections, perform a test operation.
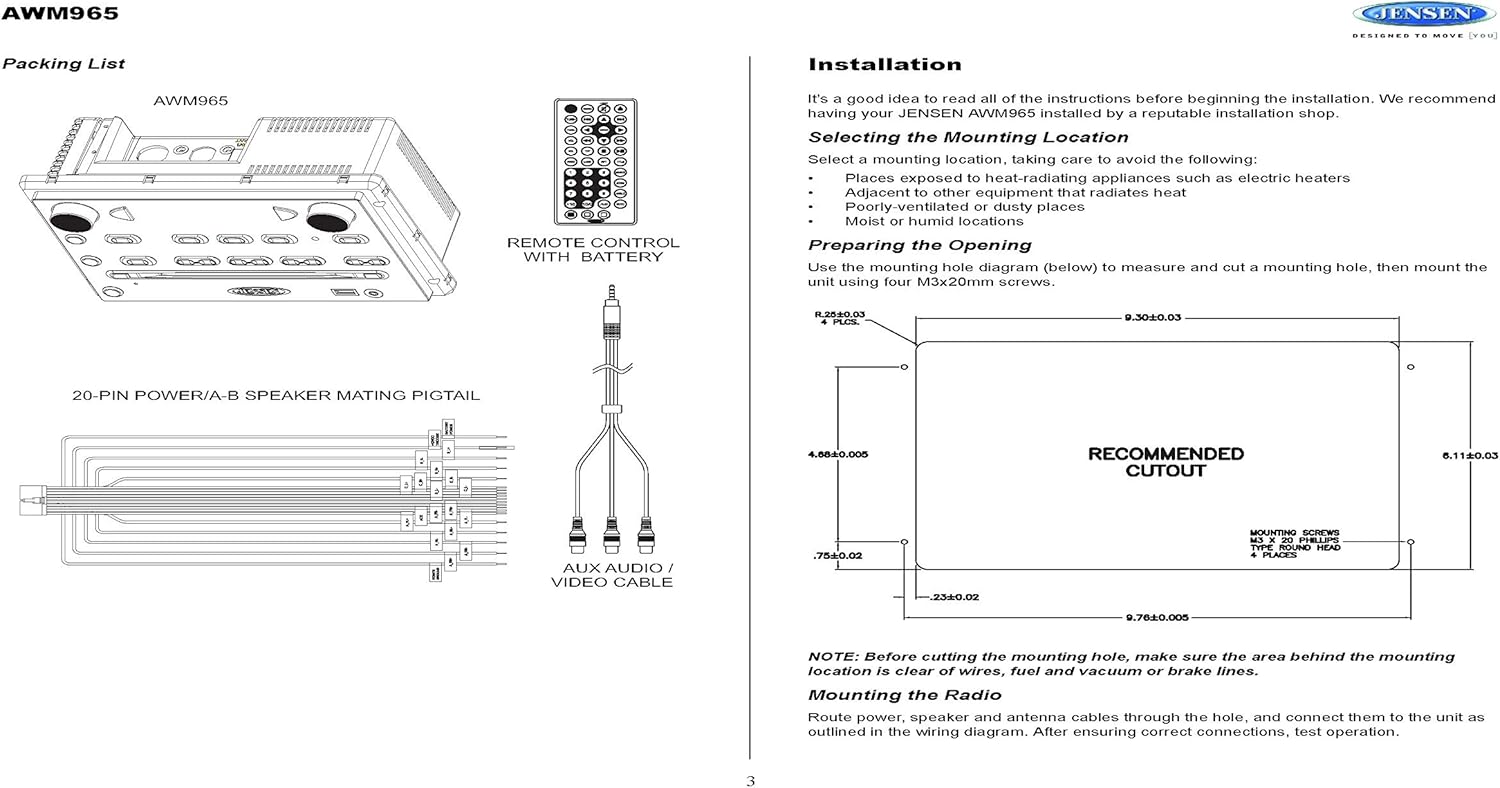
Figure 4.1: Detailed diagram showing the product dimensions (10.43"W x 7.01"H x 5"D) and the recommended cutout dimensions for installation (9.30"W x 6.11"H).
4.4 Электр зымдары
The wiring diagram below depicts all the connections required for proper operation of the unit. Ensure all connections are secure and correctly matched to prevent damage.
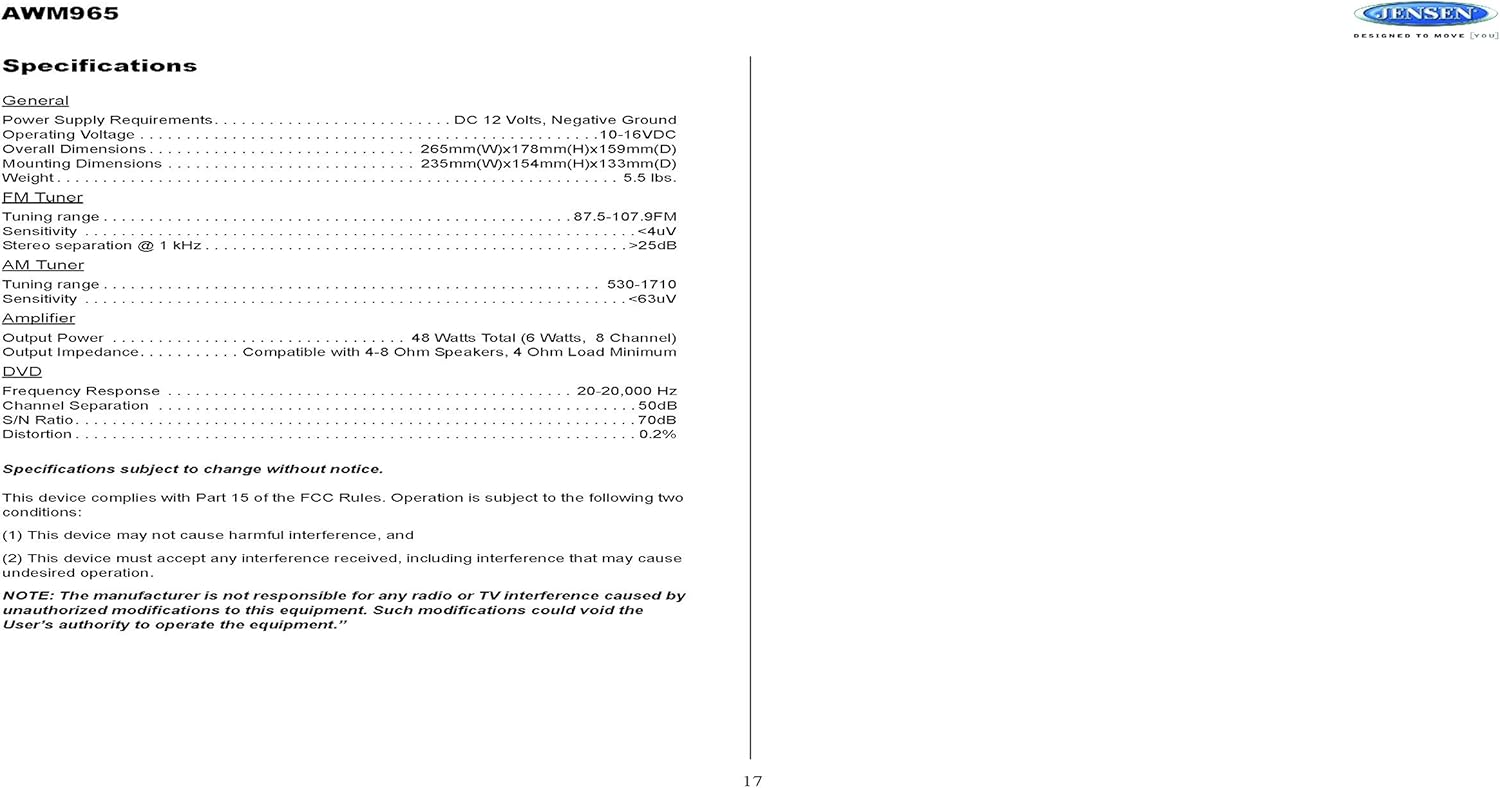
Figure 4.2: Detailed wiring diagram for the Jensen AWM965, showing the 20-pin connector pin assignments for power, ground, accessory, antenna, and speaker outputs (Right/Left, Front/Rear, A/B/C zones).
Wiring Harness Pin Details:
| PIN No. | Wire Color | Description |
|---|---|---|
| 1 | КЫЗГЫЗ / КАРА | ОҢ (С) Спикер (-) |
| 2 | PINK | ОҢ (С) Спикер (+) |
| 3 | ЖАШЫЛ | СОЛ (С) Спикер (+) |
| 4 | ЖАШЫЛ / КАРА | СОЛ (С) Спикер (-) |
| 5 | КҮРӨҢ КАРА | СОЛ (Б) СПИКЕР (-) |
| 6 | КҮРӨҢ | СОЛ (Б) КОЛДОНУУЧУ (+) |
| 7 | БОЗ / КАРА | АЛДЫНКЫ ОҢ (A) Спикер (-) |
| 8 | КЫЗЫЛ | ACCESSORY / IGNITION (+) |
| 9 | АК КАРА | АЛДЫНКЫ СОЛ (A) СПИКЕР (-) |
| 10 | АК | АЛДЫНКЫ СОЛ (A) Спикер (+) |
| 11 | АЧЫК КҮРӨҢ | СОЛ АЛДЫНКЫ КОЛДОНУШ (+) |
| 12 | ORANGE / BLACK | СОЛ АЛДЫНДАГЫ Спикер (-) |
| 13 | КҮРӨҢ | ОҢ (Б) Спикер (+) |
| 14 | КӨК | КУЧТУУ АНТЕННА |
| 15 | САРЫ | MEMORY / BATTERY (+) |
| 16 | КАРА | ЖЕР |
| 17 | VIOLET | ОҢ АРТЫК (A) СИНАКЕР (+) |
| 18 | VIOLET / BLACK | ОҢ АРТЫК (A) СИНАКЕР (-) |
| 19 | ЖАШЫЛ / КАРА | СОЛ АРТЫК (A) СИНАКЕР (-) |
| 20 | ЖАШЫЛ | СОЛ АРТЫК (A) СОНКЕР (+) |
5. Иштөө нускамалары
5.1 Алдыңкы панелдин башкаруу элементтери
Familiarize yourself with the controls on the front panel for easy operation.

Сүрөт 5.1: Жакын пландан view of the Jensen AWM965 front panel, highlighting the display, volume knob, power button, tuning/track buttons, and various function buttons for AUX, AS/PS, speaker zones, and media playback.
- ҮН (Үн) баскычы: Rotate to adjust volume. Push to access audio menu.
- КҮЧ баскычы: Бирдикти күйгүзүү же өчүрүү үчүн басыңыз.
- T/F CLOCK Button: Press to display or set the clock.
- TUN/TRK (Tune/Track) Buttons: Use for tuning radio stations or navigating tracks on media.
- AUX баскычы: Кошумча киргизүү булагын тандайт.
- AS/PS (Auto Store/Preset Scan) Button: Automatically stores strong radio stations or scans through presets.
- A, B, C (Speaker Zone) Buttons: Activates or deactivates speaker output zones.
- ENTER баскычы: Тандоолорду ырастайт.
- LOUD баскычы: Үндүн катуулугун компенсациялоону иштетет/өчүрүү.
- MUTE баскычы: Аудио чыгарууну үнсүз кылат/күйгүзөт.
- 1-6 баскычтары: Radio station presets, track functions (RPT, RDM, G.LANG).
- ALARM SET / ON/OFF Buttons: Sets and activates/deactivates the alarm clock.
- DVD MENU Button: Accesses the DVD menu.
- Disc Eject Button: Ejects a loaded disc.
- USB порт: Медиа ойнотуу жана кубаттоо үчүн USB түзмөктөрүн туташтырыңыз.
5.2 Негизги операция
- Күйгүзүү/өчүрүү: басыңыз КҮЧ баскычы.
- Үндү тууралоо: айлантыңыз ТОМ баскыч.
- Булак тандоо: басыңыз РЕЖИМ button (if available, or cycle through sources using a dedicated button or menu).
5.3 Радио операциясы (AM/FM)
- тюнинг: басыңыз TUN/TRK buttons to manually tune or hold to seek.
- Алдын ала коюлган станциялар: Press and hold a numbered button (1-6) to store the current station. Press briefly to recall.
- Auto Store / Preset Scan: колдонуу AS/PS button for automatic station management.
5.4 CD/DVD/MP3/USB Playback
- Дисктерди жүктөө: Insert a disc into the slot with the label side up. The unit will automatically begin playback.
- USB ойнотуу: Insert a compatible USB flash drive into the front USB port. The unit supports MP3, WMA, and JPEG formats.
- Ойнотуу башкаруулары: колдонуу TUN/TRK buttons for track navigation (skip forward/backward). Use numbered buttons for repeat (RPT) or random (RDM) playback.
- DVD Менюсу: басыңыз DVD МЕНЮС button to access the disc's menu.
- USB заряддоо: The front USB port supports charging of iPod and other USB-based devices.
5.5 Clock and Alarm Features
- Саатты орнотуу: басып, кармап туруңуз T/F CLOCK саат орнотуу режимине өтүү үчүн баскыч. колдонуу TUN/TRK сааттарды жана мүнөттөрдү жөндөө үчүн баскычтарды жана ENTER ырастоо үчүн.
- Ойготкуч саат: колдонуу Сигналды орнотуу button to configure the alarm time and the КҮЙГҮЗҮҮ/ӨЧҮРҮҮ аны иштетүү же өчүрүү үчүн баскычты басыңыз.
- Уйку таймери: Refer to the full manual for detailed instructions on setting the sleep timer.
5.6 Көмөкчү киргизүү
Connect external audio/video devices to the front 3.5mm line-level input using the provided Aux Audio/Video Cable. Press the AUX button to select this source.
5.7 Алыстан башкаруу
The included wireless remote control provides convenient access to most functions. Ensure the battery is correctly installed.
Figure 5.2: Image of the Jensen AWM965 remote control, showing buttons for power, menu, tune, volume, enter, source, program, language, repeat, title, zoom, angle, and numeric keypad.
6. Техникалык тейлөө
6.1 Агрегатты тазалоо
Wipe the front panel and cabinet with a soft, dry cloth. For stubborn stains, dampen the cloth lightly with water. Never use harsh chemicals, abrasive cleaners, or solvents as they may damage the finish.
6.2 Дискке кам көрүү
Манжа издерин болтурбоо үчүн дисктерди четтеринен кармаңыз. Дисктерди таза жана чийиксиз кармаңыз. Колдонулбаган учурда дисктерди кутучасында сактаңыз.
7. Кыйынчылыктарды
If you experience problems with your AWM965, consult the following common issues and solutions before contacting support.
- Кубат жок: Check the 12V DC power connection and ensure the unit's fuse (10 AMP) is not blown. Verify proper grounding.
- Үн жок: Check speaker connections and ensure speaker zones (A, B, C) are activated. Verify volume level and mute status.
- Disc Error: Дисктин таза, чийиксиз жана туура салынганын текшериңиз. Башка дискти колдонуп көрүңүз.
- Радио кабыл алуу начар: Check the antenna connection. Ensure the antenna is fully extended and positioned for best reception.
- USB түзмөгү таанылган жок: Ensure the USB device is formatted correctly and contains compatible files (MP3, WMA, JPEG). Try a different USB device.
8. Техникалык шарттар
Detailed technical specifications for the Jensen AWM965 unit.
| Категория | Спецификация |
|---|---|
| Электр камсыздоо | 12V DC, терс негиз |
| Operating Voltage | 10-16VDC |
| Жалпы өлчөмдөр | 265mm(W) x 178mm(H) x 159mm(D) / 10.4"W x 7"H x 5"D |
| Монтаждоо өлчөмдөрү | 235mm(W) x 154mm(H) x 133mm(D) / 9.25"W x 6.06"H x 5.25"D |
| Салмагы | 0.9 фунт (болжол менен) |
| FM тюнинг диапазону | 87.5-107.9 МГц |
| FM сезгичтиги | <4уВ |
| FM Stereo Separation @ 1 kHz | >25дБ |
| AM тюнинг диапазону | 530-1710кГц |
| AM Сезгичтиги | <63уВ |
| Ampкөтөргүч Output Power | 48 Watts Total (8 Channel) |
| Чыгуу импедансы | Compatible with 4-8 Ohm Speakers |
| DVD Frequency Response | 20-20,000 Гц |
| DVD Channel Separation | 50дБ |
| DVD S/N Ratio | 70дБ |
| DVD Distortion | 0.2% |
| Туура келген диск форматтары | CD, CD-R, CD-RW, MP3, DVD, DVD+/-RW |
| Өзгөчөлүктөр | Adjustable LCD Dimmer, Front USB (MP3/WMA/JPEG, Charging), Front 3.5mm Line-Level Video/Audio Input, 1 Composite Video Out, 1 Stereo Audio Input |
Техникалык мүнөздөмөлөр эскертүүсүз өзгөртүлүшү мүмкүн.
8.1 FCC шайкештиги
Бул аппарат FCC эрежелеринин 15-бөлүгүнө ылайык келет. Операция төмөнкү эки шартка ылайык жүргүзүлөт:
- Бул аппарат зыяндуу тоскоолдуктарды жаратпашы мүмкүн.
- Бул аппарат келген тоскоолдуктарды, анын ичинде каалабаган операцияга алып келиши мүмкүн болгон тоскоолдуктарды кабыл алышы керек.
NOTE: The manufacturer is not responsible for any radio or TV interference caused by unauthorized modifications to this equipment. Such modifications could void the user's authority to operate the equipment.
9. Кепилдик маалыматы
Jensen products are designed and manufactured to the highest quality standards. This product is covered by a limited warranty against defects in materials and workmanship. The specific terms and duration of the warranty are typically provided with the product packaging or can be found on the manufacturer's official webсайт. Кепилдик дооматтары үчүн сатып алганыңыздын далилин сактап коюңуз.
10. Колдоо
If you require further assistance or encounter issues not covered in this manual, please contact Jensen customer support. You can typically find contact information (phone number, email, or support portal) on the official Jensen webсайтында же продуктунун таңгагында.
When contacting support, please have your product model number (AWM965) and a detailed description of the issue ready.


