Introduction
This manual provides comprehensive instructions for the safe and effective operation, maintenance, and troubleshooting of the Testo 400563 4354 IAQ Kit. This device is designed for simple and intuitive operation for reading, saving, and analyzing ventilation and indoor air quality parameters, including Relative Humidity (RH), Temperature, Carbon Dioxide (CO2), and Barometric Pressure.
Коопсуздук маалыматы
Please read this section carefully before operating the device. Failure to comply with these instructions may result in injury or damage to the instrument.
- Always operate the device within its specified operating temperature and humidity ranges.
- Do not expose the device to extreme temperatures, direct sunlight, or corrosive environments.
- Аппаратты түшүрүүдөн же катуу таасирлерден сактаныңыз.
- Only use specified batteries and dispose of them properly.
- Аппаратты өзүңүз ачууга же оңдоого аракет кылбаңыз. Бардык тейлөөлөрдү квалификациялуу кызматкерлерге тапшырыңыз.
- Аппаратты чаңдан жана таштандылардан таза жана таза кармаңыз.
Продукт бүттүview
The Testo 400563 4354 IAQ Kit is a versatile instrument for environmental measurements. Familiarize yourself with its components:
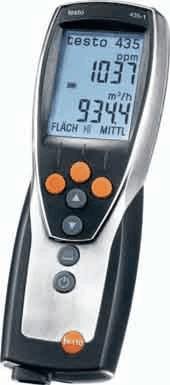
1-сүрөт: Testo 435-4 IAQ Meter. This image displays the handheld meter, featuring a large digital display at the top showing readings like "1037 ppm" and "934.4 m³/h". Below the screen are several control buttons: three orange circular buttons at the top, followed by two grey arrow buttons (up and down), another grey circular button, and finally a power button with a power symbol. The device has a sleek, ergonomic design with a black body and silver-colored accents.
Негизги компоненттер:
- Дисплей: Large LCD for clear reading of measurement values and menu navigation.
- Башкаруу баскычтары: Intuitive buttons for power, navigation, selection, and function activation.
- Сенсор киргизүү: Port for connecting various probes (e.g., CO2, humidity, temperature).
- Батарея бөлүмү: Located at the rear for power supply.
Жайгашуу
1. Батареяны орнотуу:
- Аппараттын артындагы батарея бөлүкчөсүнүн капкагын табыңыз.
- Open the cover by sliding or unscrewing it (refer to specific model instructions if screws are present).
- Insert the required batteries (e.g., AA or AAA, typically 3 or 4) ensuring correct polarity (+/-).
- Батарея уясынын капкагын бекем жабыңыз.
2. Зонд туташуу:
- Connect the desired measurement probe (e.g., CO2 probe, humidity/temperature probe) to the designated input port on the device.
- Ensure the connection is firm and secure to prevent inaccurate readings.
Иштөө нускамалары
1. Күйгүзүү/өчүрүү:
- Күйгүзүү үчүн, басып, кармап туруңуз Күч button (usually marked with Ⓢ) дисплей күйгүчө.
- Өчүрүү үчүн, басып туруңуз Күч дисплей өчмөйүнчө кайра басыңыз.
2. Өлчөөлөрдү алуу:
- Once powered on and a probe is connected, the device will typically display real-time measurements for the connected parameters (e.g., CO2 in ppm, Temperature in °C/°F, RH in %).
- Position the probe in the environment you wish to measure. Ensure proper air circulation around the sensor for accurate readings.
- Allow a few moments for readings to stabilize, especially for CO2 and humidity.
3. Navigating Menus and Saving Data:
- колдонуу Өйдө/Төмөн arrow buttons to navigate through different measurement modes or menu options.
- басыңыз Киргизүү/ОК button (often a central circular button) to select an option or confirm a setting.
- To save a measurement, look for a Сактоо or Эс button/option. Follow the on-screen prompts to store data.
- To recall saved data, navigate to the Эс or Эскертүү меню опциясы.
Техникалык тейлөө
1. Тазалоо:
- Түзмөктү сүртүңүз casing жумшак менен, гamp кездеме. Абразивдүү тазалагычтарды же эриткичтерди колдонбоңуз.
- Ensure no liquid enters the sensor openings or electrical connections.
- For probes, follow specific cleaning instructions provided with the probe itself.
2. Батареяны алмаштыруу:
- Дисплейде батарейка аз индикатору пайда болгондо батарейкаларды алмаштырыңыз.
- Always use new batteries of the specified type.
- Эски батареяларды жергиликтүү эрежелерге ылайык жок кылыңыз.
3. Калибрлөө:
- Regular calibration is essential for maintaining measurement accuracy.
- Refer to the device's on-screen calibration menu or consult Testo's official support for recommended calibration intervals and procedures.
- Some probes may require specific calibration gases or humidity standards.
Проблемаларды чечүү
| Көйгөй | Мүмкүн себеп | Чечим |
|---|---|---|
| Түзмөк күйбөйт. | Өлүк же туура эмес орнотулган батарейкалар. | Батареянын полярдуулугун текшериңиз; жаңылары менен алмаштырыңыз. |
| Туура эмес окуулар. | Sensor dirty, damaged, or out of calibration; improper probe connection. | Clean sensor; ensure probe is securely connected; perform calibration. |
| Display shows "Error" or "---". | Sensor malfunction; out of measurement range; internal error. | Check probe connection; move to an environment within measurement range; restart device; contact support if persistent. |
| Cannot save data. | Memory full; incorrect save procedure. | Delete old data; refer to operating instructions for saving data. |
Техникалык шарттар
The following specifications are for the Testo 400563 4354 IAQ Kit:
- Продукт түрү: CO2/Temp/RH/Barometric Meter
- Модел: 400563 4354
- Бренд: Testo
- Бөлүмдүн номери: AO-10382-23
- Пакет саны: АР БИР
- Пакеттин өлчөмдөрү: 16.3 x 13 x 4.3 дюйм; 8.2 фунт
- ASIN: B00481RUUA
- Биринчи жеткиликтүү: 18-июль, 2012-жыл
Note: Specific measurement ranges and accuracies depend on the probes used with the device. Refer to individual probe documentation for detailed specifications.
Кепилдик жана колдоо
For warranty information, technical support, or service inquiries, please contact Testo customer service or visit their official webсайт.
Көбүрөөк маалымат жана байланыш маалыматтарын даректен таба аласыз Testo Store on Amazon.


