1. Киришүү
Thank you for choosing the LTC 3-Channel 60W Public Address Amplifier with USB/SD-MP3. This manual provides essential information for the safe and efficient operation of your new amplifier. Please read it thoroughly before use and keep it for future reference. This amplifier is designed for public address applications, offering versatile input options including microphones, auxiliary devices, and integrated USB/SD card playback.
2. Коопсуздук нускамалары
Коопсуз эксплуатацияны камсыз кылуу жана зыян келтирбөө үчүн төмөнкү коопсуздук чараларын сактаңыз:
- Кубат булагы: туташтыруу amplifier only to the specified power sources (12V DC or 220V AC) as indicated on the unit. Ensure the voltage сиздин жергиликтүү электр камсыздооңузга дал келет.
- Вентиляция: Эч кандай желдетүүчү тешиктерди жаап албаңыз. Ашыкча ысып кетүүнүн алдын алуу үчүн аппараттын айланасында адекваттуу аба агымын камсыз кылыңыз.
- Нымдуулук: ачыкка чыгарбагыла amplifier to rain, moisture, or excessive humidity. Keep it away from liquids.
- Тазалоо: Тазалоодон мурун электр кубатынан сууруп алыңыз. Кургак, жумшак чүпүрөктү колдонуңуз. Суюк тазалоочу каражаттарды же аэрозольдорду колдонбоңуз.
- Тейлөө: Бул продуктуну өзүңүз тейлөөгө аракет кылбаңыз. Бардык тейлөө иштерин квалификациялуу тейлөө кызматкерлерине тапшырыңыз. Түзмөктү ачуу сизди кооптуу абалга алып келиши мүмкүнtages же башка коркунучтар.
- Жайгашкан жери: кой amplifier on a stable, flat surface. Avoid placing it near heat sources or in direct sunlight.
- Ашыкча жүктөө: ашыкча жүктөөгө болбойт amplifier. Ensure connected speakers match the amplifier's impedance and power ratings.
3. Продукт бүтүп калдыview
The LTC 3-Channel 60W Public Address Amplifier is a versatile audio solution designed for various PA applications. It features multiple input options and an integrated MP3 player for convenience.
3.1 Алдыңкы панелдин башкаруу элементтери жана байланыштары
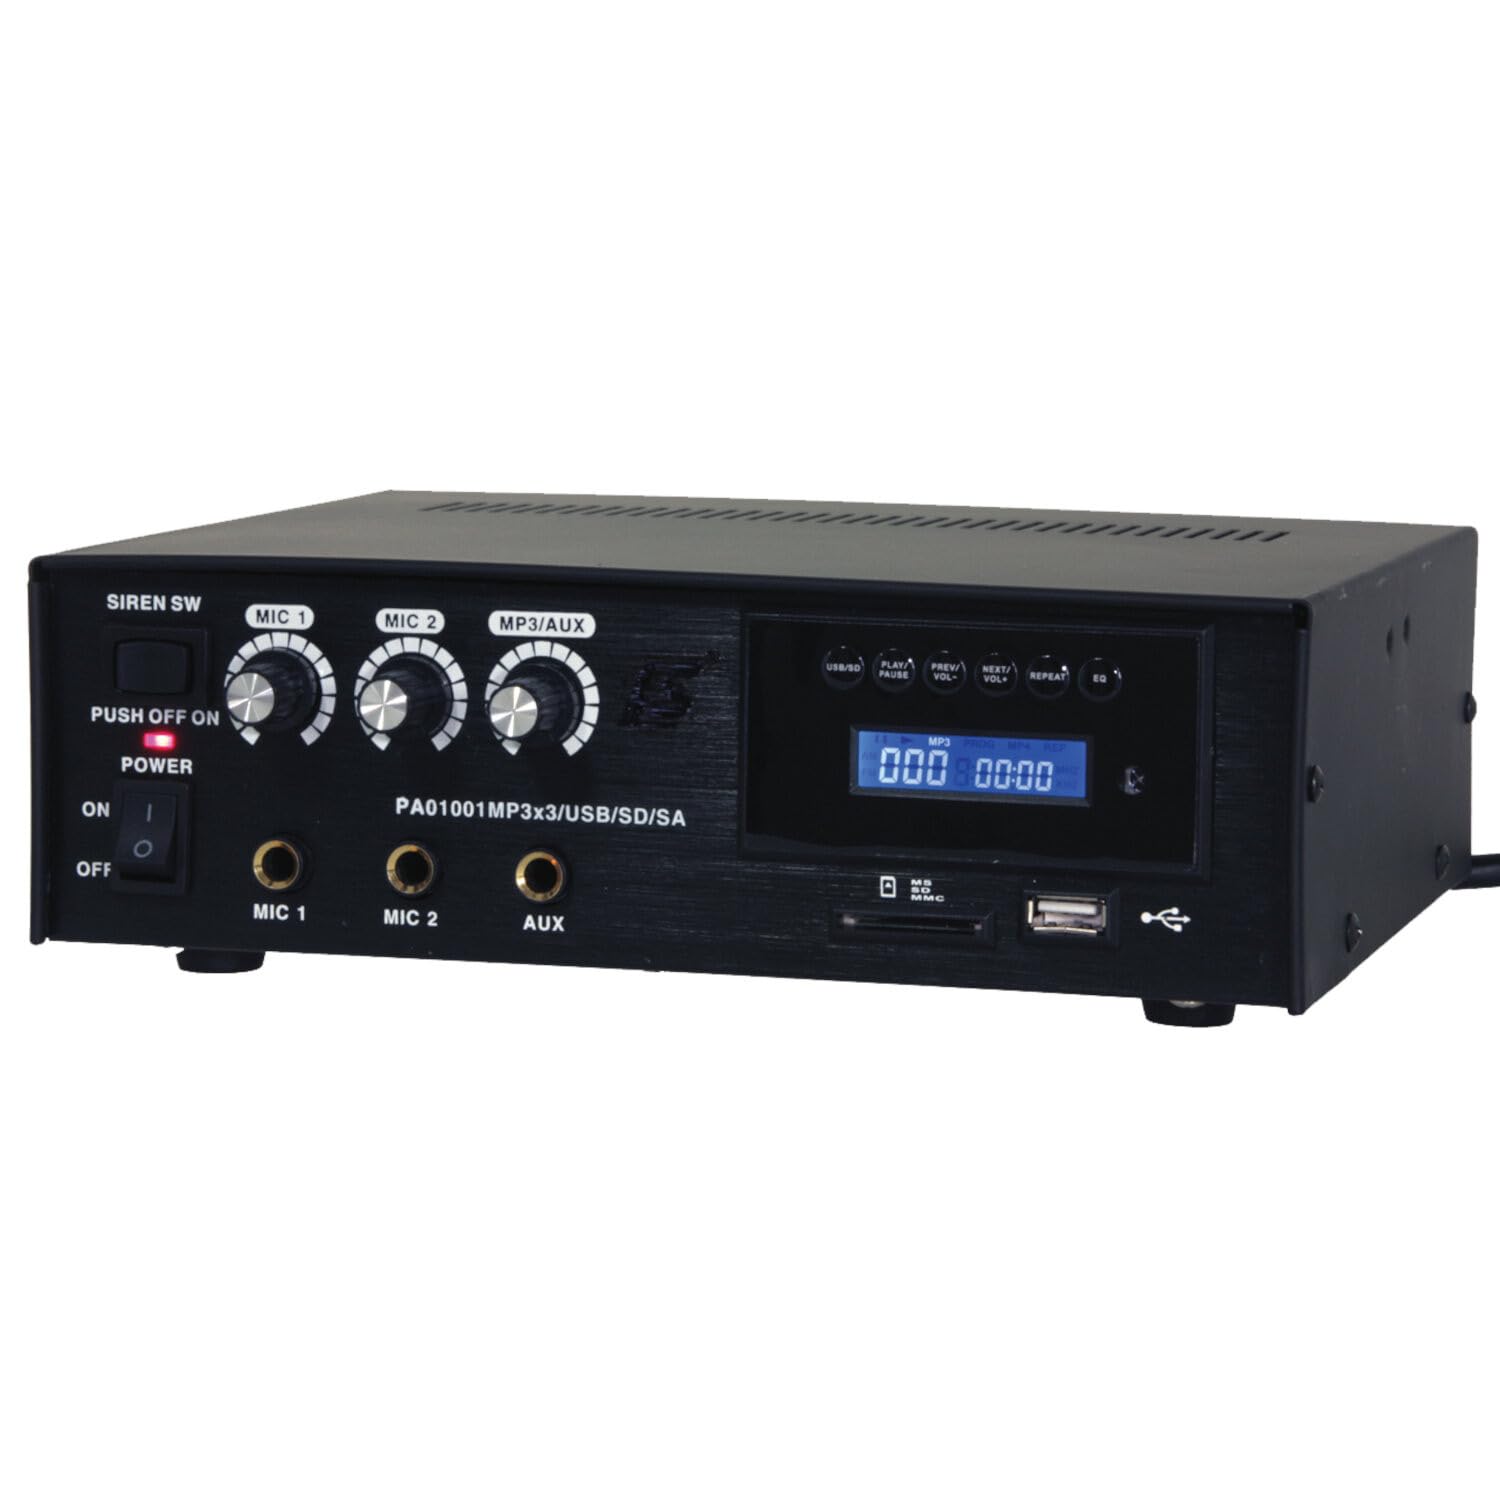
Image: Front panel of the LTC 3-Channel 60W Public Address Amplifier. Visible controls include volume knobs for MIC1, MIC2, and MP3/AUX, a Master volume knob, a Power switch, a Siren switch, and input jacks for MIC1, MIC2, and AUX. The MP3 player section features a display, USB port, and SD card slot.
- SIREN SW: Switch to activate the built-in siren sound.
- PUSH OFF / ON / OF Power Switch: Main power switch for the ampөмүрлүү.
- MIC 1 Volume: Rotary knob to adjust the volume level for Microphone Input 1.
- MIC 2 Volume: Rotary knob to adjust the volume level for Microphone Input 2.
- MP3/AUX Volume: Rotary knob to adjust the volume level for the MP3 player and Auxiliary input.
- MASTER Көлөмү: Rotary knob to control the overall output volume of the ampөмүрлүү.
- MIC 1 киргизүү: 6.3mm jack for connecting Microphone 1.
- MIC 2 киргизүү: 6.3mm jack for connecting Microphone 2.
- AUX киргизүү: 6.3mm jack for connecting external audio sources (e.g., CD player, smartphone).
- USB/SD MP3 Player: Integrated player with USB port and SD card slot for direct playback of audio files. Includes control buttons (Play/Pause, Prev/Vol-, Next/Vol+, Repeat, EQ) and an LCD display.
3.2 Негизги өзгөчөлүктөрү
- Mobile or fixed amplifier with 12V battery (car, boat) or 220V mains power supply.
- Integrated MP3 player with USB and SD ports for music playback.
- Includes a siren for powerful sound and an MP3 control screen with a blue LCD display.
4. Орнотуу
Орнотуу үчүн төмөнкү кадамдарды аткарыңыз ampөмүр берүүчү:
4.1 Кубат туташтыруу
- For 220V AC Operation: Connect the supplied power cord to the AC input on the rear panel of the amplifier and then to a standard 220V AC wall outlet.
- 12V DC иштеши үчүн: Connect a 12V DC power source (e.g., car battery) to the 12V DC input terminals on the rear panel. Ensure correct polarity (+ to + and - to -).
- камсыз кылуу amplifier's power switch is in the 'OFF' position before connecting to power.
4.2 Динамиктин туташуусу
- Locate the speaker output terminals on the rear panel of the ampөмүрлүү.
- Connect your speakers to these terminals, ensuring correct polarity (positive to positive, negative to negative).
- Verify that the total impedance of the connected speakers is compatible with the amplifier's output specifications to prevent damage.
4.3 Аудио киргизүү туташуусу
- Микрофондор: Insert your microphones into the MIC 1 and/or MIC 2 input jacks on the front panel.
- Көмөкчү түзүлүштөр: Connect external audio sources (e.g., smartphone, laptop, CD player) to the AUX input jack on the front panel using an appropriate 6.3mm audio cable.
- USB/SD медиа: Insert a USB flash drive into the USB port or an SD card into the SD card slot on the front panel for MP3 playback.
5. Иштөө нускамалары
Бир жолу ampкөтөргүч орнотулган болсо, аны иштетүү үчүн төмөнкү кадамдарды аткарыңыз:
5.1 Күйгүзүү/өчүрүү
- Бардык байланыштар коопсуз экенин текшериңиз.
- Turn the MASTER volume knob to its minimum position.
- POWER которгучун 'ON' абалына буруңуз. Кубат индикаторунун жарыгы күйөт.
- To power off, turn the MASTER volume to minimum and then flip the POWER switch to 'OFF'.
5.2 Микрофонду колдонуу
- Connect your microphone(s) to the MIC 1 and/or MIC 2 inputs.
- Slowly increase the MIC 1 and/or MIC 2 volume knob(s) to the desired level.
- Adjust the MASTER volume for overall output.
- Avoid pointing microphones directly at speakers to prevent feedback (howling).
5.3 AUX киргизүүсүнүн колдонулушу
- Connect your external audio device to the AUX input.
- Ensure the volume on your external device is set to a moderate level.
- Slowly increase the MP3/AUX volume knob to the desired level.
- Adjust the MASTER volume for overall output.
5.4 MP3/USB/SD Playback
- Insert a USB flash drive into the USB port or an SD card into the SD card slot. The amplifier медианы автоматтык түрдө таап, ойнотууну баштайт.
- Use the 'PLAY/PAUSE' button to start or pause playback.
- Use the 'PREV/VOL-' button to go to the previous track or press and hold to decrease volume.
- Use the 'NEXT/VOL+' button to go to the next track or press and hold to increase volume.
- Use the 'REPEAT' button to cycle through repeat modes (e.g., repeat one, repeat all).
- Use the 'EQ' button to cycle through equalizer presets.
- Adjust the MP3/AUX volume knob and MASTER volume for desired output.
5.5 Siren Function
- To activate the siren, flip the SIREN SW to the 'ON' position.
- To deactivate, flip the SIREN SW back to the 'OFF' position.
- Use the MASTER volume to control the siren's output level.
6. Техникалык тейлөө
Proper maintenance ensures the longevity of your ampөмүр берүүчү:
- Тазалоо: Агрегатты жумшак, кургак чүпүрөк менен дайыма сүртүп туруңуз. Абразивдүү тазалагычтарды, момдорду же эриткичтерди колдонбоңуз.
- Вентиляция: Ensure that the ventilation grilles are free from dust and debris. Use a soft brush or vacuum cleaner to clear them if necessary.
- Сактагыч: сакталган болсо ampкөтөргүчтү узак убакытка күйгүзүп койсоңуз, аны электр тармагынан сууруп, салкын, кургак жерде, күндүн түз нурунан жана өтө жогорку температурадан алыс сактаңыз.
- Байланыштары: Periodically check all cable connections for tightness and signs of wear.
7. Кыйынчылыктарды
Эгер сиз менен көйгөйлөр пайда болсо amplifier, refer to the table below for common problems and solutions:
| Көйгөй | Мүмкүн себеп | Чечим |
|---|---|---|
| Күч жок | Power cable not connected; Power outlet faulty; Power switch off; 12V DC battery depleted or incorrectly connected. | Check power cable connection; Try a different outlet; Ensure power switch is ON; Check 12V DC battery charge and polarity. |
| Үн чыгышы жок | Master volume too low; Input volume too low; Speakers not connected or faulty; Incorrect input selected (for MP3/AUX); Mute activated. | Increase Master and input volumes; Check speaker connections and functionality; Ensure correct input source is active; Check if any mute function is engaged. |
| Бурмаланган үн | Volume too high (clipping); Speaker impedance mismatch; Faulty cables or connections. | Reduce volume; Verify speaker impedance compatibility; Check and replace faulty cables. |
| MP3/USB/SD not playing | Туура эмес file format; USB drive/SD card faulty or not inserted correctly; MP3/AUX volume too low. | камсыз кылуу files are MP3 format; Reinsert USB/SD card; Try a different USB/SD card; Increase MP3/AUX volume. |
| Feedback (howling) from microphones | Микрофон динамиктерге өтө жакын; Микрофондун үнү өтө жогору. | Reposition microphones away from speakers; Reduce microphone volume. |
Бул чечимдерди колдонуп көргөндөн кийин көйгөй чечилбесе, кардарларды колдоо менен байланышыңыз.
8. Техникалык шарттар
Technical specifications for the LTC 3-Channel 60W Public Address Ampөмүр берүүчү:
| Өзгөчөлүк | Спецификация |
|---|---|
| Модель номери | LTCAUDIO95-1000 |
| Чыгаруу кубаттуулугу (12В) | RMS 35W, Max. 45W |
| Чыгаруу кубаттуулугу (220В) | RMS 45W, Max. 60W |
| Каналдардын саны | 3 (MIC1, MIC2, AUX/MP3) |
| Тtage | 220 Вольт (өзгөрмө ток), 12 Вольт (ТК) |
| Maximum Supply Voltage | 240 вольт |
| Minimum Supply Voltage | 220 вольт (AC) |
| Продукциянын өлчөмдөрү (L x W x Y) | 48 x 9 x 35 см (18.9 x 3.5 x 13.8 дюйм) |
| Продукт Салмагы | 3.26 килограмм (7.19 фунт) |
| Монтаж түрү | Стол орнотуу |
| Integrated Features | USB/SD MP3 Player, Siren |
9. Кепилдик жана колдоо
This product is manufactured by Ibiza and sold under the LTC brand. Spare parts availability is indicated for 2 years from the date of purchase. For technical support, troubleshooting assistance beyond what is provided in this manual, or warranty claims, please contact your retailer or the authorized service center. Keep your proof of purchase for warranty validation.


