1. Киришүү
This manual provides essential information for the proper installation, operation, and maintenance of your Behringer Truth B1031A Active 2-Way Reference Studio Monitor. Please read this manual thoroughly to ensure optimal performance and longevity of your device. The B1031A is designed for professional audio applications, offering ultra-linear frequency response and precise sound reproduction.
2. Маанилүү коопсуздук нускамалары
- Кубат булагы: Connect the unit only to a power supply of the voltage specified in the manual or on the unit.
- Негиздөө: Электр шокунан сактануу үчүн аппараттын туура жерге туташтырылганын текшериңиз.
- Вентиляция: Вентиляциялык тешиктерди тоспогула. Өндүрүүчүнүн көрсөтмөсүнө ылайык орнотуңуз.
- Суу жана ным: Бул аппаратты суунун жанында колдонбоңуз же жамгыр же нымдуулукка тийгизбеңиз.
- Жылуулук: Радиаторлор, жылуулук регистрлери, мештер же башка аппараттар (анын ичинде) сыяктуу жылуулук булактарынын жанына орнотпоңуз ampкөтөргүчтөр) жылуулукту пайда кылуучу.
- Тазалоо: Кургак чүпүрөк менен гана тазалаңыз.
- Тейлөө: Бардык тейлөөлөрдү квалификациялуу тейлөө кызматкерлерине тапшырыңыз. Аппарат кандайдыр бир зыянга учураганда, мисалы, кубат берүүчү шнур же сайгыч бузулганда, суюктук төгүлгөндө же аппараттын ичине нерселер түшкөндө, аппарат жамгырга же нымдуулукка дуушар болгондо, нормалдуу иштебей калганда тейлөө талап кылынат. , же түшүрүлгөн.
3. Пакеттин мазмуну
Upon unpacking your Behringer Truth B1031A, please verify that all components are present and in good condition:
- Behringer Truth B1031A Active Studio Monitor (1 unit)
- Электр кабели
- Колдонуучунун Колдонмосу (бул документ)
Эгерде кандайдыр бир буюмдар жок же бузулуп калса, дароо дилериңизге кайрылыңыз.
4. Продукт бүтүп калдыview
The Behringer Truth B1031A is an active 2-way reference studio monitor featuring an 8-inch Kevlar woofer and a 1-inch silk dome tweeter. It incorporates precision Class A/B amplifiers with active protection circuits, delivering 100 W for low frequencies and 50 W for high frequencies. Its design aims for ultra-linear frequency response and wide dispersion characteristics.
4.1. Алдыңкы панель

The front panel features the primary acoustic components: the 8-inch Kevlar woofer for low-frequency reproduction and the 1-inch silk dome tweeter for high frequencies. Indicator LEDs provide visual feedback on the monitor's power status and signal clipping.
4.2. Арткы панель
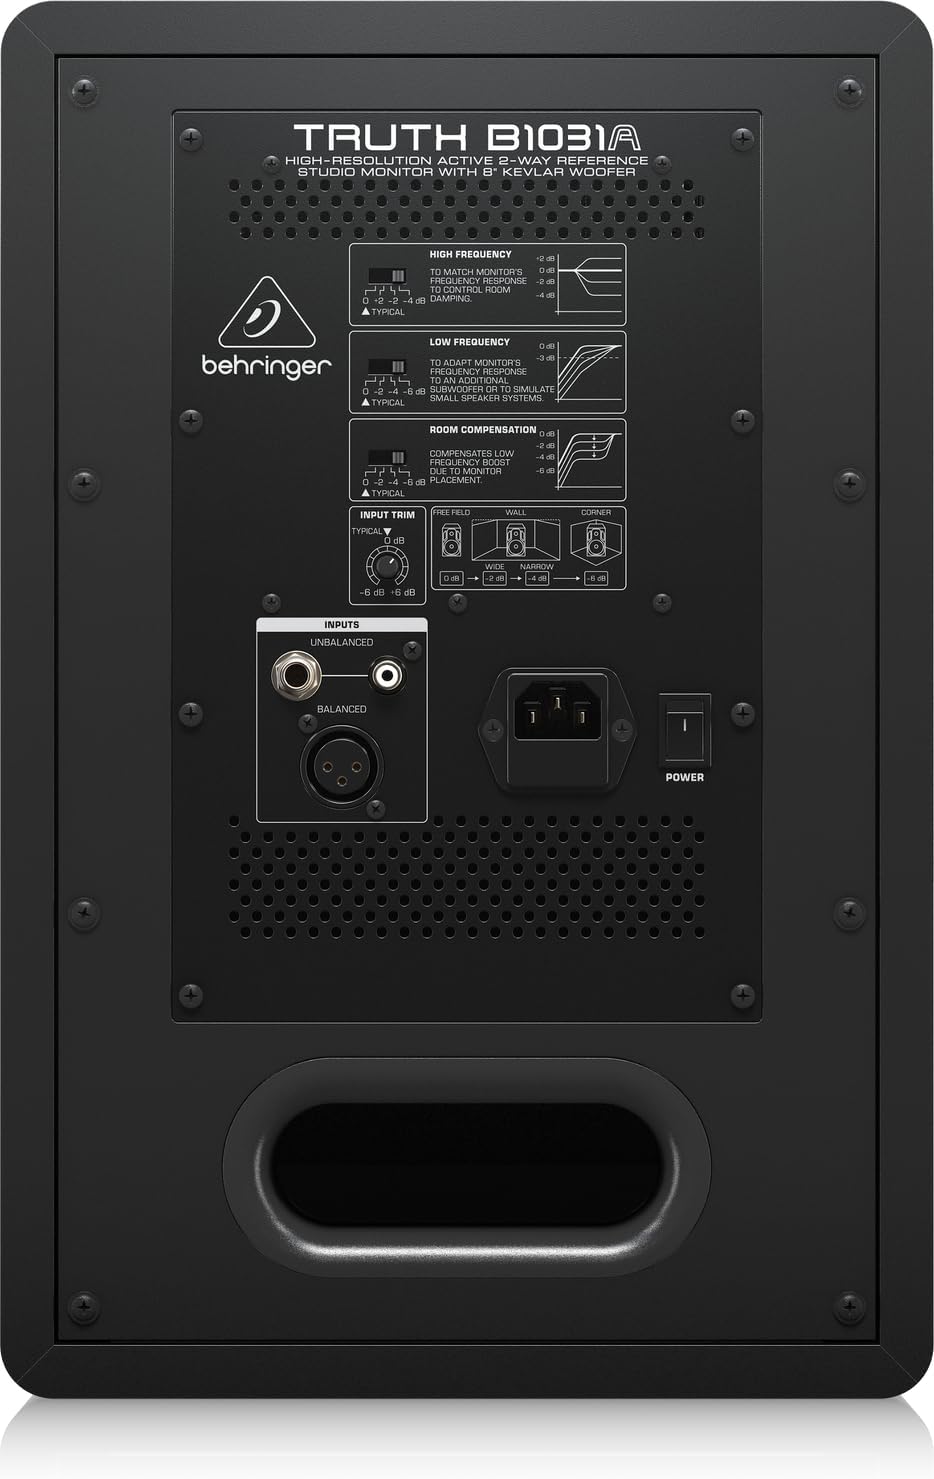
The rear panel houses all input connections and acoustic adjustment controls. These include:
- Салмактуу XLR киргизүү: Кесипкөй аудио туташуулар үчүн.
- Балансталган 1/4" TRS киргизүү: Кесипкөй аудио туташуулар үчүн.
- Unbalanced RCA Input: For consumer audio devices.
- Киргизүү кыркуу: Киргизүү сезгичтигин тууралайт.
- High Frequency Adjustment: Allows tailoring of the high-frequency response.
- Low Frequency Adjustment: Allows tailoring of the low-frequency response.
- Room Compensation Switches: Adjusts the monitor's response to compensate for room acoustics (e.g., placement near walls or corners).
- Power Switch and IEC Power Inlet: Электр кабелин туташтыруу жана түзмөктү күйгүзүү/өчүрүү үчүн.
5. Орнотуу
5.1. Жайгаштыруу
Proper placement of your studio monitors is crucial for accurate sound reproduction. Consider the following guidelines:
- Стерео үч бурчтук: Position the monitors and your listening position to form an equilateral triangle. The distance between the two monitors should be equal to the distance from each monitor to your head.
- Кулак деңгээли: Твиттерлер, сиз негизги угуу абалында турганда, кулактын деңгээлинде болушу керек.
- Дубалга чейинки аралык: Avoid placing monitors directly against walls or in corners, as this can exaggerate bass frequencies. If unavoidable, use the Бөлмө компенсация switches on the rear panel to adjust.
- Симметрия: Ensure the left and right monitors are placed symmetrically within the room to maintain a balanced stereo image.
5.2. Байланыштар
Before making any connections, ensure the monitor is powered off and unplugged from the mains.
- Аудио киргизүү: Connect your audio source (e.g., audio interface, mixer) to the B1031A using either an XLR, 1/4" TRS, or RCA cable. For optimal signal integrity, balanced XLR or TRS connections are recommended.
- Кубат туташуу: Insert the supplied power cable into the IEC power inlet on the rear panel of the monitor, then plug the other end into a suitable AC power outlet.
6. Иштөө
6.1. Күйгүзүү / Өчүрүү
- Ensure all audio connections are secure and the input trim is set to a low level.
- Flip the power switch on the rear panel to the 'ON' position. The power indicator LED on the front panel will illuminate.
- To power off, flip the power switch to the 'OFF' position. It is recommended to power off your audio source first, then the monitors.
6.2. Башкаруу элементтерин тууралоо
- Киргизүү кыркуу: Use this knob to match the output level of your audio source. Start with a low setting and gradually increase until you achieve a comfortable listening level without distortion.
- High Frequency Adjustment: This switch allows you to boost or cut high frequencies to suit your listening environment or preference.
- Low Frequency Adjustment: This switch allows you to boost or cut low frequencies. This is particularly useful for compensating for room acoustics or if you are using a separate subwoofer.
- Room Compensation: These switches are designed to optimize the monitor's performance based on its placement in your room. Refer to the diagram on the rear panel for recommended settings when placing the monitor near walls or in corners.
7. Техникалык тейлөө
To ensure the longevity and optimal performance of your Behringer Truth B1031A monitor, follow these maintenance guidelines:
- Тазалоо: Use a soft, dry cloth to clean the exterior of the monitor. Avoid using abrasive cleaners, solvents, or waxes, as these can damage the finish.
- Чаң: Regularly dust the speaker cones and vents to prevent accumulation, which can affect sound quality and cooling.
- Курчап турган чөйрө: Мониторду туруктуу чөйрөдө, өтө жогорку температурадан, нымдуулуктан жана түз күн нурунан алыс иштетиңиз.
- Транспорт: When moving the monitor, ensure it is powered off and disconnected. Use appropriate packaging to protect it from physical damage.
8. Кыйынчылыктарды
If you encounter issues with your B1031A monitor, consult the following table for common problems and solutions:
| Көйгөй | Мүмкүн себеп | Чечим |
|---|---|---|
| Үн жок | No power; incorrect input connection; input trim too low; audio source issue. | Check power cable and switch; verify audio cable connections; increase input trim; check audio source output. |
| Бурмаланган үн | Input signal too high; damaged cable; faulty audio source. | Reduce input trim or output level from source; try a different audio cable; test with another audio source. |
| Ызы-чуу же ызы-чуу | Ground loop; interference from other electronics; unbalanced cable used for long runs. | Ensure proper grounding; move monitor away from other electronic devices; use balanced cables (XLR/TRS). |
| Uneven stereo image | Improper monitor placement; differing acoustic settings between monitors. | Adjust monitor placement for symmetry; ensure High/Low Frequency and Room Compensation settings are identical on both monitors. |
Эгер бул чечимдерди колдонгондон кийин маселе чечилбесе, Behringer кардарларды колдоо кызматына же квалификациялуу тейлөө техникине кайрылыңыз.
9. Техникалык шарттар
Technical specifications for the Behringer Truth B1031A Active Studio Monitor:
| Өзгөчөлүк | Спецификация |
|---|---|
| Модель аты | ЧЫНДЫК B1031A |
| Динамик түрү | Активдүү эки тараптуу шилтеме студиялык монитор |
| Вуфердин диаметри | 8 Inches (Kevlar cone) |
| Tweeter түрү | 1 дюймдук жибек күмбөз |
| Ampжашоочу түрү | А/Б классы |
| LF Ampкөтөргүч Output | 100 Ватт |
| HF Ampкөтөргүч Output | 50 Ватт |
| Жалпы өндүрүш Втtage | 150 Ватт |
| Байланыш технологиясы | XLR, 1/4" TRS, RCA |
| Power Source | Электр зымдары (110 вольт) |
| Продукциянын өлчөмдөрү (D x W x Y) | 13.3" x 10.28" x 15.47" |
| Элемент Салмагы | 24.91 фунт |
| Түс | Кара |
| Материал | Металл |
10. Кепилдик жана колдоо
Behringer products are designed and manufactured to high-quality standards. For detailed warranty information, including terms and conditions, please refer to the warranty card included with your product or visit the official Behringer website. For technical support, service, or spare parts, please contact your local Behringer dealer or authorized service center. You can also find support resources and contact information on the Берингер дүкөнү.


