1. Киришүү
This manual provides comprehensive instructions for the setup, operation, maintenance, and troubleshooting of your Thomson WHP3001BK UHF Wireless Headphones. Please read this manual thoroughly before using the product to ensure proper function and longevity.
2. Коопсуздук нускамалары
- Do not expose the headphones or transmitter to rain, moisture, or extreme temperatures.
- Аппаратты түшүрүүдөн же катуу таасирлерден сактаныңыз.
- Агрегатты ажыратууга же өзгөртүүгө аракет кылбаңыз. Бардык тейлөөлөрдү квалификациялуу кызматкерлерге тапшырыңыз.
- Keep the product away from medical devices that may be affected by radio waves.
- Батареяларды жергиликтүү эрежелерге ылайык таштаңыз.
- Үндүн катуу деңгээлинде узакка созулган угуу угуунун бузулушуна алып келиши мүмкүн.
3. Пакеттин мазмуну
Пакетте бардык буюмдар бар экенин текшериңиз:
- Thomson WHP3001BK Wireless Headphones (1 unit)
- UHF Transmitter/Charging Base (1 unit)
- Audio Connection Cable (3.5mm jack to RCA)
- Кубаттуу адаптер
- Rechargeable AAA NiMH Batteries (2 units, pre-installed or separate)
- Колдонуучунун Колдонмосу (бул документ)
4. Продукт бүтүп калдыview
Familiarize yourself with the components of your wireless headphone system.
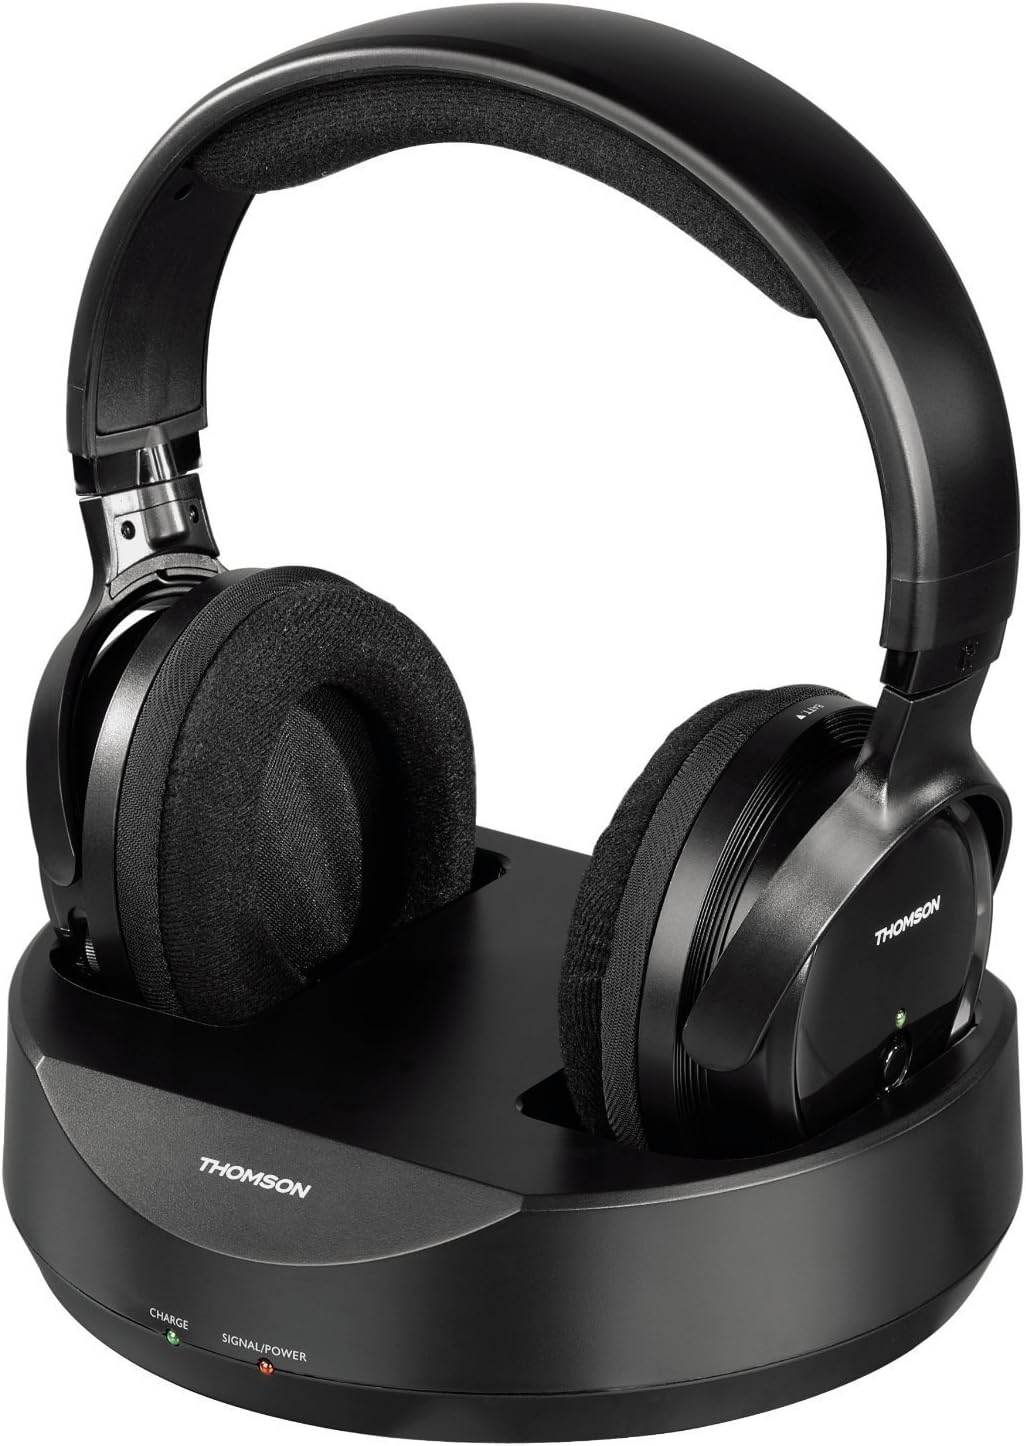
1-сүрөт: Thomson WHP3001BK Wireless Headphones resting on their charging base. The headphones feature large, padded earcups and an adjustable headband. The base unit includes indicator lights for charge and power status.

2-сүрөт: Side view of the Thomson WHP3001BK Wireless Headphones, highlighting the over-ear design and the power button with LED indicator on the right earcup.

3-сүрөт: Rear panel of the charging base, showing the DC IN port, Audio IN (RCA L/R) ports, and a channel selection switch.

4-сүрөт: Included audio connection cable, featuring a 3.5mm stereo jack on one end and red/white RCA plugs on the other, for connecting the transmitter to an audio source.
5. Орнотуу
5.1. Наушниктерди заряддоо
- Connect the power adapter to the DC IN port on the rear of the charging base (Figure 3).
- Plug the power adapter into a wall outlet. The "SIGNAL/POWER" LED on the base should illuminate.
- Place the headphones onto the charging base, ensuring the charging contacts align. The "CHARGE" LED on the base should illuminate, indicating that the headphones are charging.
- Allow approximately 8-10 hours for the initial full charge. Subsequent charges may take less time.
Эскертүү: The headphones use 2 AAA NiMH rechargeable batteries. Ensure these are correctly inserted if not pre-installed.
5.2. Connecting the Transmitter to an Audio Source
The transmitter connects to your audio source (e.g., TV, stereo system, computer) via a 3.5mm jack.
- Identify the audio output port on your source device. This is typically a 3.5mm headphone jack or RCA audio output ports (red and white).
- Using the supplied audio cable (Figure 4), connect the 3.5mm jack end to your source device's headphone output.
- Connect the red and white RCA plugs to the "AUDIO IN" ports on the rear of the charging base (Figure 3).
- If your source device only has RCA outputs, use the RCA ends of the cable for both connections. If your source device has a 3.5mm output, use the 3.5mm end for the source and the RCA ends for the base.
- Ensure the audio source is powered on and playing audio. The "SIGNAL/POWER" LED on the base should turn green when an audio signal is detected.
Маанилүү: When connecting to a TV's headphone jack, the TV's internal speakers may be muted. To allow others to hear the TV, consider using an alternative audio output (e.g., RCA audio out, optical out with a converter) if available.
5.3. Initial Pairing and Tuning
- Ensure the transmitter is powered on and receiving an audio signal (green "SIGNAL/POWER" LED).
- Turn on the headphones by pressing the power button on the right earcup. The LED on the headphones will illuminate.
- The headphones feature auto-tuning. They will automatically search for and connect to the strongest signal from the transmitter.
- If you experience interference, you may need to adjust the channel switch on the rear of the transmitter (Figure 3) and allow the headphones to re-tune.
6. Операция
6.1. Күйгүзүү / Өчүрүү
- To power on the headphones, press and hold the power button on the right earcup until the LED illuminates.
- To power off the headphones, press and hold the power button until the LED turns off.
- The transmitter powers on automatically when connected to power and an audio signal is detected. It will enter standby if no signal is present for a period.
6.2. Үндү башкаруу
- Adjust the volume using the volume control dial located on the headphones.
- For optimal sound quality and to minimize static or hiss, it is recommended to set the volume of your audio source (TV, stereo) to a high level and then adjust the headphone volume to your desired listening level.
6.3. Диапазон
The Thomson WHP3001BK headphones offer a wireless range of up to 100 meters in open areas and approximately 20-30 meters indoors, depending on environmental factors and obstacles.
7. Техникалык тейлөө
7.1. Тазалоо
- Кулакчындарды жана өткөргүчтү жумшак, кургак чүпүрөк менен сүртүңүз.
- Суюк тазалагычтарды же абразивдүү материалдарды колдонбоңуз.
7.2. Батареяга кам көрүү
- Use only the specified NiMH rechargeable AAA batteries.
- If the headphones will not be used for an extended period, remove the batteries to prevent leakage.
- Батареялардын иштеши бир кыйла начарлаганда, аларды алмаштырыңыз.
8. Кыйынчылыктарды
| Көйгөй | Мүмкүн себеп | Чечим |
|---|---|---|
| Наушниктен үн чыкпайт. |
|
|
| Статикалык же тоскоолдук. |
|
|
| Наушник заряддалбай жатат. |
|
|
9. Техникалык шарттар
| Өзгөчөлүк | Деталь |
|---|---|
| Модел | WHP3001BK |
| Байланыш технологиясы | Wireless (Radio-frequency) |
| Наушник түрү | Over-Ear (Circum-Auriculaire) |
| Зымсыз диапазон | Up to 100m (open area), 20-30m (indoors) |
| Audio Input (Transmitter) | 3.5mm Jack / RCA |
| Өзгөчөлүктөр | Volume control, Auto-tuning |
| Батареялар | 2 x AAA NiMH кайра заряддалуучу (кошулган) |
| Материал | Пластик |
| Түс | Кара |
| Элемент Салмагы | 960 Grams (including packaging/accessories) |
| Өндүрүүчү | Хама |
10. Кепилдик жана колдоо
For warranty information, please refer to the documentation provided at the time of purchase or contact your retailer. For technical support, please visit the official Thomson webсайтка же кардарларды тейлөө бөлүмүнө кайрылыңыз.
Сураныч, кепилдик дооматтар үчүн сатып алуу далилиңизди сактап коюңуз.


