Introduction
This manual provides comprehensive instructions for the setup, operation, and maintenance of your AT&T 1040 Corded Four-Line Expandable Telephone. This device is designed for small business environments, offering multi-line capabilities, conferencing, and intercom features to enhance communication efficiency.
Негизги өзгөчөлүктөр төмөнкүлөрдү камтыйт:
- Four-line operation for managing multiple calls simultaneously.
- Integrated speakerphone for hands-free communication.
- 3-party conferencing capability.
- 32-number speed dial for quick access to frequently called numbers.
- Intercom functionality for internal communication.
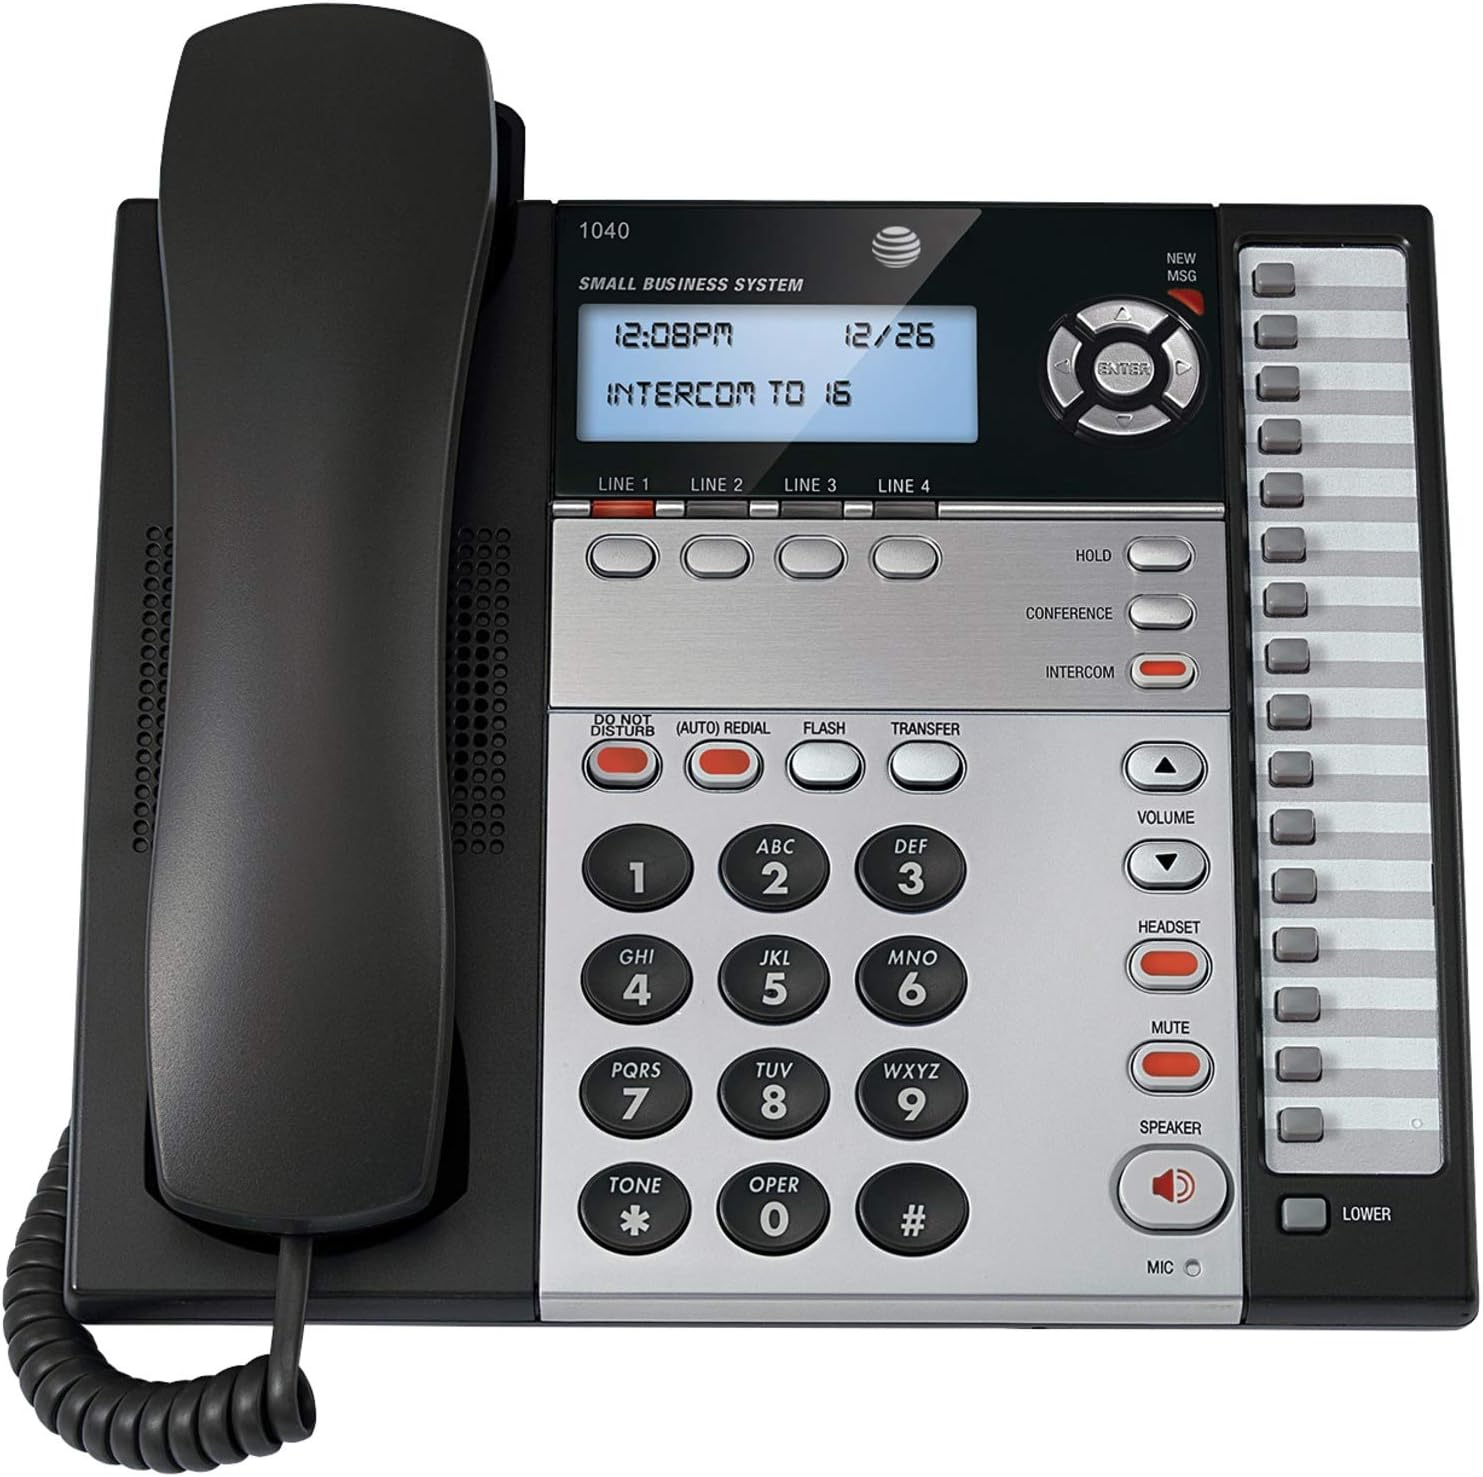
1-сүрөт: The AT&T 1040 Corded Four-Line Expandable Telephone. This image displays the main unit with its handset resting on the cradle, the digital display showing time and intercom status, the four line buttons, and the full keypad with function buttons like HOLD, CONFERENCE, INTERCOM, VOLUME, HEADSET, MUTE, and SPEAKER.
Жайгашуу
1. Пакеттен чыгаруу жана компоненттерди текшерүү
Орнотууну баштоодон мурун, бардык компоненттер бар экенин текшериңиз:
- AT&T 1040 Base Unit
- Телефон
- Уюлдук аппараттын шнуры
- Line Cords (up to 4, depending on configuration)
- AC кубат адаптери
- 9V Battery (for backup, typically included or purchased separately)
2. Телефонду туташтыруу
- Телефонду туташтыруу: Plug one end of the coiled handset cord into the handset and the other end into the jack labeled сүйл on the side of the telephone base.
- Connect the Line Cords: For each telephone line you wish to use, plug one end of a line cord into the jack labeled 1-САП, 2-САП, 3-САП, же 4-САП on the back of the telephone base. Plug the other end of each line cord into a modular wall jack.
- Install the 9V Battery: Open the battery compartment on the bottom of the telephone base. Insert a 9V battery, observing the correct polarity (+/-). This battery provides backup power for settings during power outages. Close the compartment.
- Connect the AC Power Adapter: Plug the small end of the AC power adapter into the КҮЧ jack on the back of the telephone base. Plug the larger end into a standard electrical outlet.
3. Initial Configuration (Date and Time)
Биринчи күйгүзүлгөндө же кубаттан кийинtage (if battery backup is not present or depleted), you may need to set the date and time. Refer to the display and use the navigation buttons (up/down arrows and ENTER) to adjust the settings. Press ENTER ар бир жөндөөнү ырастоо үчүн.
Иштөө нускамалары
1. Негизги чалуу функциялары
- Чакыруу:
- Телефонду көтөрүңүз же басыңыз СПИКЕР баскычы.
- Select an available line by pressing one of the LINE 1-4 баскычтар.
- Каалаган телефон номерин териңиз.
- Чалууга жооп берүү:
- Телефон шыңгыраганда, телефонду көтөрүңүз же басыңыз СПИКЕР button. The corresponding line button will flash.
- Чалууну аяктоо:
- Телефонду кайра бешикке салыңыз же басыңыз СПИКЕР динамик колдонулса, кайра баскычын басыңыз.
2. Multi-Line Operation
- Selecting a Line: Каалаганды басыңыз LINE 1-4 button to select an available line for making or receiving calls.
- Switching Between Lines: During an active call on one line, press another LINE button to switch to that line or answer an incoming call on it. The first call will automatically be placed on hold.
3. Динамик
Динамикти колдонуу үчүн, басыңыз СПИКЕР button. The indicator light will illuminate. You can then dial or speak hands-free. Press the СПИКЕР button again to end the call or switch to the handset by lifting it.
4. Домофон
The intercom feature allows internal communication between connected AT&T 1040 units. To initiate an intercom call:
- басыңыз ИНТЕРКОМ баскычы.
- Dial the extension number of the desired internal unit (e.g., "16" as shown on the display).
- The other unit will ring, and you can speak when answered.
5. Hold Function
Активдүү чалууну күтүүгө коюу үчүн, басыңыз БЕРҮҮ button. The line indicator light will flash slowly. To retrieve the call, press the flashing LINE баскычы.
6. Конференция чалуу
To establish a 3-party conference call:
- Establish a call on 1-САП.
- басыңыз БЕРҮҮ button to place the first call on hold.
- Select an available line (e.g., 2-САП) and dial the second party.
- Экинчи тарап жооп бергенден кийин, басыңыз КОНФЕРЕНЦИЯ button. All three parties will now be connected.
7. Тез терүү
The AT&T 1040 supports 32-number speed dial entries.
- Тез терүүнү программалоо: Consult the full manual for detailed programming steps, typically involving a ПРОГРАММА or ДҮКӨН button followed by a memory location and the number.
- Тез терүүнү колдонуу: Телефонду көтөрүңүз же басыңыз СПИКЕР, select a line, then press the speed dial memory location button.
8. Үндү башкаруу
колдонуу VOLUME өйдө (▲) жана ылдый (▼) buttons to adjust the listening volume during a call (handset or speakerphone). Ringer volume can typically be adjusted via a switch or menu setting on the base unit.
9. Үнсүз
Чалуу учурунда, басыңыз БАСУУ Микрофонуңузду убактылуу өчүрүү үчүн баскычын басыңыз. Экинчи тарап сизди укпайт, бирок сиз аларды дагы эле уга аласыз. Басыңыз БАСУУ кайрадан сүйлөөнү улантуу үчүн.
10. Тынчымды алба
басыңыз ТЫНЧ АЛБАЙ button to silence incoming calls. The indicator light will illuminate. Press it again to deactivate.
11. Кайра терүү
басыңыз (AUTO) REDIAL button to automatically redial the last number called.
12. Flash / Transfer
The FLASH button is used for accessing network features such as call waiting or transferring calls, depending on your telephone service provider. The Трансфер button is typically used in conjunction with intercom or other system features to transfer an external call to another internal extension.
13. Headset Operation
To use a headset (not included), plug it into the КУЛАКЧА jack on the side of the telephone base. Press the КУЛАКЧА button to activate headset mode. The indicator light will illuminate. Press it again to deactivate or switch to handset/speakerphone.
Техникалык тейлөө
1. Тазалоо
Wipe the telephone's exterior with a soft, slightly damp cloth. Do not use cleaning sprays or abrasive cleaners, as these can damage the finish or internal components. Ensure the phone is unplugged from power before cleaning.
2. Батареяны алмаштыруу
The 9V battery provides backup for settings. If the display shows incorrect time/date after a power outage, the battery may need replacement. Open the battery compartment on the bottom of the unit, remove the old battery, and insert a new 9V alkaline battery, observing polarity. Dispose of old batteries responsibly.
3. Жалпы кам көрүү
Avoid exposing the telephone to extreme temperatures, direct sunlight, or moisture. Do not drop the unit or subject it to strong impacts. Keep it away from sources of electrical noise, such as motors or fluorescent lighting fixtures.
Проблемаларды чечүү
| Көйгөй | Чечим |
|---|---|
| Терүү үнү жок. |
|
| Чалууларды кабыл алуу же жасоо мүмкүн эмес. |
|
| Дисплей бош же окулбайт. |
|
| Домофон иштебей жатат. |
|
Техникалык шарттар
- Продукциянын өлчөмдөрү: 10.2 x 11.5 x 4.5 дюйм
- Элемент Салмагы: 0.16 унция (4.54 г)
- Телефон түрү: жоон
- Кубат булагы: Электр зымдары
- Терүүчү түрү: Жалгыз баскычтоп
- Жооп берүү системасынын түрү: Санарип
- Конференция чалуу мүмкүнчүлүгү: 3-жол
- Көп линия операциясы: Multi-Line Operation (Four-Line)
- Speed Dial Capacity: 32 саны
- Домофон: Ооба
Кепилдик жана колдоо
For warranty information and technical support, please refer to the official AT&T product webсайтына кириңиз же AT&T кардарларды тейлөө кызматына кайрылыңыз. Кепилдик талаптары үчүн сатып алуунун далили катары сатып алуу дүмүрчөгүңүздү сактап коюңуз.
Online resources may include FAQs, additional troubleshooting guides, and contact information for support.