1. Киришүү
This manual provides comprehensive instructions for the installation, operation, and maintenance of your LUX Pro PSD010BF Digital Non-Programmable Thermostat. This battery-powered thermostat is designed for heat-only systems with a fan, offering precise digital temperature control and a clear, easy-to-read display.

Сүрөт 1: Алдыңкы view of the LUX Pro PSD010BF Digital Non-Programmable Thermostat.

Image 2: The PSD010BF thermostat seamlessly integrated into a home environment.
2. Коопсуздук маалыматы
- Always turn off power to the heating system at the main fuse or circuit breaker panel before installing or servicing the thermostat.
- Орнотуудан жана иштетүүдөн мурун бардык нускамаларды кылдат окуп чыгыңыз.
- Бардык зымдарды туташтыруу коопсуз жана жергиликтүү электр коддоруна ылайык экенин текшериңиз.
- Бул термостат төмөнкү көлөм үчүн иштелип чыкканtage systems only. Do not use with line voltage (120/240V) systems.
- Батареяларды балдар жетпеген жерде сактаңыз.
3. Өзгөчөлүктөрү
The LUX Pro PSD010BF thermostat offers a range of features designed for user convenience and efficient heating control:
- Санариптик тактык: Provides precise temperature control for reliable performance.
- Желдетүүчү которгуч: Includes a fan switch for convenient control (AUTO/ON).
- Батарея менен иштейт: Operates solely on battery power (2 AA batteries included).
- Large LED Illuminated Display: Easy-to-read digital display with backlight for visibility in various lighting conditions.
- Attractive Slim Design: Modern aesthetic suitable for any room.
- Quick & Easy Temperature Change Buttons: Intuitive up/down buttons for setting desired temperature.
- F/C Selectable Temperature Display: Option to display temperature in Fahrenheit or Celsius.
- Fixed 5 Minute Minimum Run / Off Time: Protects heating equipment.
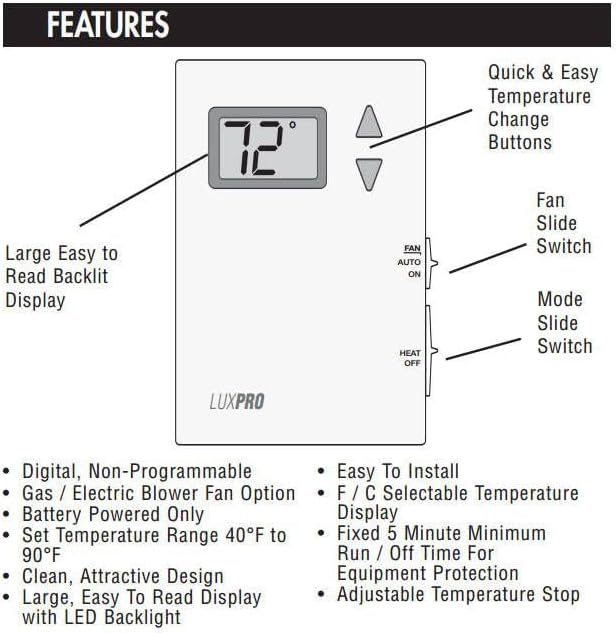
Image 3: Detailed diagram highlighting the key features and controls of the thermostat.
4. Шайкештик
The LUX Pro PSD010BF thermostat is compatible with the following systems:
- Most 24-volt, single-stage heating systems, with or without a blower fan.
- Millivolt systems (e.g., gas fireplaces, floor furnaces).
This thermostat мүмкүн эмес be used to control:
- Муздатуу системалары.
- Heat pumps.
- 3-wire zone valves.
- 120/240 volt (line voltagд) системалар.
For other system types, please consult your dealer for alternative LUXPRO thermostats.

Image 4: Official compatibility guidelines for the thermostat.
5. Орнотуу
5.1 Алдын ала орнотуу текшерүү тизмеси
- Ensure the thermostat is compatible with your heating system (refer to Section 4).
- Gather necessary tools: Phillips screwdriver, wire strippers (if needed), drill (if new mounting holes are required).
- Turn off power to the heating system at the circuit breaker.
5.2 Эски термостатыңызды алып салуу
- Жылытуу системасына электр энергиясын өчүрүү.
- Эски термостатыңыздын капкагын алып салыңыз.
- Note the wire connections. It is recommended to take a picture or label each wire with the terminal designation (e.g., R, W, G).
- Зымдарды ажыратып, эски термостаттын негизин дубалдан чыгарыңыз.
5.3 Wiring Your New Thermostat
The PSD010BF is designed for simple 2-wire or 4-wire heat-only systems. Refer to the diagram below for typical wiring configurations.

Image 5: Wiring diagram for heating-only systems, including those with a fan. Note the jumper between RC and RH.
- Connect the wires from your heating system to the corresponding terminals on the new thermostat base.
- For heating-only systems, ensure the jumper between RC жана RH terminals is installed.
- W1 terminal: Connect to the heating control wire.
- G terminal: Connect to the blower fan control wire (if applicable).
- Бардык байланыштар бекем жана коопсуз экендигин текшериңиз.
5.4 Термостатты орнотуу
- Secure the thermostat base to the wall using the provided screws. Avoid overtightening.
- Insert two fresh AA batteries into the battery compartment. Ensure correct polarity.
- Carefully align the thermostat front cover with the base and snap it into place.
6. Операция
6.1 Күйгүзүү жана баштапкы орнотуу
- After installation and battery insertion, restore power to your heating system at the circuit breaker.
- The thermostat display should illuminate, showing the current room temperature.
- Use the F/C selectable temperature display option if you wish to change between Fahrenheit and Celsius (refer to the thermostat's internal settings or specific instructions for this model if available, otherwise assume it's a simple switch).
6.2 Температураны коюу
- колдонуу ▲ (Өйдө) жана ▼ (Down) buttons on the front of the thermostat to adjust the desired temperature.
- The display will show the set temperature briefly, then revert to the current room temperature.
- The heating system will activate when the room temperature falls below your set temperature.
6.3 Fan Control
The thermostat features a fan slide switch with two positions:
- АВТО: The fan will run only when the heating system is actively heating. This is the recommended setting for normal operation.
- КҮЙҮК: The fan will run continuously, regardless of whether the heating system is active.
6.4 Система режими
The thermostat features a mode slide switch with two positions:
- ЖЫЛУУ: Термостат белгиленген температураны кармап туруу үчүн жылытуу системасын көзөмөлдөйт.
- ӨЧҮК: The heating system is turned off. The thermostat will not activate the heater.
7. Техникалык тейлөө
7.1 Батареяны алмаштыруу
The thermostat is powered by two AA batteries. Replace them annually or when the low battery indicator appears on the display.
- Gently pull the thermostat cover from the base to access the battery compartment.
- Эски батарейкаларды алып чыгып, жоопкерчиликтүү түрдө жок кылыңыз.
- Туура полярдуулукту (+/-) камсыз кылып, эки жаңы AA щелочтуу батарейканы салыңыз.
- Snap the thermostat cover back onto the base.
Эскертүү: Replacing batteries typically does not affect your temperature settings.
7.2 Тазалоо
Термостаттын сыртын жумшак, damp кездеме. Абразивдүү тазалагычтарды же эриткичтерди колдонбоңуз.
8. Кыйынчылыктарды
| Көйгөй | Мүмкүн себеп | Чечим |
|---|---|---|
| Дисплей жок / Бош экран | Өлүк же туура эмес орнотулган батарейкалар. | Батареяларды жаңы AA щелочтуу батареялары менен алмаштырыңыз, полярдуулукту туура сактаңыз. |
| Heating System Not Responding |
|
|
| Температураны туура эмес окуу | Thermostat located near a heat source, draft, or direct sunlight. | Relocate the thermostat to a more central location away from direct influences. Ensure proper air circulation around the unit. |
| Fan Runs Continuously | Желдеткичтин которгучу КҮЙҮК абалында. | Set the fan switch to AUTO for automatic operation with heating cycles. |
9. Техникалык шарттар
- Модел: PSD010BF
- Кубат булагы: 2 АА батарейкалар (кошулган)
- Тtage: 24 Volts (low voltage)
- Башкаруу түрү: Push Button, Slide Switch
- Дисплей түрү: Digital, LED Backlit
- Продукциянын өлчөмдөрү: 1.25"D x 3.5"W x 5.25"H
- Элемент Салмагы: 1.92 унция
- Материал: Пластик
- Түсү: Ак
- Монтаж түрү: Дубалга орнотуу
- Атайын колдонуулар: Heating only systems
10. Кепилдик жана колдоо
For warranty information or technical support, please refer to the official LUX website or contact LUX customer service directly. Keep your purchase receipt as proof of purchase.
LUX Customer Support: www.luxproproducts.com/support


