1. Киришүү
This manual provides essential instructions for the installation, operation, maintenance, and troubleshooting of your Juniper EX2200-C-12T-2G Layer 3 Switch. Please read this manual thoroughly before using the device to ensure proper functionality and safety. The Juniper EX2200-C-12T-2G is a compact, fanless, and power-efficient platform designed for low-density micro branch deployments, commercial access, or enterprise workgroup environments.
2. Продукт бүтүп калдыview
2.1. Негизги өзгөчөлүктөрү
- Silent and power-efficient operation.
- Compact and fanless form factor.
- Layer 3 switching capabilities.
- 12 x 1000Base-T RJ-45 ports.
- 2 x SFP ports.
- Runs on Junos Operating System.
2.2. Пакеттин мазмуну
Пакетте бардык буюмдар бар экенин текшериңиз:
- Juniper EX2200-C-12T-2G Layer 3 Switch
- Электр кабели
- 12 x 1000Base-T RJ-45 cables (Ethernet cables)
- 2 x SFP cables
2.3. Физикалык мүнөздөмө
The Juniper EX2200-C-12T-2G switch features a robust design with various ports and indicators on its front panel.
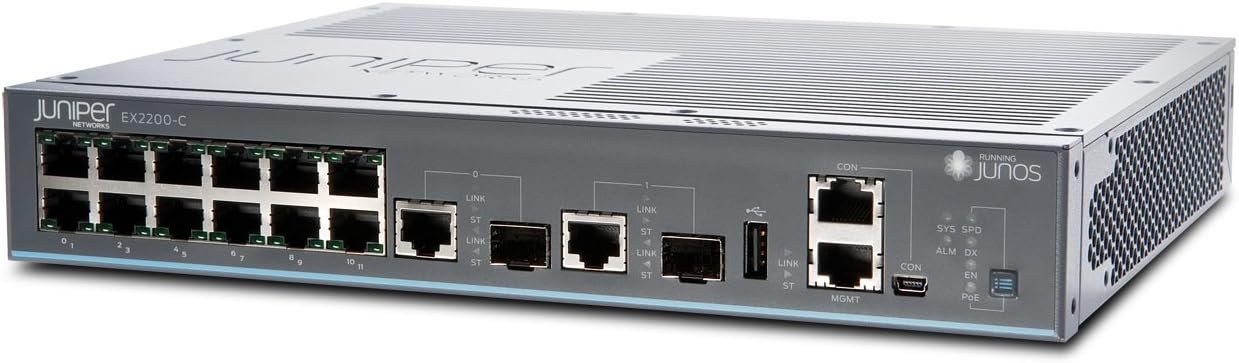
Сүрөт 1: Алдыңкы view of the Juniper EX2200-C-12T-2G Layer 3 Switch. This image displays the front panel of the switch, highlighting the 12 RJ-45 Ethernet ports, two SFP uplink ports, console ports (RJ45 and Mini-USB), and various status LEDs including SYS, SPD, ALM, DX, CON, EN, and PoE indicators.

Figure 2: Alternative front view of the Juniper EX2200-C-12T-2G Layer 3 Switch. This perspective offers a clearer view of the port numbering (0-11 for RJ-45 ports) and the labeling of the SFP ports and management interfaces.
3. Орнотуу
3.1. Сайтты даярдоо
- Курчап турган чөйрө: Place the switch in a clean, dry, and well-ventilated area. Ensure the ambient temperature does not exceed 40 degrees Celsius.
- Монтаждоо: The compact design allows for desktop placement or wall mounting (mounting hardware not included).
- Кубат булагы: Connect the switch to a reliable power outlet using the provided power cable. The switch operates on 230 Volts.
3.2. Которгучту туташтыруу
- Кубат туташуу: Connect the power cable to the switch's power inlet and then to an appropriate electrical outlet.
- Тармактык байланыштар:
- RJ-45 порттору: Use the provided 1000Base-T RJ-45 cables to connect network devices (computers, servers, other switches) to the 12 Ethernet ports (labeled 0-11) on the front panel.
- SFP порттору: Insert SFP transceivers (if required) into the two SFP ports and connect fiber optic cables for uplink or high-speed connections.
- Console Connection (Initial Configuration): For initial configuration and management, connect a serial cable from your management workstation to the CON (console) port on the switch. Alternatively, a Mini-USB console port is also available.
4. Иштөө нускамалары
4.1. Күйгүзүү
Once the power cable is connected, the switch will automatically power on. The boot process for the Junos OS may take several minutes.
4.2. LED көрсөткүчтөрү
Monitor the front panel LEDs for operational status:
- SYS (Система): Indicates the overall system status. Typically solid green for normal operation.
- SPD (Ылдамдык): Indicates the link speed of the connected port.
- ALM (Сигнализация): Indicates an alarm condition. Refer to the Junos OS documentation for specific alarm codes and troubleshooting.
- DX (Дуплекс): Indicates the duplex mode of the connected port.
- CON (Console): Indicates activity on the console port.
- EN (Иштетүү): Статус көрсөткүчү.
- PoE (Power over Ethernet): If applicable, indicates PoE status for ports. (Note: This model does not explicitly list PoE as a feature, but the LED is present).
4.3. Конфигурация
The Juniper EX2200-C-12T-2G switch is managed using the Junos Operating System via a Command Line Interface (CLI). Access the CLI through the console port or via SSH after initial network configuration. Refer to the official Juniper Networks Junos OS documentation for detailed configuration procedures, including VLAN setup, routing protocols, and security settings.
5. Техникалык тейлөө
5.1. Жалпы кам көрүү
- Keep the switch clean and free from dust. Use a soft, dry cloth for cleaning.
- Ensure adequate airflow around the device, even though it is fanless, to prevent heat buildup.
- Коммутаторду өтө жогорку температурага, нымдуулукка же түз күн нуруна дуушар кылбаңыз.
5.2. Микропрограмманы жаңыртуу
Juniper Networks колдоосун мезгил-мезгили менен текшерип туруңуз website for available Junos OS updates. Applying updates can improve performance, add new features, and address security vulnerabilities. Follow the instructions provided by Juniper Networks for safe firmware upgrade procedures.
6. Кыйынчылыктарды
6.1. Power Issues
- Кубат жок: Verify the power cable is securely connected to both the switch and the power outlet. Check the power outlet with another device.
6.2. Байланыш көйгөйлөрү
- Шилтеме жок: Check the Ethernet or fiber optic cables for secure connections and damage. Verify the connected device is powered on and functioning correctly. Observe the port's Link/Activity LED.
- Жай туташуу: Ensure cables are appropriate for the desired speed (e.g., Cat5e/6 for Gigabit Ethernet). Check for duplex mismatches or network congestion.
6.3. Alarm LED On
If the ALM LED is illuminated, it indicates a system alarm. This could be due to various reasons such as hardware failure, environmental issues, or configuration errors. Access the switch's CLI via the console port to view detailed alarm messages and logs. Consult the Junos OS documentation or Juniper Networks support for specific alarm interpretations and resolution steps.
7. Техникалык шарттар
| Өзгөчөлүк | Спецификация |
|---|---|
| Модель номери | EX2200-C-12T-2G |
| Бренд | Juniper Networks |
| Элемент Салмагы | 4.41 фунт |
| Продукциянын өлчөмдөрү (LxWxH) | 9 x 11 x 2 дюйм |
| Тtage | 230 вольт |
| Иштин материалы | Пластик |
| Жогорку температура рейтинги | 40 градус |
| Interface Type | RJ45, SFP |
| Маалыматтарды өткөрүү ылдамдыгы | 1000 Мегабит секундасына |
| Порттардын саны | 12 (RJ-45) + 2 (SFP) |
| RAM | 512 MB |
| Flash эстутум өлчөмү | 1024 MB |
| Операция системасы | Жунос |
8. Кепилдик жана колдоо
8.1. Кепилдик маалыматы
For detailed warranty information regarding your Juniper EX2200-C-12T-2G switch, please refer to the warranty card included with your product or visit the official Juniper Networks webсайт. Кепилдиктин шарттары жана шарттары аймакка жана сатып алуу күнүнө жараша өзгөрүшү мүмкүн.
8.2. Техникалык колдоо
If you encounter issues that cannot be resolved using the troubleshooting steps in this manual, or require advanced assistance, please contact Juniper Networks technical support. Support resources, including documentation, knowledge bases, and contact information, are available on the official Juniper Networks support portal.


