1. Киришүү
This manual provides detailed instructions for the installation, operation, and maintenance of your Soundstream VL-11A Single DIN Digital Media Receiver. Please read this manual thoroughly before using the product to ensure proper operation and to prevent damage.
The Soundstream VL-11A is designed to provide high-quality audio playback from various digital sources, including USB drives, SD cards, and auxiliary input devices. It features a compact single DIN chassis for easy integration into most vehicle dashboards.
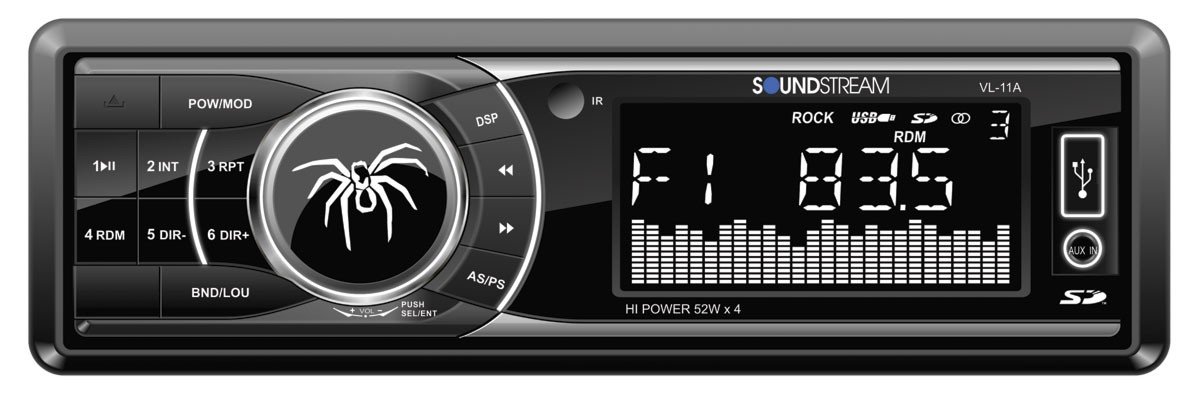
1.1-сүрөт: Фронт view of the Soundstream VL-11A Digital Media Receiver. This image displays the main unit with its control buttons and display panel.
2. Коопсуздук маалыматы
Жабдууга зыян келтирбөө же жаракат алуунун алдын алуу үчүн төмөнкү коопсуздук чараларын сактаңыз:
- Агрегатты айдоодон алаксыта тургандай иштетпеңиз. Ар дайым жол коопсуздугун биринчи орунга коюу.
- Ensure proper wiring connections. Incorrect wiring can cause fire or damage to the vehicle's electrical system.
- Агрегатты нымдуулукка же экстремалдык температурага дуушар кылуудан алыс болуңуз.
- Агрегатты ажыратууга же өзгөртүүгө аракет кылбаңыз. Бардык тейлөөлөрдү квалификациялуу кызматкерлерге тапшырыңыз.
- Үндүн катуулугун сырттагы жол кыймылынын үндөрүн угууга мүмкүндүк берген деңгээлде кармаңыз.
3. Пакеттин мазмуну
Пакетте бардык буюмдар бар экенин текшериңиз:
- Soundstream VL-11A Digital Media Receiver
- Электр зымдары
- Монтаждоочу жабдык (буроолор, монтаждык жең)
- Алыстан башкаруу
- Колдонуучунун Колдонмосу (бул документ)
4. Продукт бүтүп калдыview
4.1 Алдыңкы панелдин башкаруу элементтери
The front panel provides access to primary functions and media inputs.
4.1-сүрөт: Illustrative diagram of the VL-11A front panel. This image highlights the display, volume knob, mode button, track controls, USB port, SD card slot, and auxiliary input.
- Кубат / режим баскычы: Press to turn on/off. Short press to cycle through audio sources (Radio, USB, SD, AUX).
- Үн баскычы: Rotate to adjust volume. Press to access audio settings (Bass, Treble, Balance, Fader, EQ).
- Дисплей: Shows current status, track information, and settings.
- USB порт: Медиа ойнотуу үчүн USB сактагыч түзмөктөрдү туташтырыңыз.
- SD карта уячасы: Медиа ойнотуу үчүн SD карталарын салыңыз.
- AUX киргизүү: Тышкы аудио түзмөктөрдү 3.5 мм уяча аркылуу туташтырыңыз.
- Track/Tune Buttons: Тректерди башкаруу же радио жыштыктарын тууралоо.
4.2 Арткы байланыштар
The rear of the unit contains the main wiring harness and preamp чыгуулар.
4.2-сүрөт: Illustrative diagram of the VL-11A rear connections. This image shows the main wiring harness connector and the RCA preamp чыгуулар.
- Main Wiring Harness: Connects to vehicle power, ground, accessory, and speaker wires.
- RCA Preamp Чыгуулары: Two sets of 2V outputs for connecting external ampаман калгандар.
5. Орнотуу
5.1 Орнотуу
Professional installation is recommended. If installing yourself, ensure the vehicle's battery is disconnected before beginning.
- Монтаждоо: Insert the metal mounting sleeve into the vehicle's dashboard opening. Bend the tabs to secure it.
- Зымдар: Connect the supplied wiring harness to the vehicle's wiring. Match wire colors and functions carefully.
- Динамик байланыштары: Connect the speaker wires from the harness to your vehicle's speakers. Ensure correct polarity.
- Кубат туташуулары: Connect the yellow wire (constant 12V), red wire (switched 12V), and black wire (ground) to the appropriate vehicle circuits.
- Антенна: Унаанын антенна кабелин блоктун антенна киришине туташтырыңыз.
- Коопсуздук бирдиги: Slide the VL-11A into the mounting sleeve until it clicks into place.
Warning: Incorrect wiring can cause severe damage to the unit or vehicle. Consult a professional if unsure.
5.2 Баштапкы кубаттуулук
After installation, reconnect the vehicle's battery. Press the power button on the unit or remote control to turn it on. The display should illuminate.
6. Иштөө нускамалары
6.1 Негизги башкаруу каражаттары
- Күйгүзүү/өчүрүү: басыңыз PWR/MODE баскычы.
- Үндү тууралоо: айлантыңыз VOLUME баскыч.
- Булак тандоо: баскычын кыска басыңыз PWR/MODE button to cycle through Radio, USB, SD, and AUX.
6.2 Аудио орнотуулары
басыңыз VOLUME knob to enter the audio menu. Rotate the knob to navigate options and press to select.
- БАС/ТРЕБЛЕ: Бас жана жогорку деңгээлдерди тууралаңыз.
- БАЛАНС: Сол жана оң динамиктердин ортосундагы аудио балансын тууралаңыз.
- FADER: Adjust audio balance between front and rear speakers.
- EQ (эквалайзер): Select from preset EQ curves (e.g., Pop, Rock, Classic) or a custom setting.
6.3 USB/SD ойнотуу
Insert a USB drive into the USB port or an SD card into the SD card slot. The unit will automatically switch to the respective source and begin playback.
- Ойнотуу/тындыруу: басыңыз ОЙНОО/ТЫНЫТТЫРУ баскычы.
- Кийинки / Мурунку трек: басыңыз КИЙИНКИ/ӨРТҮ баскычтар.
- Папка навигациясы: колдонуу ПАПКАНЫ ӨЙДӨ/ТӨМӨН buttons (if available on remote or unit).
6.4 Көмөкчү киргизүү (AUX)
Connect an external audio device (e.g., smartphone, MP3 player) to the 3.5mm AUX input on the front panel using an audio cable. Select AUX as the source using the РЕЖИМ баскычы.
6.5 Radio Tuner
Select Radio as the source. The unit supports AM/FM bands.
- Топтун тандоосу: басыңыз БАНД button to switch between FM1, FM2, FM3, and AM.
- Кол менен жөндөө: баскычын кыска басыңыз ЖОГОРУ/ТӨМӨНДӨТҮҮ buttons to adjust frequency step-by-step.
- Күүлөөнү издөө: көпкө басыңыз ЖОГОРУ/ТӨМӨНДӨТҮҮ кийинки күчтүү станцияны автоматтык түрдө издөө үчүн баскычтар.
- Алдын ала коюлган станциялар: Press and hold a numbered preset button (1-6) to save the current station. Short press to recall a saved station.
6.6 Алыстан башкаруу
The included remote control provides convenient access to most functions. Point the remote control towards the unit's front panel sensor.
6.1-сүрөт: Illustrative diagram of the VL-11A remote control. This image shows the various buttons for power, mode, volume, track control, and numeric presets.
7. Техникалык тейлөө
7.1 Агрегатты тазалоо
- Алдыңкы панелди жана дисплейди сүртүү үчүн жумшак, кургак чүпүрөктү колдонуңуз.
- Абразивдүү тазалагычтарды, момдорду же эриткичтерди колдонбоңуз.
- Тазалоочу эритмелерди түз эле шайманга чачуудан алыс болуңуз.
7.2 Жалпы кам көрүү
- Ашыкча ысып кетүүнүн алдын алуу үчүн аппараттын айланасында туура желдетүүнү камсыз кылыңыз.
- Аппараттын үстүнө оор нерселерди коюудан алыс болуңуз.
- If the unit is exposed to extreme cold, allow it to warm up before operation to prevent condensation.
8. Кыйынчылыктарды
Эгер көйгөйгө туш болсоңуз, колдоо кызматына кайрылуудан мурун төмөнкү таблицаны караңыз:
| Көйгөй | Мүмкүн себеп | Чечим |
|---|---|---|
| Күч жок | Blown fuse; Incorrect wiring; Disconnected battery. | Check vehicle fuses and unit fuse. Verify wiring connections. Ensure battery is connected. |
| Үн жок | Үн өтө төмөн; Үнсүз кылуу иштетилди; туура эмес динамик зымдары; Булак тандалган жок. | Increase volume. Deactivate mute. Check speaker connections and polarity. Select correct audio source. |
| USB/SD ойнобой жатат | Колдоого алынбайт file format; Corrupt media; Incorrectly inserted device. | Медиада колдоого алынган аудио камтылганын текшериңиз files (e.g., WMA). Try a different USB/SD. Reinsert device. |
| Радио кабыл алуу начар | Антенна туташкан эмес; Сигнал алсыз аймак. | Антеннанын туташуусун текшериңиз. Күчтүү станцияга жөндөп көрүңүз. |
| Пульт иштебей жатат | Dead battery; Obstruction; Not pointing at sensor. | Replace remote battery. Remove obstructions. Ensure direct line of sight to unit's IR sensor. |
9. Техникалык шарттар
Technical specifications for the Soundstream VL-11A Digital Media Receiver:
- Модел: VL-11A
- Бренд: Soundstream
- Өндүрүүчү: Soundstream
- Продукциянын өлчөмдөрү: 22.35 x 20.32 x 9.65 см
- Элемент Салмагы: 771.11 г (1.7 фунт)
- Аудио Wattage: 52 Ватт (макс)
- Каналдардын саны: 4
- Preamp Чыгуулары: 2 Sets of 2V
- Медиа форматы: WMA (and other common digital audio formats)
- Өзгөчөлүктөр: SD Card Input, USB Input, Auxiliary Input
- Туташтыргыч түрү: Көмөкчү, USB, 3.5 мм уяча
- Шайкеш түзмөктөр: Баяндамачы
- Башкаруу ыкмасы: Алыстан
10. Кепилдик жана колдоо
Soundstream products are designed and manufactured to the highest quality standards. For specific warranty information, please refer to the warranty card included with your product or visit the official Soundstream webсайт.
For technical support or service inquiries, please contact Soundstream customer service through their official channels. Keep your purchase receipt and product model number (VL-11A) handy when contacting support.


