1. Киришүү
This manual provides instructions for the safe and effective operation of the Voltcraft VC155 Digital Hand-held Multimeter. The VC155 is designed for measuring and displaying electrical parameters within the CAT III 600V category. It offers functions for measuring direct and alternating voltage, resistance, acoustic continuity, diode testing, non-contact 230V/AC voltage testing, electric current (10A, mA, µA), and K-type temperature measurement.
Please read this manual thoroughly before using the device to ensure proper handling and to prevent potential hazards.
2. Коопсуздук маалыматы
Observe all safety precautions to prevent electric shock, injury, or damage to the meter or the equipment under test.
- The device is rated for Measurement Category CAT III 600V. Do not exceed these limits.
- Always ensure the test leads are in good condition and properly connected before making measurements.
- Көлөмдү өлчөөгө аракет кылбаңызtage or current on circuits exceeding the specified maximum input values.
- The two measuring inputs are secured against overload. The voltage in the measuring circuit must not exceed 600V.
- This digital multimeter is equipped with ceramic high-performance fuses for protection. Do not bypass or use incorrect fuses.
- Only operate the device with a 9V block battery. Ensure correct polarity during installation.
- Эгерде эсептегич бузулгандай көрүнсө же батареянын капкагы туура жабылбаган болсо, аны колдонбоңуз.
- Avoid working alone when performing high-voltage өлчөөлөр.
- Өлчөө учурунда колду жана манжаларды зонд тосмолорунун артында кармаңыз.
3. Продукттун өзгөчөлүктөрү жана компоненттери

Сүрөт 3.1: Алдыңкы view of the Voltcraft VC155 Digital Multimeter with connected test leads.

3.2-сүрөт: Каптал view of the Voltcraft VC155 Digital Multimeter with its integrated kickstand extended for hands-free operation.
Негизги өзгөчөлүктөрү:
- Дисплей: 2000 counts digital display.
- Өлчөө диапазону: Кол менен диапазонду тандоо.
- кармап туруу функциясы: Freezes the displayed measurement value.
- Арткы жарык функциясы: Жарыгы аз шарттарда колдонуу үчүн дисплейди жарыктандырат.
- Факел функциясы: Integrated flashlight for illuminating the work area.
- Байланышсыз томtage (NCV) тести: AC томун аныктайтtagд түз байланышсыз.
- Күчтүү дизайн: 2-component housing with soft rubber protection for durability and grip.
Компоненттери:
- LCD дисплей: Shows measurement values, units, and function indicators.
- HOLD баскычы: Toggles data hold function.
- BACK LIGHT баскычы: Activates/deactivates display backlight and torch.
- Айлануучу которгуч: Өлчөө функцияларын жана диапазондорун тандайт.
- COM киргизүү уясы: Бардык өлчөөлөр үчүн жалпы (терс) киргизүү.
- VΩmAµA киргизүү уячасы: Том үчүн оң киргизүүtage, resistance, diode, continuity, and small current measurements.
- 10A max Input Jack: Жогорку ток (10А чейин) өлчөө үчүн оң киргизүү.
- Байланышсыз томtage (NCV) сенсору: Located at the top of the meter.
4. Орнотуу
4.1 Батареяны орнотуу
The Voltcraft VC155 requires one 9V block battery for operation. The battery is included with the device.
- Мультиметр өчүрүлгөнүн текшериңиз.
- Аппараттын артындагы батарея бөлүкчөсүн табыңыз.
- Бекитүүчү бураманы(ларды) бурап чыгарып, батареянын капкагын алып салыңыз.
- Туура полярдуулукту (+ жана -) сактап, 9V батарейканы батарейканын клиптерине туташтырыңыз.
- Батареяны бөлүмгө салыңыз жана капкакты ордуна бурагыч(тар) менен бекитиңиз.
4.2 Сыноо линиясынын туташуу
Сыноо өткөргүчтөрүн туура туташтыруу так жана коопсуз өлчөө үчүн абдан маанилүү.
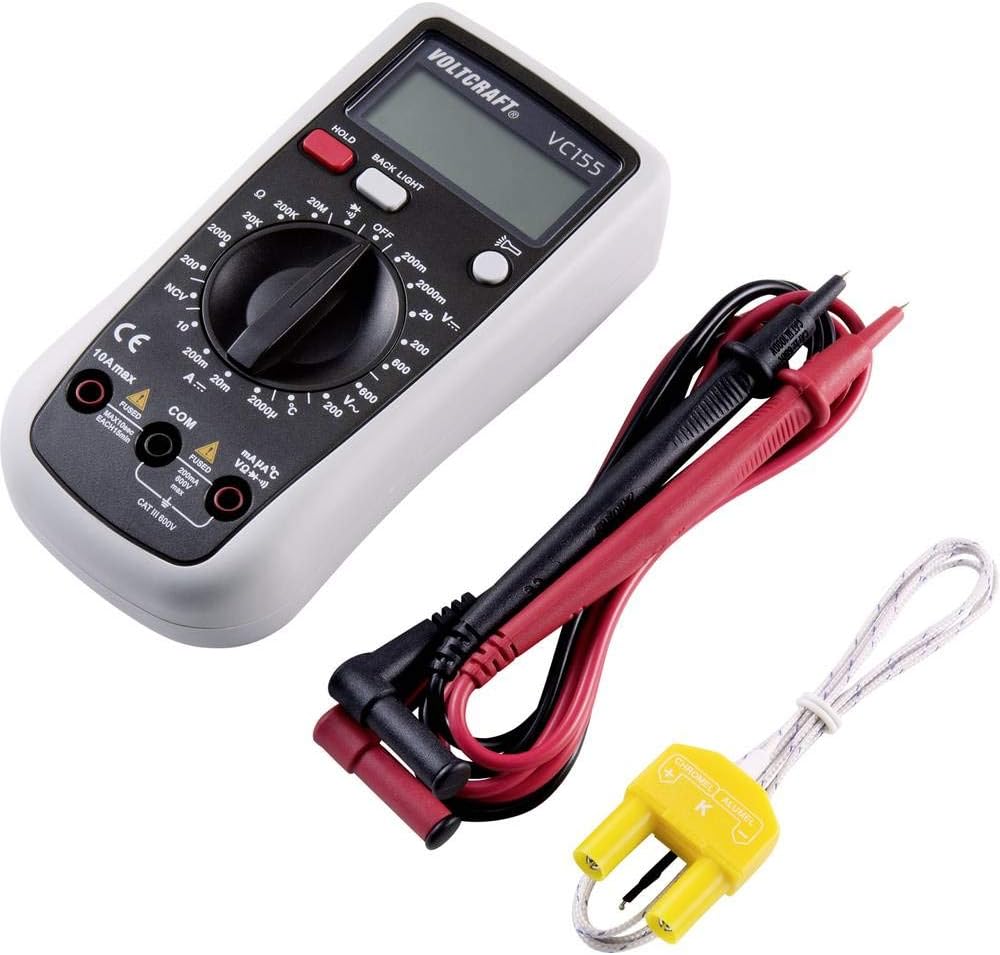
Figure 4.1: Voltcraft VC155 Multimeter showing connected test leads and the K-type temperature sensor.
- ар дайым туташтырыңыз кара сыноо үчүн жетек COM киргизүү уячасы.
- Том үчүнtage, resistance, diode, continuity, and small current (mA/µA) measurements, connect the кызыл сыноо үчүн жетек VΩmAµA киргизүү уячасы.
- For high current (up to 10A) measurements, connect the кызыл сыноо үчүн жетек 10А макс киргизүү уячасы.
- Туташуулардын бекем жана коопсуз экендигин текшериңиз.
4.3 Температура сенсорунун туташуусу
To measure temperature, use the provided K-type temperature sensor.
- Connect the K-type temperature sensor's plug into the VΩmAµA жана COM input jacks, observing polarity (positive to VΩmAµA, negative to COM).
5. Иштөө нускамалары
Turn the rotary switch to the desired function to power on the multimeter. Turn it to the "OFF" position to power off.
5.1 DC Voltage Өлчөө (V=)
- Set the rotary switch to the desired "V=" range (e.g., 200mV, 2V, 20V, 200V, 600V).
- Кызыл тест учун туташтырыңыз VΩmAµA джек жана кара тест алып барат COM джек.
- Сыноо зонддорун өлчөнө турган компонент же схема боюнча параллелдүү туташтырыңыз.
- Томду окуңузtage мааниси дисплейде.
5.2 AC томtage Өлчөө (V~)
- Set the rotary switch to the desired "V~" range (e.g., 200V, 600V).
- Кызыл тест учун туташтырыңыз VΩmAµA джек жана кара тест алып барат COM джек.
- Сыноо зонддорун AC тому боюнча параллелдүү туташтырыңызtage булагы.
- Томду окуңузtage мааниси дисплейде.
5.3 Туруктуу токту өлчөө (A=)
- ЭСКЕРТҮҮ: Never connect the meter in parallel with a voltage source when measuring current. This can blow the fuse or damage the meter.
- Set the rotary switch to the desired "A=" range (e.g., 200µA, 2mA, 20mA, 200mA, 10A).
- For µA/mA ranges, connect the red test lead to the VΩmAµA jack. For 10A range, connect the red test lead to the 10А макс jack. Connect the black test lead to the COM джек.
- Ток өлчөнө турган схеманы ачып, эсептегичти катарга туташтырыңыз.
- Дисплейдеги учурдагы маанини окуңуз.
5.4 Каршылыкты өлчөө (Ω)
- Set the rotary switch to the desired "Ω" range (e.g., 200Ω, 2kΩ, 20kΩ, 200kΩ, 2MΩ, 20MΩ).
- Кызыл тест учун туташтырыңыз VΩmAµA джек жана кара тест алып барат COM джек.
- Каршылыкты өлчөөдөн мурун чынжыр же тетиктин энергиясы өчүрүлгөнүн текшериңиз.
- Сыноо зонддорун компоненттин үстүнө туташтырыңыз.
- Дисплейдеги каршылык маанисин окуп чыгыңыз.
5.5 Үзгүлтүксүздүк тести (•))))
- Set the rotary switch to the "•)))"позиция.
- Кызыл тест учун туташтырыңыз VΩmAµA джек жана кара тест алып барат COM джек.
- Схема кубаты өчүрүлгөнүн текшериңиз.
- Сынамык зонддорду чынжыр же компонент боюнча туташтырыңыз.
- If continuity exists (resistance below approximately 50Ω), the buzzer will sound. The display will show the resistance value.
5.6 Диод сыноо (→|)
- Set the rotary switch to the "→|"позиция.
- Кызыл тест учун туташтырыңыз VΩmAµA джек жана кара тест алып барат COM джек.
- Диод чынжырдан ажыратылганын текшериңиз.
- Кызыл зондду анодго, кара зондду диоддун катодуна туташтырыңыз. Дисплей алдыга томду көрсөтөтtagд тамчы.
- Зонддорду тескери буруңуз. Жакшы диод үчүн дисплейде "OL" (Open Loop) көрсөтүлүшү керек.
5.7 Контактсыз томtage (NCV) тести
- Set the rotary switch to the "NCV" position.
- Hold the top of the multimeter near an AC voltage булагы (мисалы, ток өткөрүүчү зым же розетка).
- The meter will emit an audible beep and the NCV indicator will light up if AC voltagе аныкталат.
5.8 Температураны өлчөө (°C/°F)
- Set the rotary switch to the "°C" or "°F" position.
- Connect the K-type temperature sensor to the VΩmAµA жана COM уячалар.
- Температура сенсорунун учун температурасы өлчөнүүчү объекттин үстүнө же жанына коюңуз.
- Дисплейдеги температуранын маанисин окуңуз.
5.9 HOLD Функциясы
- басыңыз БЕРҮҮ button during a measurement to freeze the current reading on the display.
- басыңыз БЕРҮҮ Көрсөтүүнү кайра чыгаруу жана түз өлчөөгө кайтуу үчүн баскычты кайра басыңыз.
5.10 Backlight and Torch Function
- басыңыз АРТЫ ЖАРЫК Дисплейдин арткы жарыгын иштетүү үчүн баскычты басыңыз.
- басып, кармап туруңуз АРТЫ ЖАРЫК button to activate the integrated torch.
- басыңыз АРТЫ ЖАРЫК button again to turn off the backlight or torch.
6. Техникалык тейлөө
6.1 Тазалоо
- Turn off the meter and disconnect all test leads before cleaning.
- Ишти жарнама менен сүртүңүзamp cloth and a mild detergent. Do not use abrasives or solvents.
- Ensure no moisture enters the meter's casing.
6.2 Батареяны алмаштыруу
When the battery symbol appears on the display, the 9V battery needs to be replaced.
- Turn off the meter and disconnect all test leads.
- Unscrew the retaining screw(s) on the battery compartment cover on the rear of the device.
- Remove the old battery and replace it with a new 9V block battery, observing correct polarity.
- Батареянын капкагын ордуна коюңуз жана аны бурама(лар) менен бекитиңиз.
6.3 Сактагычты алмаштыруу
The current input jacks are protected by ceramic high-performance fuses. If the meter fails to measure current, the fuse may need replacement. Fuse replacement should only be performed by qualified personnel.
- Эритиндилер: F1: F 200mA/250V, F2: F 10A/250V (specific fuse ratings are typically printed near the fuse holder or in a more detailed service manual).
- Always replace with fuses of the exact same type and rating.
7. Кыйынчылыктарды
| Көйгөй | Мүмкүн себеп | Чечим |
|---|---|---|
| Дисплей жок же күңүрт дисплей | Өлгөн же аз батарея. | 9V батарейканы алмаштырыңыз. |
| Туура эмес окуулар | Incorrect function/range selected; poor test lead connection; damaged test leads. | Verify function and range; ensure secure connections; inspect and replace damaged leads. |
| Токту өлчөө мүмкүн эмес | Blown fuse in the current input circuit. | Replace the appropriate fuse (refer to Section 6.3). |
| "OL" (Ашыкча жүктөө) көрсөтүлөт | Measurement exceeds the selected range; open circuit (for resistance/continuity). | Select a higher range; check for open circuits or proper connection. |
8. Техникалык шарттар
| Параметр | Нарк |
|---|---|
| Дисплей | 2000 эсеп |
| Өлчөө категориясы | CAT III 600V |
| DC Voltage (V=) | Ranges: 200mV, 2V, 20V, 200V, 600V; Basic Accuracy: 0.5% |
| AC Voltage (V~) | Ranges: 200V, 600V; Basic Accuracy: 0.1V ~600V AC reading range |
| DC Current (A=) | Ranges: 200µA, 2mA, 20mA, 200mA, 10A |
| Каршылык көрсөтүү (Ω) | Ranges: 200Ω, 2kΩ, 20kΩ, 200kΩ, 2MΩ, 20MΩ; 10MΩ DC resistance, 4.5MΩ AC resistance |
| Үзгүлтүксүздүк тести | Audible buzzer below approx. 50Ω |
| Диод сыноо | Ооба |
| Байланышсыз томtage (NCV) | Yes (230V/AC test) |
| Температураны өлчөө | K-type sensor input |
| Power Source | 1 x 9V block battery (included) |
| Өлчөмдөрү (L x W x Y) | 5.91 x 2.95 x 1.5 дюйм (15.0 x 7.5 x 3.8 см) |
| Салмагы | 7.1 унция (200 грамм) |
9. Кепилдик жана колдоо
Voltcraft products are manufactured to high-quality standards and are subject to strict quality controls. For information regarding warranty terms, technical support, or service, please refer to the documentation provided with your purchase or contact your local Voltcraft dealer or customer service center.
You can also visit the official Voltcraft webкошумча жардам жана продукт маалымат алуу үчүн сайт.


