1. Киришүү
Сатып алганыңыз үчүн рахматasing the Lexibook RL2000 Radio Alarm Clock with Humidifier. This device combines a digital alarm clock, an FM radio, and a humidifier to enhance your comfort. It also displays indoor temperature and humidity levels, helping you monitor your environment. Please read this manual carefully before use to ensure proper operation and maintenance.
2. Коопсуздук маалыматы
- Ар дайым колдонуңуз дистилденген суу in the humidifier reservoir to prevent mineral buildup and ensure optimal performance.
- Аппаратты сууга же башка суюктуктарга салбаңыз.
- Аппаратты түз күндүн нурунан, жылуулук булактарынан жана экстремалдык температурадан алыс кармаңыз.
- Аппараттын айланасында туура желдетүүнү камсыз кылыңыз.
- Агрегатты өз алдынча бөлүүгө же оңдоого аракет кылбаңыз. Квалификациялуу тейлөө кызматкерлерине кайрылыңыз.
- Батареяларды жергиликтүү эрежелерге ылайык таштаңыз.
3. Продукт бүтүп калдыview
Familiarize yourself with the components and controls of your Lexibook RL2000.
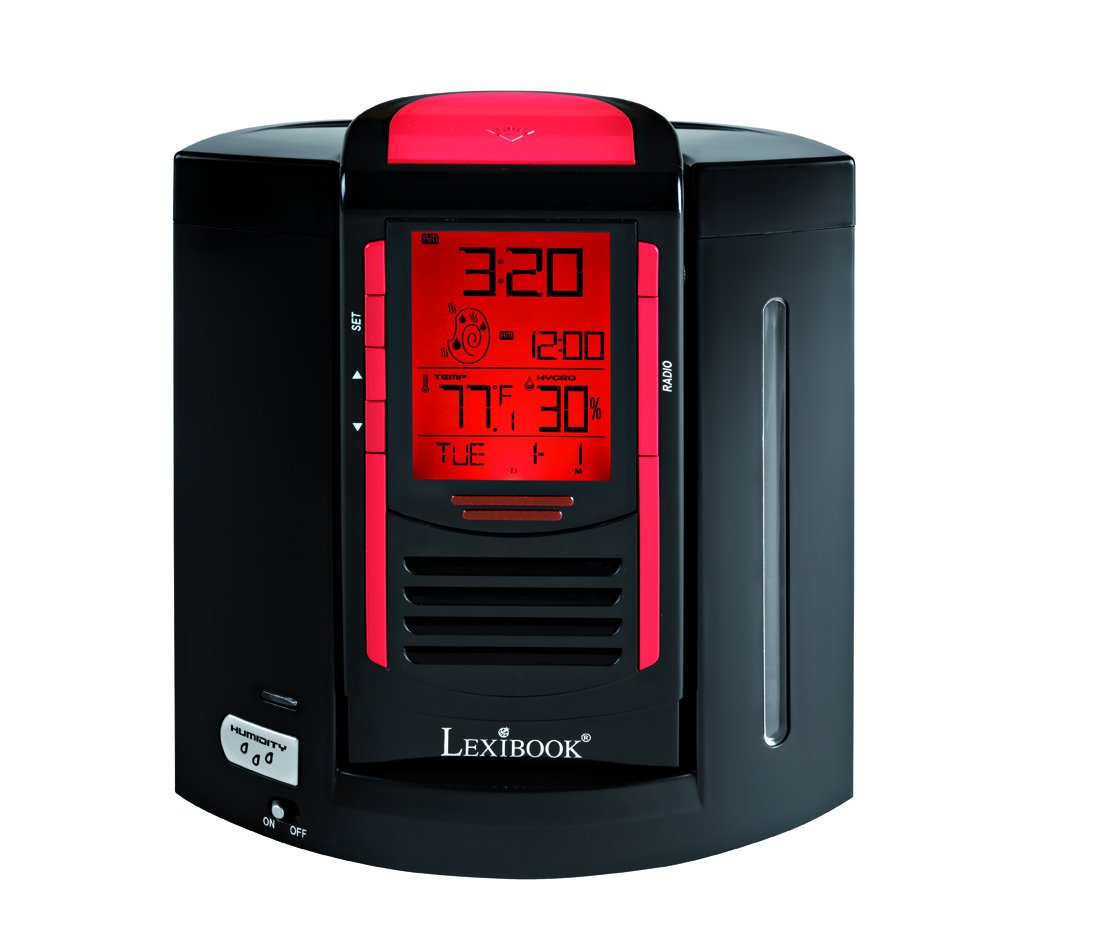
This image shows the front of the Lexibook RL2000, highlighting the digital display, control buttons (SET, Up/Down arrows), and the radio speaker grille. The display shows time, date, indoor temperature, and humidity.

This image illustrates the two main components of the RL2000: the clock/radio unit and the humidifier base. The humidifier base includes the water reservoir and the 'HUMIDITY ON/OFF' switch.
Башкаруу жана дисплей:
- Санариптик дисплей: Убакытты, датаны, жуманын күнүн, үйдүн ичиндеги температураны жана нымдуулукту көрсөтөт.
- SET баскычы: Used to enter and confirm settings for time, date, and alarm.
- Өйдө/төмөн жебелер: Used to adjust values during setting modes and for radio tuning.
- RADIO Button: FM радио функциясын иштетет жана башкарат.
- HUMIDITY ON/OFF Switch: Located on the humidifier base, controls the humidifier function.
4. Орнотуу
4.1 Батареяны орнотуу
- Locate the battery compartment on the back of the clock/radio unit.
- Батарея уясынын капкагын ачыңыз.
- Туура полярдуулукту (+/-) камсыз кылып, 4 AA батарейкасын (кошулмага кирбейт) салыңыз.
- Батарея уясынын капкагын бекем жабыңыз.
4.2 Агрегатты чогултуу
- Place the humidifier base on a stable, flat surface.
- Carefully align the clock/radio unit with the humidifier base and gently push it into place until it is securely seated.
4.3 Filling the Humidifier Reservoir
- Separate the clock/radio unit from the humidifier base.
- Locate the water filling port on the humidifier base.
- Fill the 0.4-liter reservoir with дистилденген суу гана. Do not overfill.
- Reattach the clock/radio unit to the humidifier base.
5. Иштөө нускамалары
5.1 Убакытты жана датаны орнотуу
- басып, кармап туруңуз SET убакыт дисплейси жаркылдаганга чейин баскычты басыңыз.
- колдонуу Өйдө/төмөн жебелер саатты жөндөө үчүн, андан кийин басыңыз SET ырастоо үчүн.
- Бул процессти мүнөт, жыл, ай жана күн үчүн кайталаңыз.
- The device will automatically display the day of the week based on the date set.
5.2 Сигналды коюу
- басыңыз SET button briefly to cycle through display modes until the alarm time flashes.
- While the alarm time is flashing, press and hold SET ойготкуч орнотуу режимине кирүү үчүн.
- колдонуу Өйдө/төмөн жебелер to set the desired alarm hour and minutes, pressing SET to confirm each.
- Ойготкучту жандыруу/өчүрүү үчүн басыңыз Жогору жебе when the alarm time is displayed (not flashing). An alarm icon will appear/disappear.
- When the alarm sounds, press any button to activate the snooze function. The alarm will sound again after a few minutes. To turn off the alarm completely, press and hold the SET баскычы.
5.3 Радио менен иштөө
- басыңыз РАДИО FM радиосун күйгүзүү үчүн баскыч.
- колдонуу Өйдө/төмөн жебелер каалаган станцияга кол менен күү салуу.
- To scan for and save stations, press and hold the РАДИО button. The device will automatically scan and store up to 20 pre-recorded stations.
- To cycle through saved stations, press the РАДИО баскычын кыскача.
- To adjust volume, use the Өйдө/төмөн жебелер when not in tuning mode.
5.4 Humidifier Function
- Ensure the humidifier reservoir is filled with distilled water.
- табыңыз HUMIDITY ON/OFF switch on the humidifier base.
- Которуштургучту жылдырыңыз ON to activate the humidifier. A mist will begin to emit from the top of the unit.
- Которуштургучту жылдырыңыз ӨЧҮРҮҮ to deactivate the humidifier.
5.5 Температура жана нымдуулук дисплейи
The digital display continuously shows the indoor temperature and relative humidity. This allows you to monitor your room's environment and maintain an ideal comfort zone.
6. Техникалык тейлөө
6.1 Нымдандыргычты тазалоо
- Regularly clean the humidifier reservoir to prevent mold and bacteria growth.
- Separate the clock/radio unit from the humidifier base.
- Суу сактагычтан калган сууну төгүңүз.
- Wipe the interior of the reservoir with a soft cloth and a mild cleaning solution, then rinse thoroughly with clean water.
- Ensure all parts are dry before reassembling and refilling with distilled water.
6.2 Жалпы тазалоо
Аппараттын сыртын жумшак, кургак чүпүрөк менен сүртүңүз. Абразивдүү тазалагычтарды же эриткичтерди колдонбоңуз.
7. Кыйынчылыктарды
| Көйгөй | Мүмкүн себеп | Чечим |
|---|---|---|
| Түзмөк күйбөйт. | Батареялар өлүп калган же туура эмес салынган. | Туура полярдуулукту камсыз кылуу менен батарейкаларды жаңы AA батарейкалары менен алмаштырыңыз. |
| Нымдандыргыч туман чыгарбайт. | Reservoir is empty; Humidifier switch is OFF. | Fill reservoir with distilled water; Ensure HUMIDITY switch is ON. |
| Радио кабыл алуу начар. | Алсыз сигнал; Интерференция. | Adjust the position of the device; Try scanning for stations again. |
| Дисплей күңүрт же окулбайт. | Батареянын кубаттуулугу төмөн. | Батареяларды алмаштырыңыз. |
8. Техникалык шарттар
- Модел: RL2000
- Бренд: Лексикитеп
- Продукциянын өлчөмдөрү: 12 x 3.81 x 17 см
- Элемент Салмагы: 1 килограмм
- Кубат булагы: 4 x AA батарейкалар (киргизилген эмес)
- Humidifier Capacity: 0.4 литр
- Өзгөчөлүктөр: FM Radio, Alarm Clock, Humidity Display, Temperature Display, Calendar
- Материал: Пластмасса, акрилонитрил бутадиен стирол
9. Кепилдик жана колдоо
For warranty information or technical support, please refer to the warranty card included with your purchase or visit the official Lexibook webсайт. Аппаратты өзүңүз оңдоого аракет кылбаңыз, анткени бул сиздин кепилдикиңизди жокко чыгарышы мүмкүн.


