1. Киришүү
This manual provides detailed instructions for the setup, operation, and maintenance of your Vibe Axcess 5-in-1 Universal Remote. Please read this manual thoroughly before using the remote control to ensure proper functionality and to maximize your user experience. This remote is designed to control up to five different audio/video devices.
2. Продукт бүтүп калдыview
The Vibe Axcess 5-in-1 Universal Remote is designed to consolidate control of multiple home entertainment devices into a single unit. It features dedicated buttons for various functions and device types.
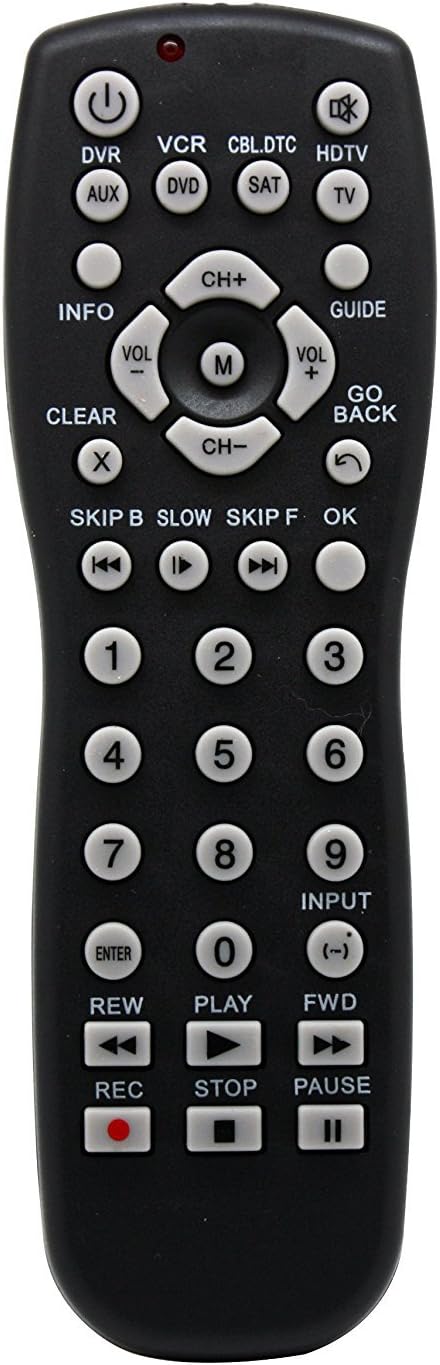
1-сүрөт: Фронт view of the Vibe Axcess 5-in-1 Universal Remote. This image displays the remote's layout, including device selection buttons (DVR, VCR, CBL.DTC, HDTV, AUX, DVD, SAT, TV), navigation pad, number keys, and media control buttons (REW, PLAY, FWD, REC, STOP, PAUSE).

2-сүрөт: Packaging of the Vibe Axcess 5-in-1 Universal Remote. The packaging highlights the remote's 5-in-1 capability and compatibility with various device types such as DVD/VCR, HDTV, DVD, AUX, and CBL/SAT/CABLE.
3. Орнотуу
3.1 Батареяны орнотуу
- Пульттун артындагы батарея бөлүкчөсүнүн капкагын табыңыз.
- Капкакты ылдый жылдырыңыз же ачуу үчүн кулпуну басып, көтөрүңүз.
- Эки (2) AAA батарейкасын салып, оң (+) жана терс (-) терминалдары бөлүмдүн ичиндеги диаграммаларга дал келгенин текшериңиз.
- Батарея бөлүкчөсүнүн капкагын ордуна коюңуз, аны бекем чыккыча ордуна жылдырыңыз.
Эскертүү: Always use fresh batteries and replace both batteries at the same time. Do not mix old and new batteries or different types of batteries.
3.2 Алыстан башкаруу пультун программалоо
To control your devices, the universal remote must be programmed with the correct codes for each device. There are typically two methods for programming:
3.2.1 Түздөн-түз код жазуусу
This method involves entering a specific code from a code list (usually provided with the remote or available online) for your device's brand.
- Башкаргыңыз келген аспапты күйгүзүңүз (мисалы, сыналгы, DVD ойноткуч).
- Алыстан башкаруу пультундагы каалаган түзмөк баскычын басып, кармап туруңуз (мисалы, TV, DVD) for approximately 3 seconds until the indicator light (usually red) illuminates and stays on.
- While the indicator light is on, enter the 3-digit or 4-digit code for your device's brand using the number keys.
- If the code is valid, the indicator light will turn off. If the light flashes and remains on, the code was invalid; re-enter the code.
- Басуу менен пультту текшериңиз КҮЧ button. If the device turns off, the code is correct. If not, try the next code listed for your brand.
3.2.2 Автоматтык код издөө
If you cannot find a code or direct code entry fails, use the auto code search method.
- Көзөмөлдөгөн шайманды күйгүзүңүз.
- Керектүү түзмөк баскычын басып, кармап туруңуз (мисалы, TV) for approximately 3 seconds until the indicator light illuminates and stays on.
- While holding the device button, press the КҮЧ button once. The indicator light will start flashing, indicating it is searching for a code.
- Point the remote at the device and wait for the device to turn off. This may take several minutes as the remote cycles through codes.
- Түзмөк өчкөндөн кийин, дароо басыңыз ENTER кодду сактоо үчүн баскыч. Индикатор жарыгы өчөт.
- Test the remote's functions. If some functions do not work, repeat the auto search process to find a more compatible code.
4. Иштөө нускамалары
Once programmed, operating your Vibe Axcess 5-in-1 Universal Remote is straightforward.
- Түзмөктү тандоо: Түзмөктүн тиешелүү баскычын басыңыз (мисалы, TV, DVD, CBL.DTC) for the device you wish to control. The indicator light will briefly illuminate to confirm selection.
- Күйгүзүү/өчүрүү: басыңыз КҮЧ Тандалган аспапты күйгүзүү же өчүрүү үчүн баскыч.
- Үндү көзөмөлдөө: колдонуу VOL+ жана VOL- үнүн тууралоо үчүн баскычтар.
- Каналды башкаруу: колдонуу CH+ жана CH- каналдарды өзгөртүү үчүн баскычтар.
- Сан баскычтары: Use the number keys (0-9) to directly enter channel numbers or other numerical inputs.
- Навигация: Use the directional pad (up, down, left, right) and OK button for menu navigation.
- Медиа башкаруу элементтери: Колдонуу ОЙНОО, ТЫНЫГУУ, ТОКТОТ, REW, FWD, жана REC for controlling media playback on compatible devices.
5. Техникалык тейлөө
5.1 Тазалоо
To clean your remote, gently wipe it with a soft, dry cloth. Do not use abrasive cleaners, solvents, or harsh chemicals, as these can damage the remote's finish or internal components.
5.2 Батареяны алмаштыруу
When the remote's performance degrades or the indicator light fails to illuminate, it is time to replace the batteries. Follow the battery installation steps in Section 3.1. Dispose of used batteries responsibly according to local regulations.
6. Кыйынчылыктарды
- Пульт иштебейт:
- Батареялар туура салынганын жана түгөнбөгөнүн текшериңиз. Керек болсо алмаштырыңыз.
- Ensure you have selected the correct device button (e.g., TV for your television).
- Verify that the remote is programmed with the correct code for your device. Re-program if unsure.
- Пульт менен аппараттын инфракызыл сенсорунун ортосунда эч кандай тоскоолдуктар жок экенин текшериңиз.
- Кээ бир функциялар иштебейт:
- Some universal remote codes may not support all original remote functions. Try another code for your device brand using the programming steps.
- Ensure the device you are trying to control supports the specific function (e.g., not all TVs have a dedicated 'INFO' button function).
- Индикатордун жарыгы күйбөй жатат:
- Батареяларды текшерип, алмаштырыңыз.
- If the issue persists after battery replacement, the remote may be faulty.
7. Техникалык шарттар
- Модел: OT795-KO
- Бренд: Vibe
- Продукциянын өлчөмдөрү: 10.7 x 4 x 0.8 дюйм
- Элемент Салмагы: 4 унция
- Батареялар: 2 AAA батарейка талап кылынат (киргизилген эмес)
- Колдоого алынган түзмөктөрдүн максималдуу саны: 5
- Байланыш технологиясы: Инфракызыл
- Өзгөчө өзгөчөлүгү: Универсал
8. Кепилдик жана колдоо
For information regarding warranty coverage or technical support, please refer to the documentation included with your purchase or contact the retailer where the product was acquired. Specific warranty terms may vary.


