1. Киришүү
Сатып алганыңыз үчүн рахматasing the Fonestar AS-170RU Hi-Fi Amplifier. This device is designed to provide high-fidelity stereo audio amplification, featuring a built-in USB/MP3 player, AM/FM digital tuner, and multiple audio inputs. This manual provides detailed instructions for safe installation, operation, and maintenance of your ampкөтөргүч. Сураныч, колдонуудан мурун бул колдонмону кылдат окуп чыгыңыз жана аны келечекте маалымат үчүн сактап коюңуз.
2. Коопсуздук нускамалары
- Электр камсыздоо: камсыз кылуу ampкөтөргүч көлөмүнө дал келген кубат булагына туташтырылганtage specified on the unit. Disconnect the power cord from the outlet if the unit will not be used for an extended period.
- Вентиляция: Do not block ventilation openings. Ensure adequate space around the unit for proper airflow to prevent overheating.
- Суу жана ным: Аппаратты жамгырга, нымга же тамчылатуучу/чачыраган суюктуктарга тийгизбеңиз. Ваза сыяктуу суюктуктар толтурулган нерселерди аппараттын үстүнө койбоңуз.
- Жылуулук булактары: Аппаратты радиаторлор, жылуулук регистрлери, мештер же башка аппараттар (анын ичинде) сыяктуу жылуулук булактарынан алыс кармаңыз. ampкөтөргүчтөр) жылуулукту пайда кылуучу.
- Тазалоо: Кургак чүпүрөк менен гана тазалаңыз. суюк тазалагычтар же аэрозолдук тазалагычтар колдонгон жок.
- Тейлөө: Бул продуктту өзүңүз тейлөөгө аракет кылбаңыз. Бардык тейлөөнү квалификациялуу тейлөө кызматкерлерине тапшырыңыз.
- Жайгашкан жери: Агрегатты туруктуу, тегиз бетке коюңуз. Аны күн тийген жерге же күчтүү магнит талаасына коюудан алыс болуңуз.
3. Пакеттин мазмуну
Сураныч, сиздин пакетиңизде төмөнкү заттар бар экенин текшериңиз:
- Fonestar AS-170RU Hi-Fi Ampөмүрлүү
- Алыстан башкаруу
- AM Антенна
- FM антеннасы
- Колдонуучунун Колдонмосу (бул документ)
4. Продукт бүтүп калдыview
4.1 алдыңкы панели
The front panel provides access to essential controls and the display.
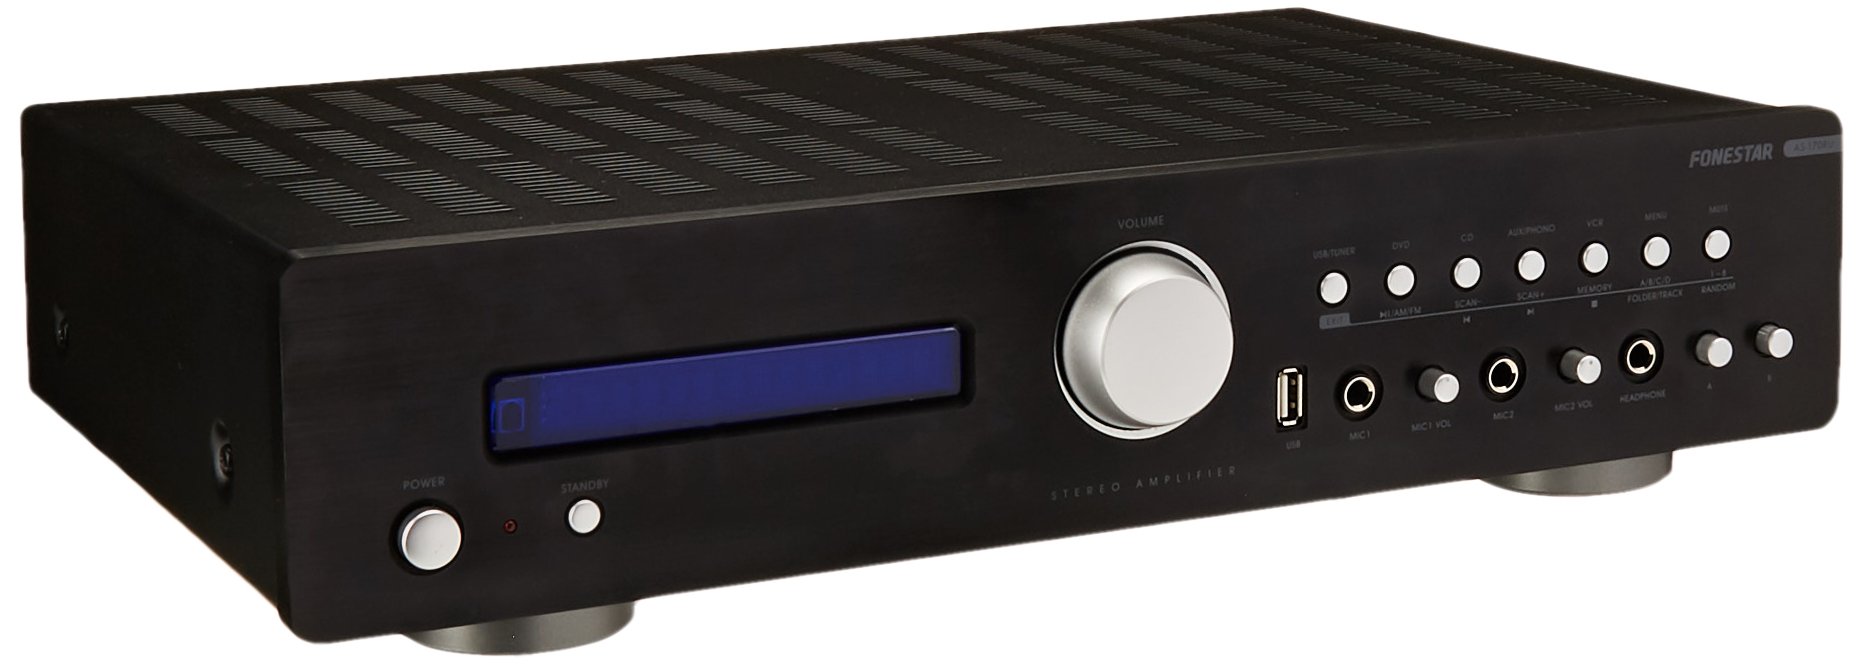
Image: Fonestar AS-170RU Front Panel. Бул сүрөт алдыңкы жагын көрсөтөт view -ныкы amplifier, showing the VFD display, USB port, headphone output, input selectors, volume knob, and other control buttons.
- Кубат баскычы: бурат ampөмүрдү күйгүзүү же өчүрүү.
- VFD дисплейи: Shows current input, volume level, tuner information (frequency, RDS), and USB/MP3 track details (ID3 tag).
- USB порт: For connecting USB storage devices to play MP3 files.
- Гарнитуранын чыгышы: Наушниктерди туташтыруу үчүн 6.3 мм уяча.
- Киргизүү тандоочулары: Buttons for choosing audio sources (CD, DVD, VCR, AUX/Phono, USB/Tuner).
- Үндү көзөмөлдөө: Rotary knob to adjust the master volume level.
- Микрофон кириштери: Two 6.3mm microphone jacks with independent volume control.
- Тон көзөмөлү: Buttons or menu options for adjusting Bass, Treble, and Balance.
4.2 Арткы панель
The rear panel contains all the necessary connections for your audio sources, speakers, and antennas.

Image: Fonestar AS-170RU Rear Panel. This image illustrates the rear connections of the amplifier, including speaker terminals (A/B), various RCA input jacks (CD, DVD, VCR, AUX/Phono), REC OUT, PRE OUT, AMP IN, and antenna connections (FM COAX, AM LOOP ANT).
- Динамиктин чыгыштары (A/B): Terminals for connecting two pairs of speakers. Supports 4-16 ohms for A or B, or 8-16 ohms for A+B.
- Аудио киргизүүлөр (RCA):
- CD киргизүү: CD ойноткучту туташтыруу үчүн.
- DVD Input: For connecting a DVD player or other audio source.
- VCR Input: For connecting a VCR or other audio source.
- AUX/PHONO Input: For connecting auxiliary devices or a turntable (Phono input may require a pre-amplifier if your turntable does not have one built-in).
- ЧЫГУУ: RCA output for connecting to a recording device.
- АЛДЫН АЛА ЧЫГАРУУ: RCA output for connecting to an external power ampөмүрлүү.
- AMP IN: RCA input for connecting an external pre-ampөмүрлүү.
- Антенна туташуулары:
- FM COAX 75Ω: For connecting an FM antenna.
- AM LOOP ANT: For connecting the supplied AM loop antenna.
4.3 Алыстан башкаруу
The included remote control allows convenient operation of the ampалыстан көтөргүч.

Image: Fonestar AS-170RU Remote Control. This image shows the remote control unit with various buttons for power, input selection, volume, mute, tuner functions, USB playback controls, and tone adjustments.
- ЖАНЫМДА БОЛ: Күйгүзүү/өчүрүү.
- Киргизүү тандоочулары: Buttons for CD, DVD, VCR, AUX/PHONO, USB/TUNER.
- Үндү жогорулатуу/төмөндөтүү (VOL +/-): Негизги үндү тууралайт.
- Үнсүз: Аудио чыгыштын үнүн басат.
- AM/FM: Switches between AM and FM tuner modes.
- СКАН: Scans for radio stations.
- Эстутум: Радиостанциянын алдын ала орнотууларын сактайт.
- USB ойнотууну башкаруу элементтери: Play/Pause, Stop, Skip Track, Folder/Track navigation.
- EQ OFF / BASS / TREBLE: Access tone controls.
- RDS / ID3: Displays RDS information for radio or ID3 tag MP3 үчүн files.
5. Орнотуу
5.1 Динамиктерди бириктирүү
- камсыз кылуу ampкөтөргүч өчүрүлгөн жана электр розеткасынан ажыратылган.
- Connect your speakers to the "SPEAKERS OUTPUT" terminals on the rear panel.
- Match the positive (+) terminal of the amplifier (red) to the positive (+) terminal of your speaker, and the negative (-) terminal (black) to the negative (-) terminal.
- The AS-170RU supports two groups of speakers (A and B). You can connect one pair to "SPEAKERS A" and another to "SPEAKERS B".
- Ensure your speakers' impedance matches the amplifier's specifications: 4-16 ohms for A or B, or 8-16 ohms for A+B.
5.2 Аудио булактарын туташтыруу
Use RCA cables to connect your audio components to the corresponding input jacks on the rear panel.
- CD ойноткуч: Connect to the "CD" input.
- DVD ойноткуч: Connect to the "DVD" input.
- Видеомагнитофон: Connect to the "VCR" input.
- Auxiliary Device (e.g., smartphone, tablet): Connect to the "AUX/PHONO" input.
- Айлануучу стол: Connect to the "AUX/PHONO" input. If your turntable does not have a built-in pre-amplifier, you may need an external phono pre-ampөмүрлүү.
5.3 Антенналарды туташтыруу
- FM антеннасы: Connect the supplied FM wire antenna to the "FM COAX 75Ω" terminal. Extend the wire for optimal reception.
- AM антенна: Connect the supplied AM loop antenna to the "AM LOOP ANT" terminals. Position the loop for best reception.
5.4 Кубат туташтыруу
Once all audio and speaker connections are made, plug the amplifier's power cord into a suitable AC power outlet.
6. Иштөө нускамалары
6.1 Негизги операция
- Күйгүзүү/өчүрүү: Press the Power button on the front panel or the STANDBY button on the remote control to turn the ampөмүрдү күйгүзүү же өчүрүү.
- Киргизүү булагын тандоо: Press the desired input selector button on the front panel (CD, DVD, VCR, AUX/PHONO) or the remote control (CD, DVD, VCR, AUX/PHONO, USB/TUNER).
- Үндү тууралоо: Үн деңгээлин тууралоо үчүн алдыңкы панелдеги Үн баскычын буруңуз же алыстан башкаруу пультундагы VOL +/- баскычтарын колдонуңуз.
- Үнсүз: Press the MUTE button on the remote control to temporarily silence the audio. Press it again to restore sound.
6.2 USB/MP3 ойнотуу
- Insert a USB storage device (flash drive) into the USB port on the front panel.
- Select "USB/TUNER" as the input source. The ampкөтөргүч автоматтык түрдө MP3 аныктап, ойнотууну баштайт files.
- Use the playback controls on the remote control (Play/Pause, Stop, Skip Track, Folder/Track) to navigate and control your music.
- The VFD display will show track information, including ID3 tags бар болсо.
- The amplifier supports up to 65,000 indexable folders and files, with a maximum of 8 folder levels.
6.3 AM/FM Tuner Operation
- Select "USB/TUNER" as the input source, then press the AM/FM button on the remote control to switch between AM and FM bands.
- Автоматтык сканерлөө: Press the SCAN button on the remote control to automatically search for and store available radio stations.
- Кол менен жөндөө: Use the tuning buttons (usually arrow keys) on the remote control to manually adjust the frequency.
- Алдын ала коюлган станциялар: The amplifier supports 64 presets. Use the MEMORY button to store and recall your favorite stations.
- RDS функциясы: If available, press the RDS button on the remote control to display Radio Data System information (e.g., station name, program type).
6.4 Микрофон киргизүү
- Connect microphones to the 6.3mm MIC 1 and MIC 2 jacks on the front panel.
- Adjust the independent volume controls for each microphone to achieve the desired level.
6.5 Tone and Balance Control
The amplifier allows adjustment of bass, treble, and balance through its menu system or dedicated buttons on the remote control. Refer to the remote control section for specific buttons like EQ OFF, BASS, TREBLE.
7. Техникалык тейлөө
- Тазалоо: Disconnect the power before cleaning. Use a soft, dry cloth to wipe the exterior surfaces. Do not use abrasive cleaners, waxes, or solvents.
- Вентиляция: Мезгил-мезгили менен желдетүү тешиктери чаңдан жана таштандыдан таза экенин текшерип туруңуз.
- Сактагыч: Эгерде түзмөктү узак убакытка сактап жатсаңыз, аны розеткадан сууруп, салкын, кургак жерде, күн нуру түз тийбеген жана өтө жогорку температурадан алыс сактаңыз.
8. Кыйынчылыктарды
If you encounter problems with your amplifier, refer to the following table for possible solutions.
| Көйгөй | Мүмкүн себеп | Чечим |
|---|---|---|
| Күч жок | Электр зымы туташкан эмес; розетка туура эмес; Ampкүтүү режиминде көтөргүч. | Ensure power cord is securely plugged in. Test the outlet with another device. Press the Power/STANDBY button. |
| Үн жок | Туура эмес киргизүү тандалган; Үн өтө төмөн; Динамиктер туура туташкан эмес; Үнсүз функция активдүү. | Select the correct input source. Increase volume. Check speaker connections. Deactivate MUTE. |
| Радио кабыл алуу начар | Antenna not connected or poorly positioned; Interference. | Connect and adjust the position of the AM/FM antennas. Move the ampкөтөргүчтү башка электрондук түзүлүштөрдөн алыс кармаңыз. |
| USB ойнотуу иштебей жатат | USB түзмөгү туура эмес салынган; шайкеш келбейт file format; USB device faulty. | Ensure USB device is fully inserted. Check if fileMP3 форматында. Башка USB түзмөгүн колдонуп көрүңүз. |
| Amplifier turns off unexpectedly or cycles power | Overheating; Short circuit in speaker wiring; Internal fault. | Ensure adequate ventilation. Check speaker wires for frayed strands causing short circuits. If the problem persists, disconnect power and contact qualified service personnel. |
9. Техникалык шарттар
- Модел: AS-170RU
- Чыгуу кубаттуулугу: 80 + 80 W RMS at 4 Ω
- Динамик Импеданс: 4-16 Ω (A or B), 8-16 Ω (A+B)
- Коргоо: 3 circuits (short circuits, overload, overvoltage)
- USB ойноткуч: MP3 file ойнотуу, ID3 tag support. Max 65,000 indexable folders/files, max 8 folder levels.
- тюнер: Digital AM/FM, 64 presets, RDS.
- Киргизүүлөр: 2 x Microphone (6.3mm), 4 x RCA (CD, DVD, VCR, AUX/Phono), 1 x RCA (AMP IN).
- Чыгуулары: 1 x RCA (REC OUT), 1 x RCA (PRE OUT), Headphone (6.3mm).
- Дисплей: Blue VFD.
- Тон көзөмөлү: Bass, Treble, Balance (via menu/remote).
- Өлчөмдөрү: 40 x 40 x 60 см (болжол менен 15.7 x 15.7 x 23.6 дюйм)
- Салмагы: 7.2 кг (болжол менен 15.87 фунт)
10. Кепилдик жана колдоо
For warranty information and technical support, please refer to the warranty card included with your product or contact your authorized Fonestar dealer. Do not attempt to repair the unit yourself, as this may void your warranty.


