1. Киришүү
This manual provides detailed instructions for the setup, operation, and maintenance of your Intermec EasyCoder PX4i Thermal Transfer Printer. The PX4i is a robust and flexible industrial printer designed for high-volume label printing, offering monochrome output at a resolution of 203 dpi and speeds up to 12 inches per second. Please read this manual thoroughly before using the printer to ensure safe and efficient operation.
2. Продукциянын өзгөчөлүктөрү
- Жогорку ылдамдыктагы басып чыгаруу: Capable of printing at speeds up to 12 inches per second.
- Жогорку чечим: Delivers clear monochrome prints at 203 dpi.
- Ийкемдүү медиа иштетүү: Supports various media types including black mark, continuous label, fanfold, gap, general identification label, notch, roll fed, tag, and ticket.
- Ethernet туташуусу: Integrated Ethernet for network integration.
- Программалануучу: Designed for optimized printing operations and streamlined deployment.
- Туруктуу дизайн: Industrial-grade construction for demanding environments.
3. Пакеттин мазмуну
Verify that all items listed below are included in your printer package. If any items are missing or damaged, contact your supplier immediately.
- Intermec EasyCoder PX4i Thermal Transfer Printer
- Электр кабели
- Labels (Included Components)
- User Documentation (This manual)
4. Коопсуздук маалыматы
Принтерге зыян келтирбөө жана жаракат алуунун алдын алуу үчүн ар дайым төмөнкү коопсуздук чараларын сактаңыз:
- Принтер туруктуу, түз бетке коюлганын текшериңиз.
- Connect the printer to a grounded power outlet.
- Do not operate the printer in wet or excessively humid conditions.
- Колдорду жана кенен кийимдерди иштөө учурунда кыймылдуу бөлүктөрдөн алыс кармаңыз.
- Кандайдыр бир тейлөө же тазалоо иштерин жүргүзүүдөн мурун электр энергиясын өчүрүңүз.
- Бекитилген алмаштыруучу тетиктерди жана аксессуарларды гана колдонуңуз.
5. Орнотуу
5.1 Пакеттен чыгаруу
- Принтерди таңгагынан этияттык менен чыгарыңыз.
- Бардык таңгактоочу материалдарды, скотчторду жана коргоочу пленкаларды алып салыңыз.
- Түпнуска таңгагын келечекте ташуу же сактоо үчүн сактаңыз.
5.2 Кубатты туташтыруу
- Принтердин кубат которгучу ӨЧҮРҮҮ абалында экенин текшериңиз.
- Connect the power cord to the printer's power inlet.
- Электр шнурунун экинчи учун жерге туташтырылган электр розеткасына сайыңыз.
5.3 Loading Media (Labels)
The PX4i printer supports various label types. Follow these general steps to load your labels:

Сүрөт: алдыңкы view of the Intermec EasyCoder PX4i printer, showing a label being fed out of the front slot. The control panel with an LCD screen and numeric keypad is visible on the top front.
- Принтердин медиа капкагын ачыңыз.
- Place the roll of labels onto the media supply spindle, ensuring it unwinds correctly.
- Feed the leading edge of the labels through the media guides and under the printhead assembly.
- Adjust the media guides to fit the width of your labels snugly but without binding.
- Close the media cover. The printer may automatically calibrate to the new media.
5.4 Connecting to a Computer/Network
The PX4i offers Ethernet connectivity for network integration.
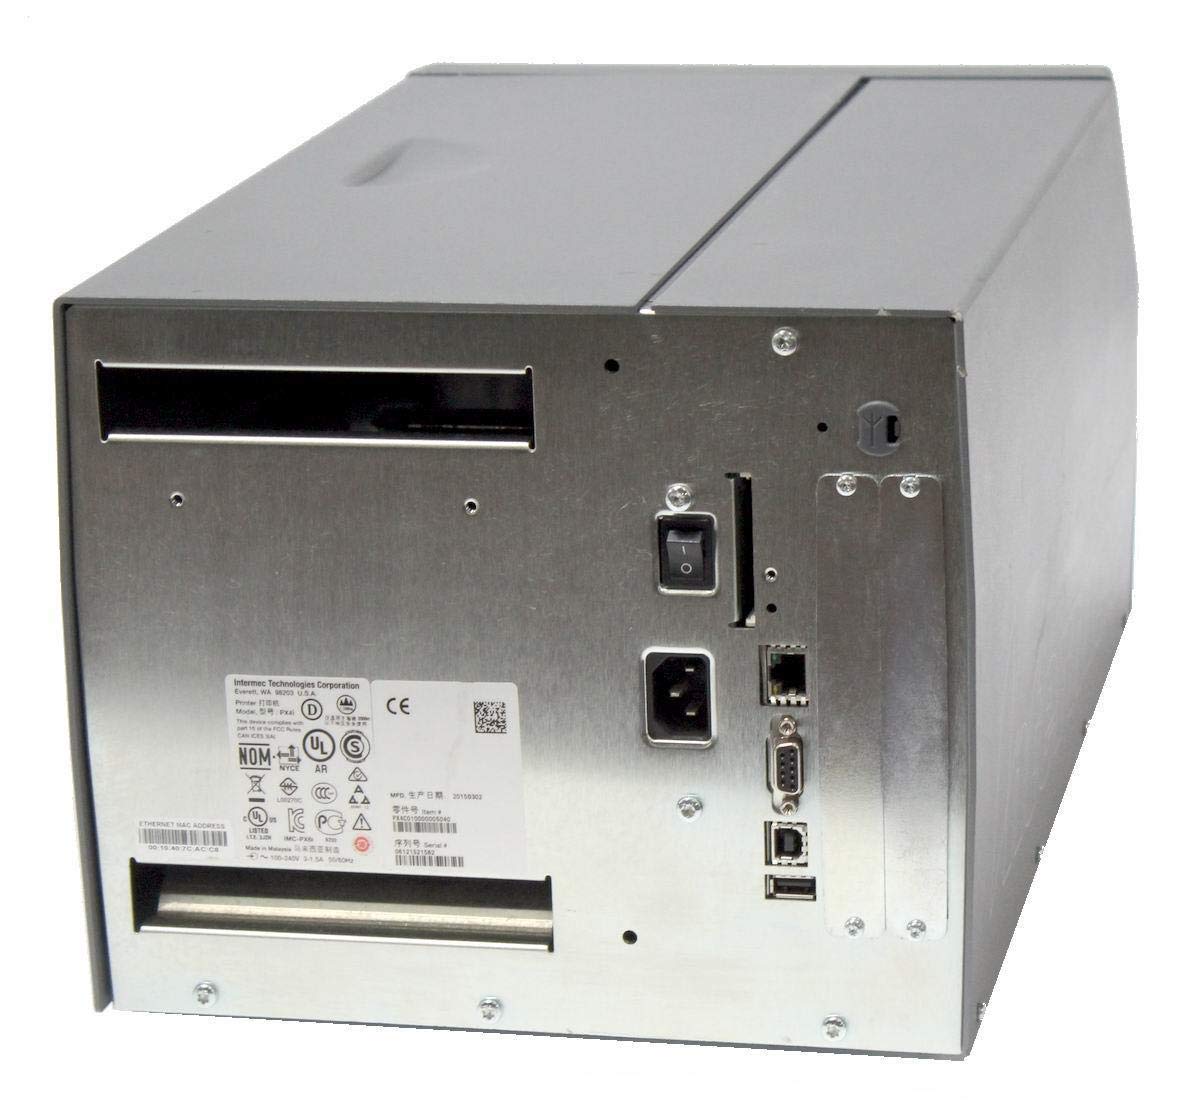
Сүрөт: Арткы view of the Intermec EasyCoder PX4i printer, displaying the power inlet, power switch, Ethernet port, serial ports, and USB ports. The metallic casing is clearly visible.
- Locate the Ethernet port on the rear of the printer.
- Connect a standard Ethernet cable from the printer to your network router or switch.
- For direct connection to a computer, use an appropriate USB or serial cable if supported by your system and printer configuration.
- Refer to the printer's network configuration guide for setting up IP addresses and other network parameters.
6. Операция
6.1 Башкаруу панелинин үстүнөview
The front control panel provides access to printer functions and status information.
Image: Close-up of the Intermec EasyCoder PX4i control panel, featuring an LCD display, navigation buttons (up, down, left, right, enter), and a numeric keypad with function keys like Pause, Feed, and Clear.
- LCD дисплей: Принтердин абалын, меню параметрлерин жана ката билдирүүлөрүн көрсөтөт.
- Чабыттоо баскычтары: Менюларды карап чыгуу жана параметрлерди тандоо үчүн колдонулат.
- Сандык баскычтоп: For entering data or selecting numbered options.
- Тыныгуу баскычы: Temporarily stops printing.
- Түрмөк баскычы: Advances one label.
- Орнотуу баскычы: Accesses printer configuration menus.
6.2 Негизги басып чыгаруу
- Принтер күйгүзүлүп, компьютериңизге же тармагыңызга туташып турганын текшериңиз.
- Open the document or application from which you wish to print labels.
- Select the Intermec PX4i printer from your printer list.
- Configure print settings such as label size, orientation, and quantity as needed.
- Initiate the print job. The printer will begin feeding and printing labels.
6.3 Adjusting Print Settings
Advanced print settings can be adjusted through the printer's control panel or via the printer driver on your computer. These settings include print darkness, print speed, label gap sensing, and more. Consult your printer driver documentation for software-based adjustments.
7. Техникалык тейлөө
Үзгүлтүксүз тейлөө оптималдуу иштешин камсыз кылат жана принтериңиздин иштөө мөөнөтүн узартат.
7.1 Басып чыгаруучу башты тазалоо
The printhead should be cleaned regularly, especially if print quality degrades.
- Принтерди өчүрүп, кубат сымын сууруп алыңыз.
- Басып чыгаруу башынын жыйындысын ачыңыз.
- Изопропил спирти менен нымдалган мамыксыз чүпүрөктү же басма башын тазалоочу калемди колдонуп, басма башынын бетин ортосунан четине чейин акырын сүртүңүз.
- Басып чыгаруу башын толугу менен кургатып, андан кийин кубат булагына туташтырыңыз.
7.2 Replacing Media and Ribbon
When the label roll or thermal transfer ribbon (if used) runs out, replace it promptly.
- Принтерди өчүрүп, медиа капкагын ачыңыз.
- Remove the empty label roll and/or used ribbon core.
- Install a new roll of labels and/or a new ribbon, following the loading instructions in Section 5.3.
- Ensure media and ribbon are properly tensioned and aligned.
- Медиа мукабасын жабыңыз.
8. Кыйынчылыктарды
This section addresses common issues you might encounter with your PX4i printer.
- Принтер күйбөй жатат: Check power cord connection, power outlet, and printer's power switch.
- Басып чыгаруу жок: Verify printer is online, connected to the computer/network, and has media loaded. Check for error messages on the LCD.
- Начар басып чыгаруу сапаты: Clean the printhead (Section 7.1). Adjust print darkness settings. Ensure correct media and ribbon are used.
- Туура тамактанбаган энбелгилер: Check media loading (Section 5.3) and ensure media guides are properly adjusted. Calibrate media sensors if necessary.
- Ката билдирүүлөрү: Refer to the printer's LCD display for specific error codes and consult the full Intermec PX4i technical manual for detailed explanations and solutions.
9. Техникалык шарттар
| Өзгөчөлүк | Description |
|---|---|
| Модель аты | PX4i |
| Элемент моделинин номери | PX4C010000000020 |
| Басма технологиясы | Жылуулук берүү |
| Print Color | Монохромдуу |
| Максималдуу басып чыгаруу ылдамдыгы | 12 in/s (Monochrome) |
| Максималдуу басып чыгаруу чечими | 203 dpi |
| Байланыш технологиясы | Ethernet |
| Максималдуу медиа өлчөмү | 12 дюйм |
| Камтылган компоненттер | Энбелгилер |
| Controller Type | Push Button |
| Өндүрүүчү | INTERMEC INDUSTRIAL PRINTERS |
| Пакеттин өлчөмдөрү | 23.25 x 15.5 x 15.25 дюйм; 36.2 фунт |
10. Кепилдик жана колдоо
The Intermec EasyCoder PX4i Thermal Transfer Printer comes with a standard manufacturer's warranty. For specific warranty terms and conditions, please refer to the warranty card included with your product or visit the official Intermec (Honeywell) support website. For technical assistance, troubleshooting beyond this manual, or to inquire about service, please contact Intermec customer support or your authorized dealer.
Онлайн ресурстар: For the latest drivers, firmware updates, and additional documentation, please visit the official Intermec support portal.


