Introduction
Thank you for choosing the Hoover DV70 DV11 Handheld Vacuum Cleaner. This manual provides essential information for the safe and efficient operation, maintenance, and troubleshooting of your appliance. Please read it thoroughly before first use and keep it for future reference.
Маанилүү коопсуздук нускамалары
- Тазалоодон же тейлөөдөн мурун шайманды дайыма электр кубатынан ажыратыңыз.
- Do not use the vacuum cleaner to pick up water or wet substances.
- Күйүүчү же күйүүчү материалдарды, ысык күлдү же учтуу нерселерди албаңыз.
- Чачты, кенен кийимдерди, манжаларды жана дененин бардык бөлүктөрүн тешиктерден жана кыймылдуу бөлүктөрдөн алыс кармаңыз.
- Чаң соргучту шнур же вилка бузулганда иштетпеңиз.
- Бул шайман тиричиликте гана колдонуу үчүн.
- Ensure the dust container is correctly fitted before use.
Продукт бүттүview
Familiarize yourself with the components of your Hoover DV70 DV11 vacuum cleaner.
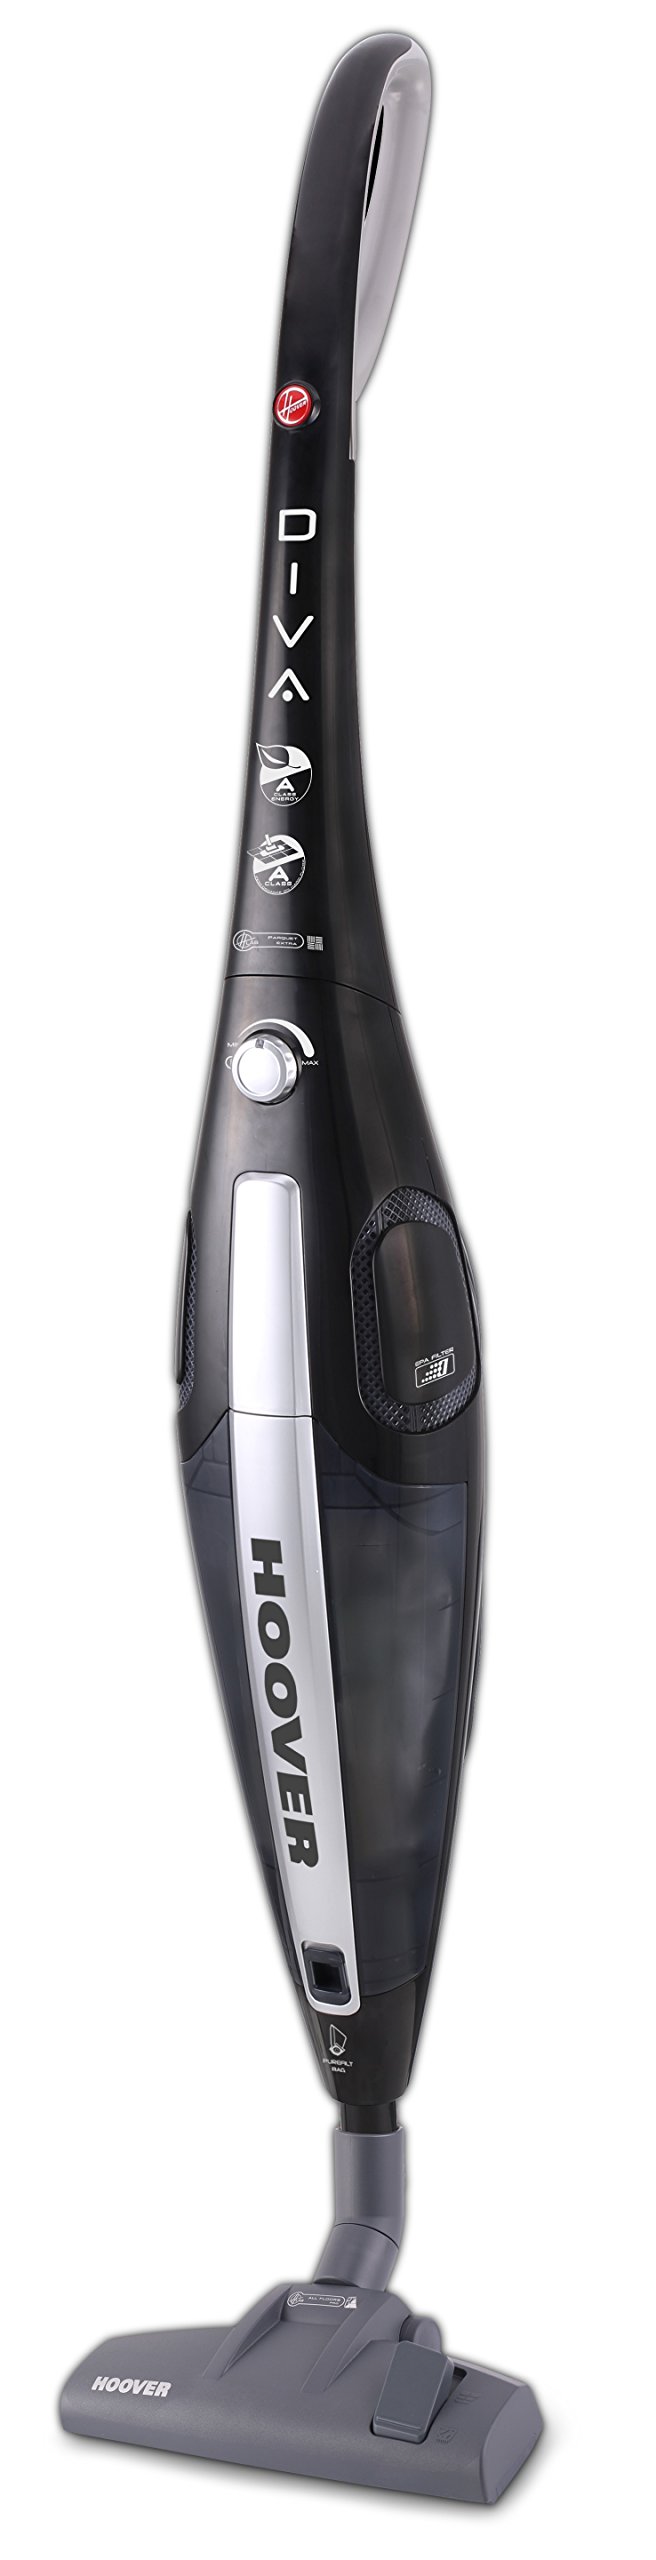
Figure 1: Hoover DV70 DV11 Handheld Vacuum Cleaner. This image shows the full assembly of the vacuum cleaner, highlighting its sleek black and silver design with the handle, main body, and floor nozzle.
- Handle
- Power Button / Performance Control
- Чаң контейнерин чыгаруу баскычы
- Чаң контейнери
- Чыпка жыйыны
- Floor Nozzle (Switchable)
- Easy Parquet Nozzle (for hard floors)
- Электр кабели
Орнотуу жана чогултуу
Чаң соргучуңузду биринчи колдонуудан мурун чогултуу үчүн бул кадамдарды аткарыңыз.
- Компоненттерди таңгактан чыгаруу: Carefully remove all parts from the packaging. Ensure all components listed in the Product Overview section are present.
- Тиркетүү туткасы: Тутканы чаң соргучтун негизги корпусуна бекем чыккыча кыстарыңыз.
- Connect Floor Nozzle: Attach the desired floor nozzle (either the switchable floor nozzle or the Easy Parquet nozzle for hard floors) to the bottom of the main body. Ensure it is firmly connected.
- Кубат туташуу: Кубат шнурун сууруп, аны ылайыктуу электр розеткасына сайыңыз.
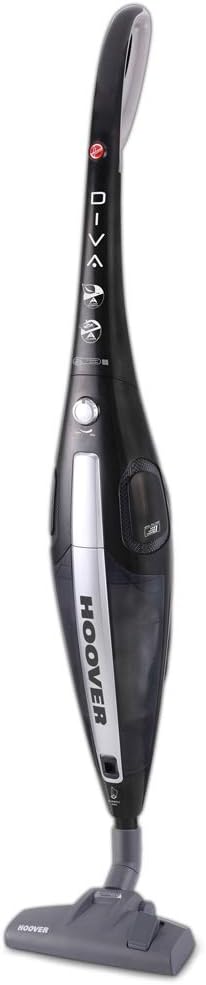
Сүрөт 2: Алдыңкы view of the Hoover DV70 DV11. This image provides a clear view of the main body and handle, useful for assembly reference.
Иштөө нускамалары
- Күйгүзүү/өчүрүү: Press the power button located on the main body to turn the vacuum cleaner on. Press it again to turn it off.
- Аткаруучулукту көзөмөлдөө: Your vacuum cleaner features electronic performance control. Adjust the suction power as needed for different surfaces or cleaning tasks using the control on the device.
- Насадкаларды колдонуу:
- колдонуу switchable floor nozzle for general cleaning on various floor types.
- For delicate hard floors, attach the Easy Parquet nozzle to prevent scratches and ensure effective cleaning.
- Dust Container Level: Monitor the dust container level indicator. Empty the container when it reaches the maximum fill line to maintain optimal suction performance.
Тейлөө жана тазалоо
Үзгүлтүксүз тейлөө сиздин чаң соргучуңуздун узак иштөөсүн жана оптималдуу иштешин камсыз кылат.
Чаң контейнерин бошотуу
- Кубатты өчүрүү: Always unplug the vacuum cleaner from the power outlet before emptying.
- Remove Dust Container: Press the dust container release button and carefully detach the dust container from the main body.
- Бош мазмун: Hold the dust container over a waste bin and open the bottom flap to empty the collected dust and debris.
- Кайра тиркөө: Close the flap and reattach the dust container to the vacuum cleaner, ensuring it clicks securely into place.
Фильтрлерди тазалоо
It is recommended to clean the filters regularly, especially if you notice a decrease in suction power.
- Кирүү чыпкалары: With the dust container removed, locate the filter assembly.
- Чыпкаларды алып салуу: Carefully remove the filters. Depending on your model, these may be washable.
- Таза чыпкалар:
- For washable filters: Rinse under cold running water until the water runs clear. Do not use detergents.
- For non-washable filters: Tap gently over a bin to remove dust. Do not wash.
- Кургак чыпкалар: Allow washable filters to air dry completely for at least 24 hours before reinserting. Do not use a dryer or heat.
- Кайра чогултуу: Once dry, reinsert the filters into the assembly and reattach the dust container.
Проблемаларды чечүү
Эгерде сиз чаң соргучуңуз менен көйгөйлөргө туш болсоңуз, төмөнкү кеңири таралган көйгөйлөрдү жана чечимдерди караңыз.
| Көйгөй | Мүмкүн себеп | Чечим |
|---|---|---|
| Чаң соргуч күйбөйт. | Электр розеткасына сайылган эмес; розетка бузук; кубат баскычы басылган эмес. | Check power cord connection; try a different outlet; press power button firmly. |
| Соруу күчү төмөн. | Dust container full; filters clogged; nozzle blocked. | Empty dust container; clean or replace filters; check nozzle for obstructions. |
| Иш учурунда адаттан тыш ызы-чуу. | Obstruction in the brush roll or hose; motor issue. | Turn off and unplug the vacuum. Inspect brush roll and hose for blockages and remove them. If noise persists, contact customer support. |
Техникалык шарттар
| Өзгөчөлүк | Деталь |
|---|---|
| Бренд | Гувер |
| Модель аты | DF70_DV11011 |
| Модель номери | DV70 DV11 |
| Өзгөчөлүктөр | Dust container level indicator |
| Power Source | Электр зымдары |
| Элемент Салмагы | 3.9 килограмм |
| Кубаттуулугу | 1.8 литр |
| Ватtage | 750 ватт |
| Форма фактору | Таяк |
| Түс | Көп түстүү |
| Ызы-чуу деңгээли | 79 децибел |
| Portable | Ооба |
| Башкаруу түрү | Кол менен башкаруу |
| Байланыш технологиясы | Wi-Fi |
| Энергия эффективдүүлүгү классы | A (from A to G) |
| Жылдык энергия керектөө | 27 кВт/саат |
| Carpet Cleaning Class | C (from A to G) |
| Hard Floor Cleaning Class | A (from A to G) |
| Dust Emission Class | B (from A to G) |
Кепилдик жана Кардарларды колдоо
Кепилдик жөнүндө маалымат алуу үчүн, өнүмүңүз менен кошо берилген кепилдик картасын караңыз же расмий Hoover дүкөнүнө баш багыңыз website. If you require further assistance, have questions, or need to report a problem not covered in this manual, please contact Hoover customer support.
You can typically find contact details for customer support on the Hoover webсайтында же сатып алуу документтеринде.


