1. Киришүү
This manual provides detailed instructions for the safe and effective operation of the Meco 2250-HZ Auto Digital Clamp Meter. This device is designed for measuring various electrical parameters, including AC/DC voltage, AC current, frequency, continuity, and diode testing. Please read this manual thoroughly before use and retain it for future reference.
2. Коопсуздук маалыматы
Always observe standard safety precautions when working with electrical circuits. Failure to do so may result in injury or damage to the meter. This meter is designed with over-voltage protection up to 200V DC and AC Peak. However, exercise caution.
- Көлөмдү өлчөөгө аракет кылбаңызtages же токтун белгиленген максималдуу чегинен ашуусу.
- Ensure the test leads are in good condition and properly connected before making measurements.
- Do not operate the meter if it appears damaged or if the battery cover is not securely closed.
- Avoid using the meter in wet environments or in the presence of explosive gases or dust.
- Always disconnect power to the circuit before connecting or disconnecting test leads, especially for current measurements.
3. Продукт бүтүп калдыview
The Meco 2250-HZ Auto Digital Clamp Meter features a robust design for reliable performance. Familiarize yourself with the components shown below.
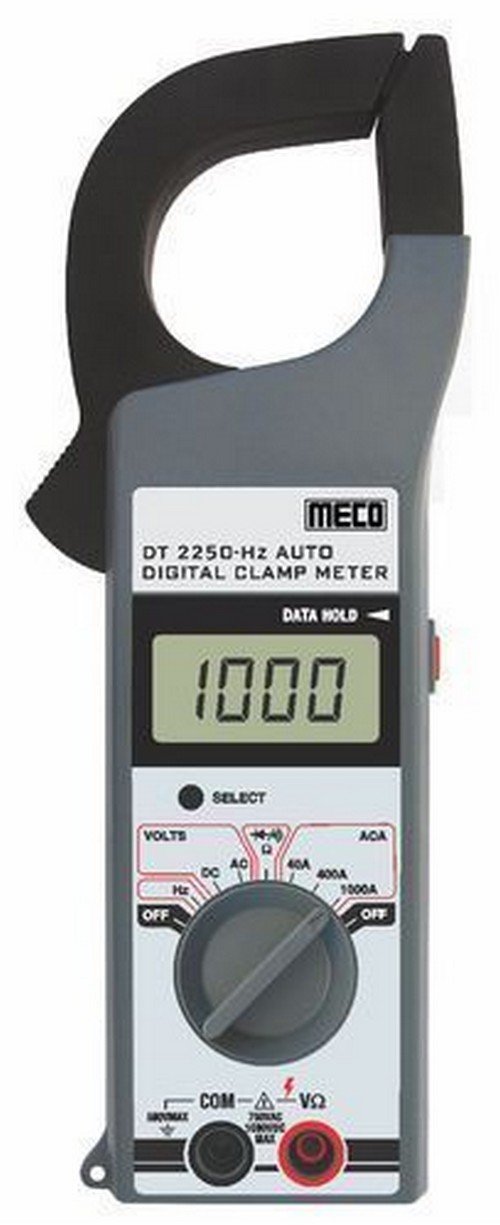
1-сүрөт: Фронт view of the Meco 2250-HZ Auto Digital Clamp Meter. This image displays the clamp jaw at the top, the LCD screen showing '1000', the function dial, and the input terminals at the bottom. The 'SELECT' and 'DATA HOLD' buttons are visible next to the display.
Негизги компоненттер:
- Clamp Жаак: Контактсыз AC токту өлчөө үчүн колдонулат.
- LCD дисплей: 3¾ digit liquid crystal display with a maximum reading of 3999. Shows measurement values, polarity, overrange indication (OL or -OL), and low battery indication.
- Функционалдык терүү: Rotary switch to select measurement functions (OFF, Volts DC/AC, Hz, ACA 40A/400A/1000A).
- ТАНДОО баскычы: Used to switch between DC and AC voltage modes, or other sub-functions within a dial setting.
- DATA HOLD Button: Дисплейдеги учурдагы окууну токтотот. Чыгаруу үчүн кайра басыңыз.
- Input Terminals (COM, VΩ): Көлөм үчүн сыноо өткөргүчтөрүн туташтыруу үчүнtage, resistance, continuity, and diode measurements.
4. Орнотуу
4.1 Батареяны орнотуу
The Meco 2250-HZ Auto Digital Clamp Meter requires batteries for operation. Batteries are not included with the product. To install or replace batteries:
- Эсептегич өчүрүлгөнүн текшериңиз.
- Эсептегичтин артындагы батарея отсегин табыңыз.
- Батарея бөлүкчөсүнүн капкагын ачуу үчүн бурагычты колдонуңуз.
- Insert the required batteries, observing correct polarity (+ and -).
- Батарея уясынын капкагын ордуна коюңуз жана аны бурама менен бекитиңиз.
A low battery indication will appear on the display when the battery voltage is low, signaling the need for replacement.
5. Иштөө нускамалары
5.1 Жалпы операция
- Turn the function dial to the desired measurement setting.
- Connect test leads to the appropriate input terminals (COM and VΩ) for voltage, resistance, continuity, or diode tests.
- Учурдагы өлчөөлөр үчүн cl колдонуңузamp jaw around a single conductor.
- басыңыз ТАНДОО button to toggle between AC/DC modes or other sub-functions if available for the selected range.
- басыңыз МААЛЫМАТ ТУТУП Учурдагы көрсөткүчтү дисплейде тоңдуруу үчүн баскычты басыңыз. Бошотуу үчүн кайра басыңыз.
5.2 AC/DC Voltage Өлчөө
- Set the function dial to the "VOLTS" position.
- Connect the black test lead to the COM terminal and the red test lead to the VΩ terminal.
- басыңыз ТАНДОО button to choose between AC or DC voltage measurement. The display will indicate "AC" or "DC".
- Сыноо өткөргүчтөрүн текшерилип жаткан схемага же компонентке параллелдүү туташтырыңыз.
- Томду окуңузtage дисплейдеги e мааниси.
5.3 AC токту өлчөө (Clamp)
- Set the function dial to the desired AC current range (40A, 400A, or 1000A).
- cl ачыңызamp триггерди басуу менен жаакты.
- Enclose only one conductor of the circuit within the clamp жаак. Жаактын толугу менен жабык экенин текшериңиз.
- ЖК дисплейден AC учурдагы маанисин окуңуз.
5.4 Жыштык (Гц) өлчөө
- Set the function dial to the "Hz" position.
- Connect the black test lead to the COM terminal and the red test lead to the VΩ terminal.
- Connect the test leads in parallel to the circuit where frequency needs to be measured.
- Read the frequency value in Hertz (Hz) on the LCD display.
5.5 Audible Continuity Check
- Set the function dial to the continuity/diode symbol (often shared with resistance).
- Connect the black test lead to the COM terminal and the red test lead to the VΩ terminal.
- Touch the test probes across the component or circuit to be tested.
- If continuity exists (low resistance), the meter will emit an audible beep.
5.6 Диоддун сыноосу
- Set the function dial to the continuity/diode symbol.
- Connect the black test lead to the COM terminal and the red test lead to the VΩ terminal.
- Connect the red test lead to the anode of the diode and the black test lead to the cathode. The display will show the forward voltagд тамчы.
- Reverse the test leads. The display should show "OL" (overload) for a good diode.
6. Техникалык тейлөө
6.1 Тазалоо
Счетчиктин сasing жарнама мененamp cloth and a mild detergent. Do not use abrasives or solvents. Keep the display clean and dry.
6.2 Батареяны алмаштыруу
Refer to Section 4.1 for battery installation and replacement instructions. Replace batteries promptly when the low battery indicator appears to ensure accurate readings.
7. Кыйынчылыктарды
| Көйгөй | Мүмкүн себеп | Чечим |
|---|---|---|
| Эсептегич күйбөйт. | Өлүк же туура эмес орнотулган батарейкалар. | Батареянын полярдуулугун текшериңиз жана керек болсо батарейкаларды алмаштырыңыз. |
| "OL" or "-OL" displayed. | Overrange condition; measurement exceeds meter's range. | Жогорку диапазонду тандаңыз же өлчөнгөн маани өлчөгүчтүн мүмкүнчүлүктөрүнө туура келерин текшериңиз. |
| Туура эмес окуулар. | Low battery, poor test lead connection, or incorrect function selection. | Replace batteries, ensure secure connections, verify function dial setting. |
| No audible beep during continuity test. | Open circuit or high resistance. | Verify the circuit is closed and resistance is low enough for continuity. |
8. Техникалык шарттар
| Өзгөчөлүк | Деталь |
|---|---|
| Дисплей | 3¾ digit LCD, max reading 3999 |
| Полярдуулук | Automatic, negative polarity indication |
| Overrange Indication | "OL" or "-OL" displayed |
| Нөлдү жөндөө | Автоматтык |
| Батареянын иштөө мөөнөтү | 200 саат типтүү |
| Voltage Коргоо | 200V DC and AC Peak |
| Audible Continuity Check | Ооба |
| Диод сыноо | Ооба |
| Батареянын төмөн көрсөткүчү | Ооба |
| Элемент Салмагы | 600 г (1.32 фунт) |
| Продукциянын өлчөмдөрү | 21 x 13 x 6 см |
| Материал | Пластик |
| Өндүрүүчү | Meco Instruments |
9. Кепилдик жана колдоо
For warranty information or technical support, please contact the retailer or the manufacturer, Meco Instruments, directly. Keep your purchase receipt as proof of purchase.


