Introduction
This manual provides comprehensive instructions for the installation, operation, and maintenance of your Westbrass ASB-50 Sink Top Waste Disposal Air Switch and Single Outlet Control Box. This air switch system is designed to provide a safe and convenient method for operating your garbage disposal unit by eliminating the risk of electrical shock associated with traditional wall switches.
Туура иштешин жана коопсуздугун камсыз кылуу үчүн орнотуудан жана иштетүүдөн мурун бул колдонмону кылдат окуп чыгыңыз.
Коопсуздук маалыматы
ЭСКЕРТҮҮ: Бул продукт Калифорния штатында рак жана тубаса кемтик же башка репродуктивдүү зыян алып келген химиялык заттарды камтыйт. Көбүрөөк маалымат алуу үчүн, өтүңүз www.P65Warnings.ca.gov.
- Always disconnect power to the disposal unit before performing any installation or maintenance.
- Ensure all electrical connections are made according to local codes and regulations. If unsure, consult a qualified electrician.
- The air switch system is designed to prevent electrical shock by using air pressure to activate the disposal, isolating the electrical components from the user.
- Do not attempt to modify the product. Use only genuine Westbrass replacement parts if needed.
Компоненттер камтылган
Your Westbrass ASB-50 Air Switch system includes the following components:
- Flush Button (Powder Coat White)
- Air Switch Control Box (Single 120V Outlet)
- 6-foot Air Hose
- Mounting Hardware (e.g., nuts, washers)

Figure 1: ашыкview of the Westbrass ASB-50 Air Switch components, including the flush button, control box, and air hose.

2-сүрөт: Детальдуу view of the flush button, highlighting its brass cover, solid brass push button, and sleek design.
Орнотуу жана орнотуу
Proper installation is key to the safe and effective operation of your air switch. Follow these steps carefully.
- Монтаждоо ордун даярдоо: The flush button requires a 1-1/4 inch to 1-3/8 inch hole for mounting. This can be on a countertop, sink, or wall. Ensure the location is within six feet of a dedicated 120V, 15 amp electrical outlet for the control box.
- Mount the Flush Button: Insert the flush button assembly into the prepared hole. Secure it from underneath with the provided mounting nut and seal washer. The button's body length is approximately 3 inches, fitting decks up to 1-1/4 inches thick.
- Аба түтүгүн туташтыруу: Attach one end of the 6-foot air hose to the air tube port on the underside of the flush button. Ensure a snug fit.
- Position Control Box: Place the control box in a dry, accessible location, ideally under the sink, close to the dedicated 120V outlet.
- Connect Air Hose to Control Box: Attach the other end of the air hose to the air inlet on the control box.
- Connect Disposal to Control Box: Plug your garbage disposal's power cord into the single 120V outlet on the control box.
- Plug Control Box into Wall Outlet: Finally, plug the control box's power cord into the dedicated 120V, 15 amp дубал розетка.

Figure 3: Installation diagram showing the connection points for the flush button, air hose, control box, and disposal unit.

Figure 4: Technical drawing with dimensions for the ASB-50 air switch components, useful for pre-installation planning.
Иштөө нускамалары
Operating your Westbrass ASB-50 Air Switch is simple and intuitive.
- To Start the Disposal: Press the flush button firmly. This sends a pulse of air through the hose to the control box, which then activates the garbage disposal.
- To Stop the Disposal: Press the flush button firmly again. A second pulse of air will signal the control box to turn off the garbage disposal.
The air switch mechanism ensures that there is no electrical connection between the button you touch and the electrical current powering the disposal, providing enhanced safety.

Figure 5: User interaction with the air switch button to activate the disposal.
Техникалык тейлөө
The Westbrass ASB-50 Air Switch is designed for durability and requires minimal maintenance. Regular cleaning and occasional checks will help ensure its longevity.
- Тазалоо: Clean the flush button with a soft, damp кездеме жана жумшак самын. Абразивдүү тазалагычтардан же катуу химиялык заттардан алыс болуңуз, анткени алар финишке зыян келтириши мүмкүн.
- Air Hose Check: Periodically inspect the air hose for any kinks, cracks, or disconnections. Ensure it remains securely attached to both the button and the control box.
- Баскычтын иштөөсү: If the button feels stiff or unresponsive, ensure no debris is lodged around it. The button is tested for 25,000 pushes, indicating long-term reliability.
Проблемаларды чечүү
If you encounter issues with your Westbrass ASB-50 Air Switch, refer to the following common problems and solutions:
| Көйгөй | Мүмкүн себеп | Чечим |
|---|---|---|
| Disposal does not turn on when button is pressed. |
|
|
| Disposal does not turn off. |
|
|
| Button feels stiff or requires excessive force. |
|
|
Техникалык шарттар
| Өзгөчөлүк | Деталь |
|---|---|
| Модель номери | ASB-50 |
| Өндүрүүчү | Westbrass |
| Элемент Салмагы | 11.2 унция |
| Продукциянын өлчөмдөрү | 7.25 x 8.25 x 3.5 дюйм (жалпы пакет) |
| Flush Button Fit | Fits 1-1/4 in. to 1-3/8 in. holes; 1-3/4 in. length switch body fits 1-1/4 in. thick decks |
| Control Box Outlet | Single (1) 120V outlet, no-shock design |
| Аба шлангынын узундугу | 6 feet (approx. 6.13 feet) |
| Материал | Brass; Plastic; Steel |
| Түс | Powder Coat White (for this specific model) |
| Келип чыккан өлкө | Тайвань |
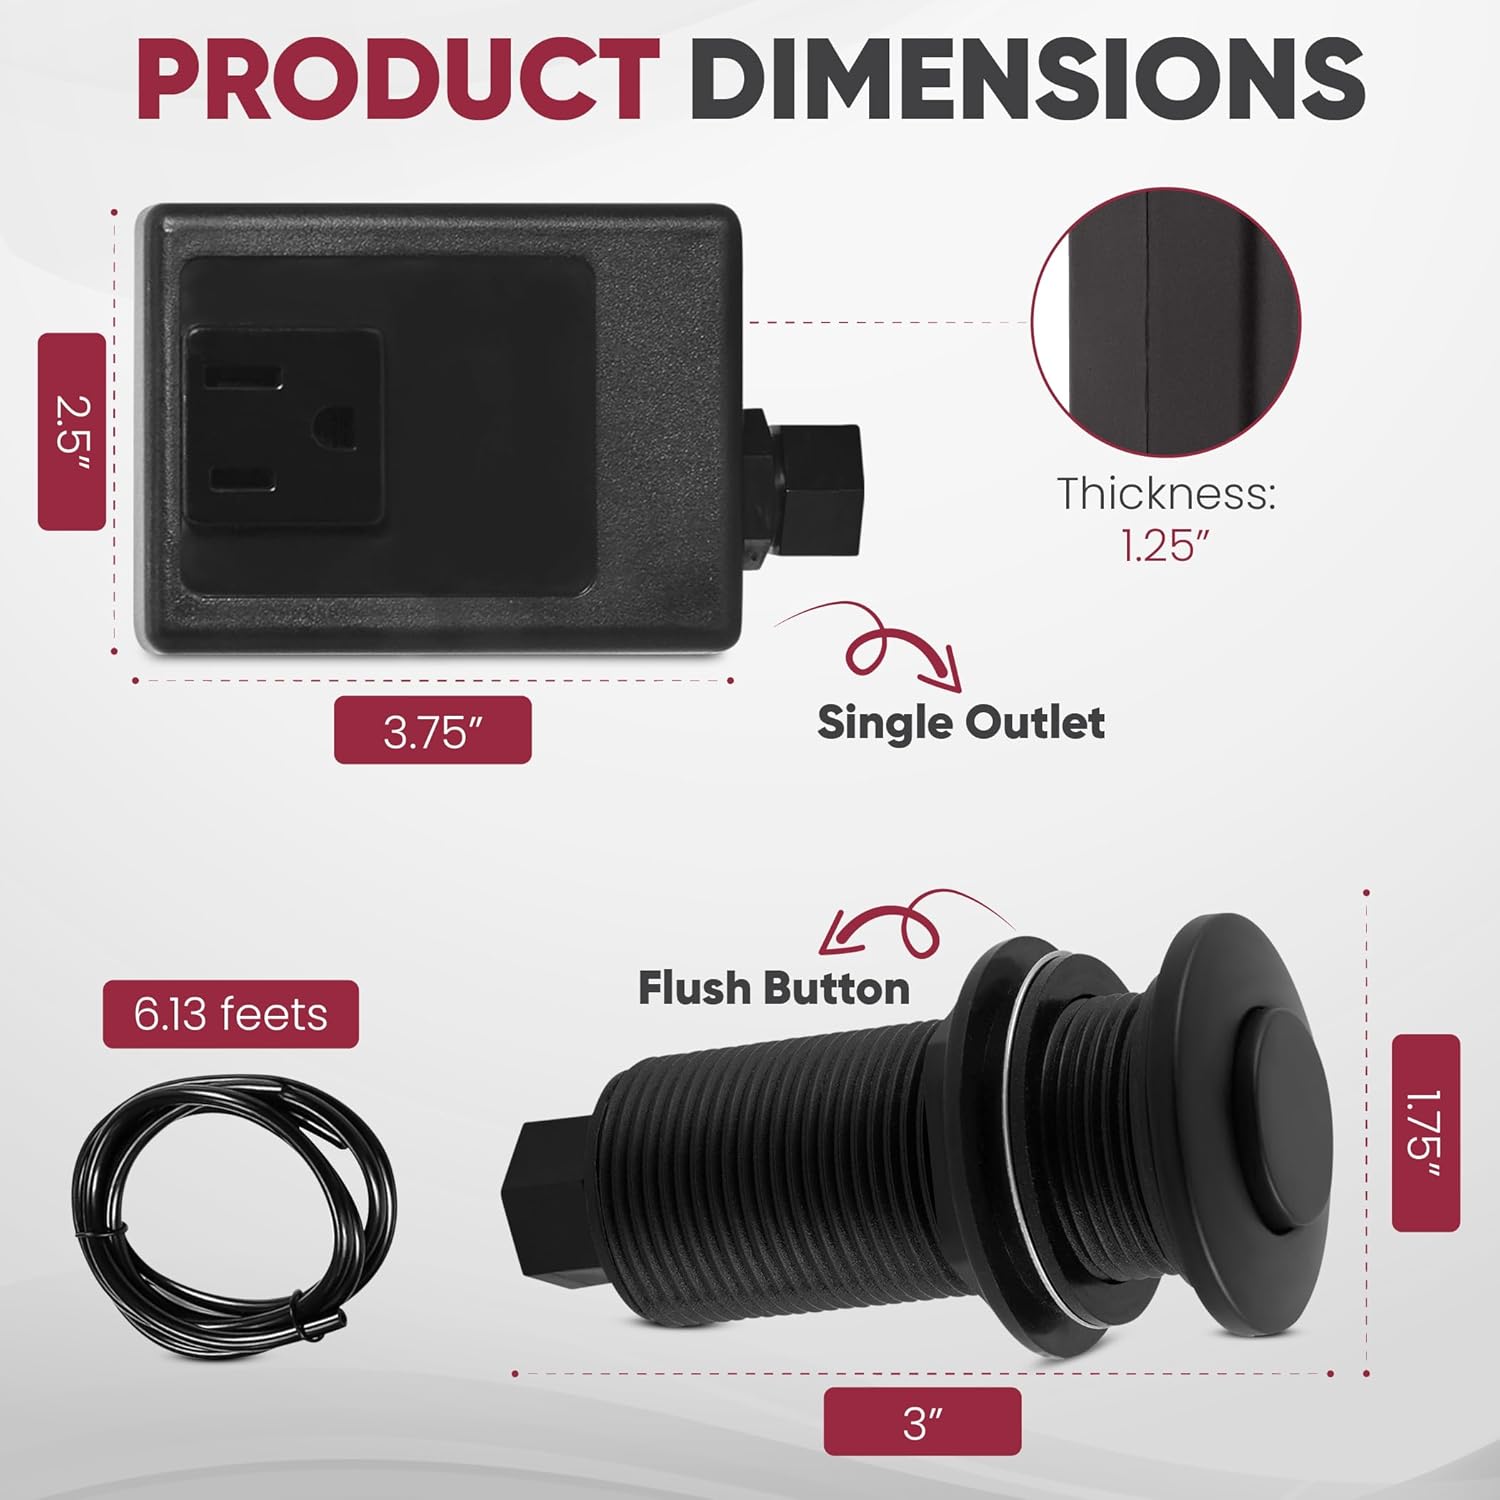
Figure 6: Detailed product dimensions for the control box and flush button.
Кепилдик жана колдоо
For warranty information or technical support regarding your Westbrass ASB-50 Air Switch, please contact Westbrass directly. Details can typically be found on the manufacturer's official website or by referring to the product packaging.
You can also visit the official Westbrass Store for more information and contact options: Amazon'догу Westbrass дүкөнү.


