1. Introduction and Overview
The Yamaha HS Series HS8W is an 8-inch, 2-way bass-reflex bi-amplified nearfield studio monitor designed for accurate sound reproduction in professional and home studio environments. This monitor features an 8-inch cone woofer and a 1-inch dome tweeter, delivering a frequency response from 38Hz to 30kHz. Its bi-amp system provides 75W for the low-frequency (LF) driver and 45W for the high-frequency (HF) driver, totaling 120W of power amplification. Integrated Room Control and High Trim response controls allow for acoustic adjustment to suit various listening environments. The monitor accepts balanced or unbalanced signals via XLR and phone jack inputs.
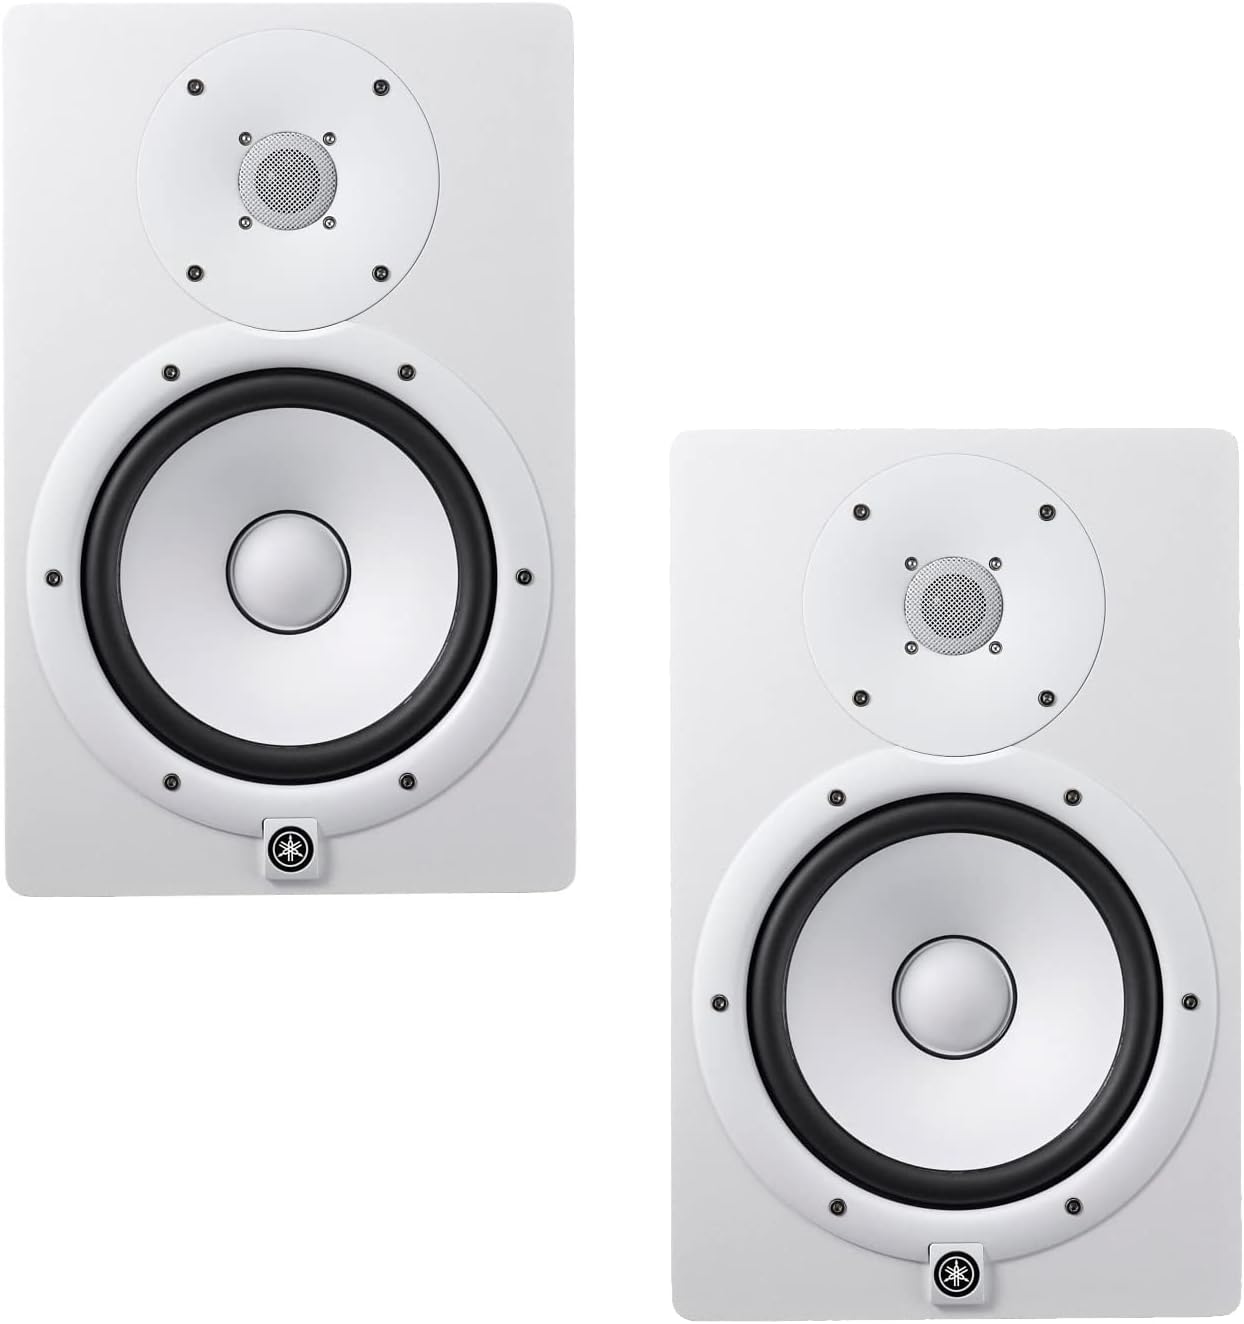
Image 1.1: A pair of Yamaha HS8W 8-inch bi-amplified nearfield studio monitors in white.
2. Орнотуу
2.1 Пакеттен чыгаруу
Carefully remove the monitors from their packaging. Retain all packaging materials for future transport or storage. Inspect the monitors for any signs of damage.
2.2 Орнотуу
Position the monitors on stable surfaces, ideally at ear level, forming an equilateral triangle with your listening position. Ensure there is adequate space around the rear bass-reflex port for optimal performance. Avoid placing objects directly in front of the monitors that could obstruct sound.
2.3 Байланыштар
Connect your audio source (e.g., audio interface, mixer) to the monitor's input jacks. The HS8W supports both balanced XLR and 1/4-inch TRS phone jack inputs. Use balanced cables for longer runs to minimize noise. Connect the power cable to the AC IN port and then to a suitable power outlet.
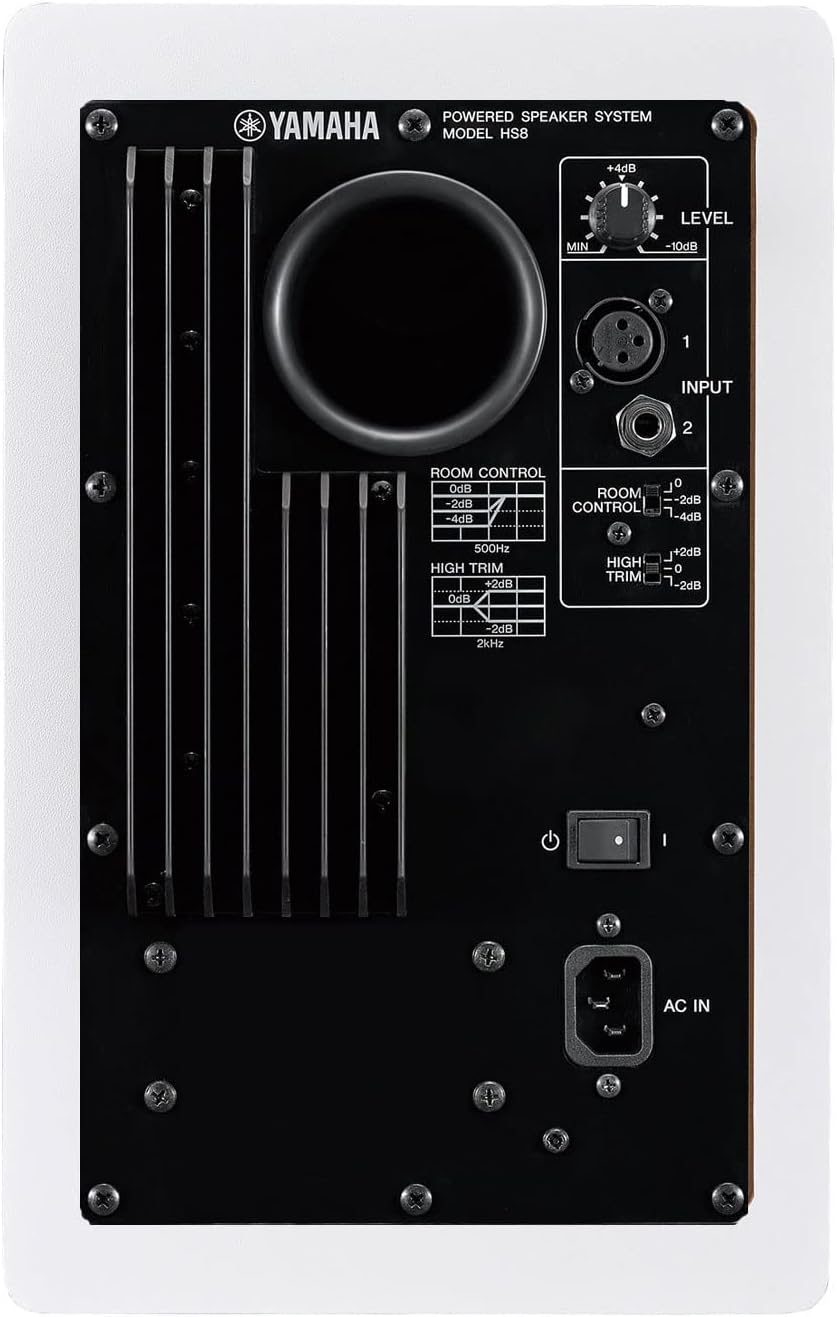
Image 2.1: Rear panel of the Yamaha HS8W monitor, illustrating the input jacks and acoustic control switches.
3. Иштөө нускамалары
3.1 Күйгүзүү/өчүрүү
Before powering on, ensure the LEVEL control on the rear panel is set to its minimum position. Turn on your audio source first, then power on the monitors using the rear panel switch. When powering off, turn off the monitors first, then your audio source.
3.2 Деңгээлди тууралоо
Use the LEVEL control knob on the rear panel to adjust the output volume of the monitor. Start with a low setting and gradually increase to a comfortable listening level.
3.3 Acoustic Controls
- БӨЛМӨНҮ БАШКАРУУ: This switch compensates for excessive low-end response that can occur when monitors are placed near walls or corners. Settings include 0dB, -2dB, and -4dB at 500Hz. Adjust based on your room's acoustics.
- ЖОГОРКУ КЕСИП: This switch allows for adjustment of the high-frequency response to match your listening environment or personal preference. Settings include +2dB, 0dB, and -2dB at 2kHz.
4. Техникалык тейлөө
To ensure the longevity and optimal performance of your Yamaha HS8W monitors, follow these maintenance guidelines:
- Тазалоо: Use a soft, dry cloth to wipe down the exterior of the monitors. Avoid using abrasive cleaners, solvents, or waxes, as these can damage the finish. Do not spray liquids directly onto the monitor.
- Чаң: Regularly dust the speaker cones and grilles to prevent accumulation, which can affect sound quality.
- Курчап турган чөйрө: Keep the monitors away from direct sunlight, heat sources, and excessive moisture. Ensure proper ventilation to prevent overheating.
- Транспорт: When moving the monitors, use the original packaging or suitable protective materials to prevent damage.
5. Кыйынчылыктарды
If you encounter issues with your Yamaha HS8W monitors, refer to the following common problems and solutions:
5.1 Үн жок
- Күч: Ensure the power cable is securely connected and the power switch on the rear panel is in the 'ON' position. Check if the power indicator LED is lit.
- Көлөмү: Verify that the LEVEL control knob on the monitor and the volume on your audio source are not set to minimum.
- Кабелдер: Check all audio cables for secure connections and ensure they are not damaged. Try swapping cables to rule out a faulty cable.
- Булак: Confirm that your audio source is playing sound and its output is correctly routed to the monitors.
5.2 Бурмаланган үн
- Киргизүү деңгээли: Reduce the input level from your audio source or the LEVEL control on the monitor. Overdriving the input can cause distortion.
- Кабелдер: Ensure balanced cables are used for balanced inputs to prevent noise and interference.
- Acoustic Controls: Adjust the ROOM CONTROL and HIGH TRIM switches. Incorrect settings for your environment can sometimes lead to perceived distortion or an unbalanced sound.
5.3 Ызы-чуу
- Негизги цикл: Try connecting all audio equipment to the same power outlet or power strip to avoid ground loops.
- Кабелдер: Use high-quality, shielded, balanced cables (XLR or TRS) for connections. Unbalanced cables are more susceptible to noise.
- Интерференция: Keep audio cables away from power cables and other sources of electromagnetic interference (e.g., fluorescent lights, power supplies).
6. Техникалык шарттар
| Өзгөчөлүк | Спецификация |
|---|---|
| Бренд | Yamaha |
| Модель аты | HS8W |
| Элемент моделинин номери | HS8 |
| Динамик түрү | Монитор |
| Монтаж түрү | Кабат туруктуу |
| Өзгөчө өзгөчөлүк | Bi ampжашоо |
| Сунушталган Колдонуулар | Professional audio recording and monitoring, potential uses in home theater systems or high-fidelity music playback |
| Шайкеш түзмөктөр | Иш такта, ноутбук, смартфон |
| Вуфердин диаметри | 8 дюйм |
| Tweeter диаметри | 1 дюйм |
| Көлөмдүү үн каналынын конфигурациясы | 2.0 |
| Түс | Ак |
| Камтылган компоненттер | 1 Year Free Extended Warranty, 2 Speakers |
| Кепилдик түрү | Кеңейтилген кепилдик |
| Элементтердин саны | 2 |
| Power Source | Электр зымдары |
| Динамиктин максималдуу чыгаруу күчү | 120 Ватт |
| Frequency Response | 38Hz - 30kHz (from description) |
| Байланыш технологиясы | XLR |
| Аудио чыгаруу режими | Стерео |
| Продукциянын өлчөмдөрү | 13.1 x 9.8 x 15.4 дюйм |
| Элемент Салмагы | 64.9 фунт |
| Дата биринчи жеткиликтүү | 25-сентябрь, 2015-жыл |
| UPC | 600599648531 |
7. Кепилдик жана колдоо
The Yamaha HS Series HS8W studio monitors come with a 1-Year Free Extended Warranty. For warranty claims, technical support, or service inquiries, please refer to the official Yamaha support channels or the retailer from whom the product was purchased. Keep your proof of purchase for warranty validation.


