1. Киришүү
This manual provides detailed instructions for the installation, setup, and operation of the HobbyEagle A3 EVO 6-axis flight controller. The A3 EVO is designed to enhance the stability and control of various RC aircraft, including fixed-wing airplanes, delta-wing aircraft, and V-tail aircraft.
The A3 EVO is built on an AVR platform, utilizing a highly efficient and concise algorithm to deliver powerful and reliable performance for RC enthusiasts.
2. Негизги өзгөчөлүктөрү
- Негизги контролер: AVR MCU
- Сенсор: MEMS 3-ок сенсор
- Gyro Scale Range: ± 2000 dps
- Өлчөмдөрү: 43×27×14мм
- Учуу режимдери: Supports 4 distinct flight modes: GYRO OFF, NORMAL, LEVEL, and HOVER.
- Wing Types: Compatible with Standard, Delta-wing, and V-Tail aircraft configurations.
- Receiver Support: Compatible with Standard PWM receivers, PPM, and Futaba S.Bus receivers.
- Throttle Output: Provides a dedicated throttle output channel when operating in PPM or S.Bus mode.
- Пайданы тууралоо: Features separate basic gain adjustments for Aileron, Elevator, and Rudder.
- Remote Master Gain: Supports remote master gain adjustment for fine-tuning during flight.
3. Продукт бүтүп калдыview
The HobbyEagle A3 EVO flight controller comes with essential accessories for installation and connection. Below is an image illustrating the components included.

3.1-сүрөт: Бүттүview of the HobbyEagle A3 EVO flight controller, connection cables, and mounting pads. The main unit is blue with white labels, showing input/output ports and gain adjustment potentiometers.
A closer look at the A3 EVO unit reveals its compact design and clearly labeled ports and adjustment points.
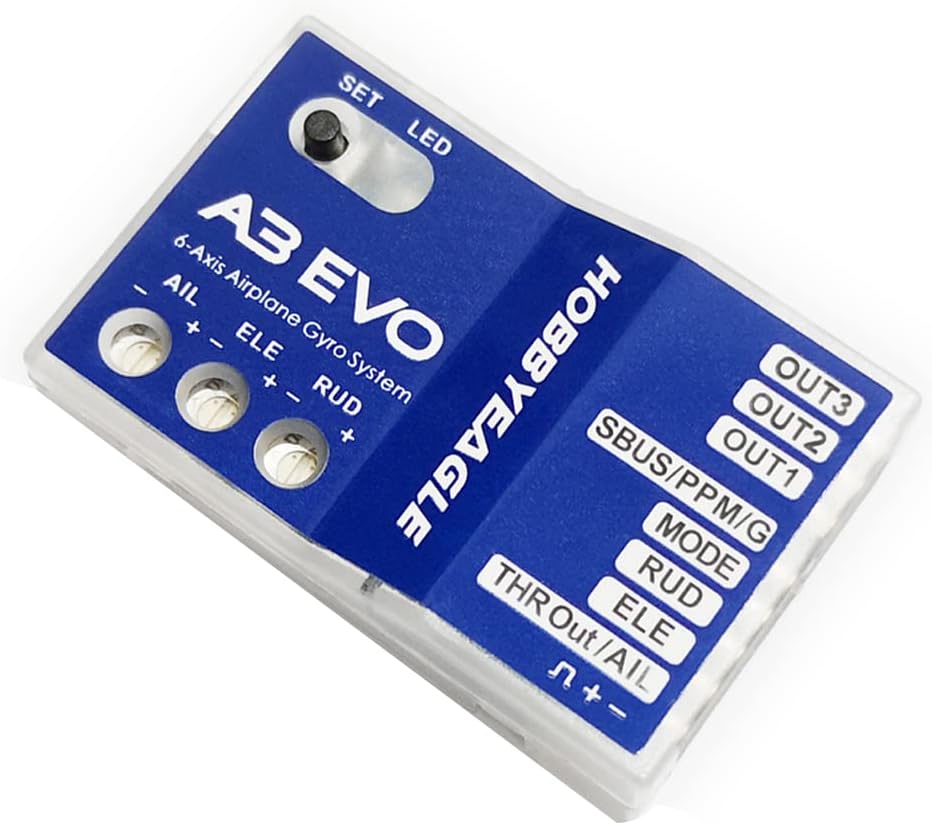
3.2-сүрөт: Деталдаштырылган view of the HobbyEagle A3 EVO flight controller, highlighting the 'SET' button, 'LED' indicator, AIL, ELE, RUD gain adjustment potentiometers, and various input/output ports including SBUS/PPM/G, MODE, RUD, ELE, AIL, and THR Out/AIL.
4. Орнотуу жана туташуу
4.1 Standard PWM Receiver Connection
When connecting the A3 EVO to a standard PWM receiver, follow the diagram below. Ensure correct polarity for all connections.
- Connect the [MODE] port to a 3-way switch channel on your receiver to switch flight modes during operation.
- Connect the [SBUS/PPM/G] port to a proportional channel (e.g., a volume knob or slide lever) on your transmitter to adjust the master gain in flight.
- The ESC or throttle servo should be connected directly to the throttle channel of the receiver, bypassing the gyro.
- Always pay attention to plug polarity: the orange signal line must be on the top, and the brown line on the bottom.
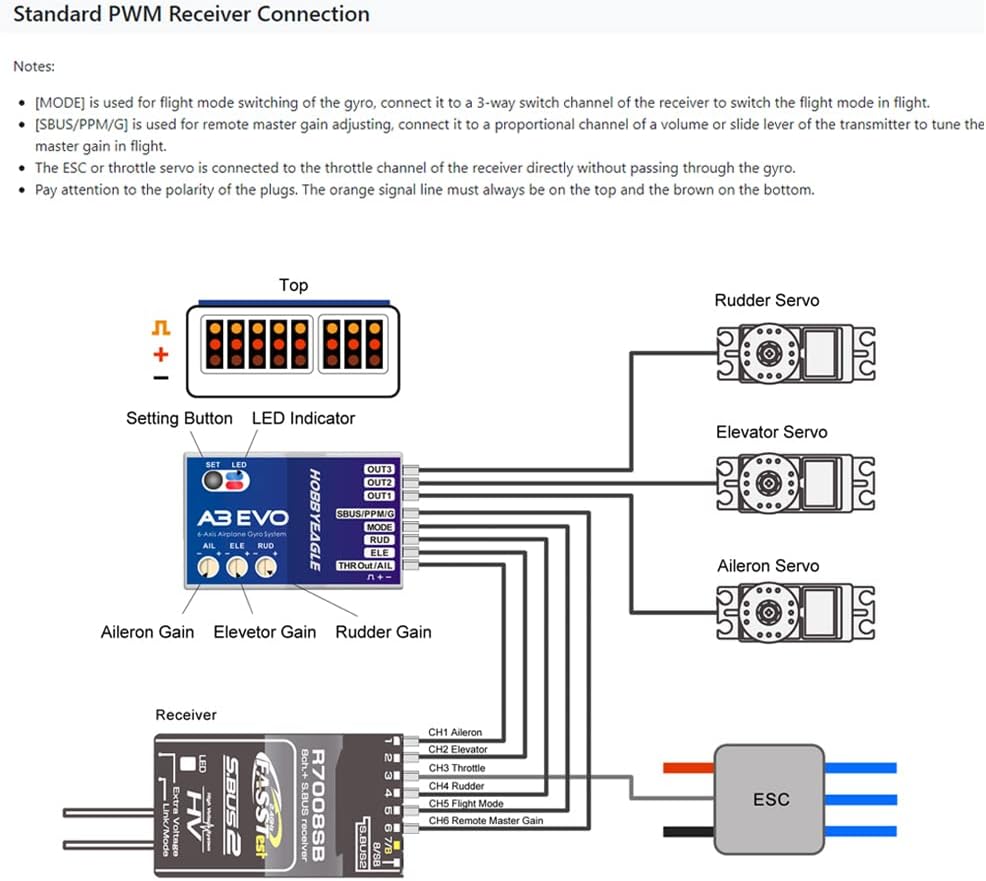
4.1-сүрөт: Wiring diagram for connecting the HobbyEagle A3 EVO to a standard PWM receiver, showing connections to Rudder, Elevator, Aileron servos, ESC, and the receiver's channels.
4.2 Single-line Receiver Connection (PPM/S.Bus)
The A3 EVO supports PPM and Futaba S.Bus serial receivers, allowing for a simplified single-wire connection. When using these receiver types, the throttle output channel is provided by the [THR Out/AIL] port on the A3 EVO.
Note: The Remote Master Gain function is disabled by default in single-line mode. To activate it, select a channel number for gain control in Item 11 of the Setting Menu.

4.2-сүрөт: Wiring diagram for connecting the HobbyEagle A3 EVO to a single-line PPM or S.Bus receiver, illustrating connections to servos, ESC, and the single signal input from the receiver.
Default Channel Mapping for Single Line Receivers:
| Сериялык кабыл алуу протоколу | АИЛ | ELE | THR | RUD | РЕЖИМ | АЛУУ |
|---|---|---|---|---|---|---|
| PPM кабыл алуучу | CH1 | CH2 | CH3 | CH4 | CH5 | - |
| Futaba S.Bus (FrSky SBUS же WFLY WBUS) | CH1 | CH2 | CH3 | CH4 | CH5 | - |
5. Иштөө режимдери
The A3 EVO offers 4 flight modes, which can be switched using a 3-position switch on your transmitter during flight. The LED indicator on the A3 EVO unit changes color to show the current flight mode.

5.1-сүрөт: Table illustrating the four flight modes of the A3 EVO (NORMAL, LEVEL, HOVER, GYRO OFF) and their corresponding LED indicator colors (Solid Blue, Solid Red, Solid Blue & Red, LED Off).
The default setting for mode allocation is MODE 1: NORMAL – LEVEL – HOVER. The table below provides different mode allocation options corresponding to the 3 positions of the switch (Item 7 in the Setting Menu).
| Режимдер | Кызматы-1 | Кызматы-2 | Кызматы-3 |
|---|---|---|---|
| MODE-1 * | НОРМАЛЬ | LEVEL | ҮЧҮН |
| MODE-2 | НОРМАЛЬ | GYRO OFF | LEVEL |
| MODE-3 | НОРМАЛЬ | GYRO OFF | ҮЧҮН |
| MODE-4 | LEVEL | GYRO OFF | ҮЧҮН |
6. Техникалык тейлөө
The HobbyEagle A3 EVO is designed for durability and reliability. To ensure optimal performance and longevity, consider the following maintenance guidelines:
- Тазалык: Keep the unit free from dust, dirt, and moisture. Use a soft, dry cloth for cleaning. Avoid using solvents or harsh chemicals.
- Байланыштары: Periodically check all wiring connections for secure fit and signs of wear or damage. Loose connections can lead to intermittent performance.
- Монтаждоо: Ensure the A3 EVO is securely mounted in your aircraft to prevent vibrations from affecting its performance. The provided mounting pads help absorb vibrations.
- Сактагыч: When not in use for extended periods, store the flight controller in a dry, cool environment, away from direct sunlight and extreme temperatures.
7. Кыйынчылыктарды
If you encounter issues with your HobbyEagle A3 EVO, refer to the following common troubleshooting steps:
- Кубат/LED өчүк эмес:
- Verify that the power supply to the receiver and subsequently to the A3 EVO is correct and stable.
- Check all power connections for proper polarity and secure fit.
- Incorrect Flight Mode Indication:
- Ensure the 3-way switch on your transmitter is correctly assigned to the MODE channel and is functioning properly.
- Confirm the channel mapping in your transmitter settings matches the A3 EVO's requirements.
- Unstable Flight/Over-correction:
- Adjust the Aileron, Elevator, and Rudder gain potentiometers on the A3 EVO. Start with lower gain settings and gradually increase until desired stability is achieved without oscillation.
- Check for excessive vibrations in the aircraft structure that might be affecting the gyro sensors. Ensure the A3 EVO is mounted on vibration-dampтөшөктөр.
- Verify that the control surfaces are moving in the correct direction relative to the gyro's compensation. If not, reverse the direction in the A3 EVO's settings or your transmitter.
- Башкаруу жообу жок:
- Check all servo connections to the A3 EVO and receiver.
- Ensure the receiver is properly bound to the transmitter and receiving a signal.
- For single-line receivers, confirm the correct channel mapping and that the throttle output is correctly configured if used.
For further assistance, please refer to the official HobbyEagle support resources or contact your retailer.
8. Техникалык шарттар
| Негизги контроллер | AVR MCU |
| Сенсор | MEMS 3-ок сенсор |
| Гиро шкала диапазону | ± 2000 dps |
| Өлчөмдөр | 43×27×14мм |
| Элемент Салмагы | 0.8 унция (болжол менен 22.7 грамм) |
| Келип чыккан өлкө | Кытай |
| Сунушталган Жаш | 14 ай жана андан жогору |
9. Кепилдик жана колдоо
For information regarding product warranty, returns, or technical support, please contact the retailer where you purchased the HobbyEagle A3 EVO flight controller. You may also visit the official HobbyEagle website for the latest support resources, firmware updates, and frequently asked questions.
Сураныч, кепилдик дооматтар үчүн сатып алуу далилиңизди сактап коюңуз.