1. Киришүү
This manual provides detailed instructions for the installation, operation, maintenance, and troubleshooting of your Gateway SX2865 SFF Desktop Motherboard H61 (Model DB.U7411.001). This motherboard is designed for Small Form Factor (SFF) desktop systems, featuring the Intel H61 Express chipset and supporting LGA 1155/1156 CPUs and DDR3 RAM. Please read this manual thoroughly before proceeding with any installation or configuration to ensure proper functionality and safety.
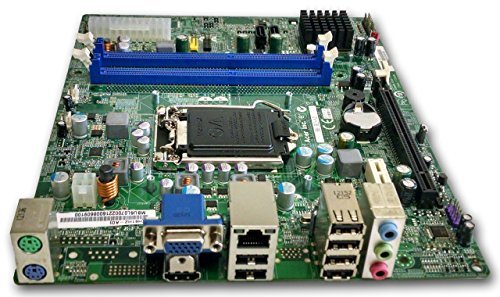
1-сүрөт: Бүттүview of the Gateway SX2865 SFF Desktop Motherboard H61. This image displays the main components and layout of the motherboard, including the CPU socket, RAM slots, and various connectors.
2. Коопсуздук маалыматы
Компьютердин компоненттерин иштетүүдө жана орнотууда ар дайым төмөнкү коопсуздук чараларын сактаңыз:
- Компоненттерди орнотуудан же алып салуудан мурун кубат шнурын розеткадан ажыратыңыз.
- Сезимтал компоненттердин электростатикалык разряддан (ЭСД) жабыркашын алдын алуу үчүн антистатикалык билек боону тагыныңыз.
- Сезимтал компоненттерге же схемаларга тийбеш үчүн, энелик платаны четтеринен кармаңыз.
- Ашыкча ысып кетүүнүн алдын алуу үчүн компьютердин корпусунун ичинде туура желдетүүнү камсыз кылыңыз.
- Motherboard нымга же экстремалдык температурага дуушар кылбаңыз.
- Эгерде сиз кандайдыр бир орнотуу кадамы боюнча күмөн санасаңыз, квалификациялуу техникке кайрылыңыз.
3. Орнотуу жана орнотуу
Follow these steps to properly install the Gateway SX2865 SFF Desktop Motherboard into your system:
3.1. Шассини даярдоо
- Open your computer chassis and ensure it is clean and free of dust.
- Install the I/O shield provided with your chassis or motherboard into the rear panel opening.
- Verify that the standoffs in the chassis align with the mounting holes on the motherboard. Adjust if necessary.
3.2. CPU орнотуу
- Locate the CPU socket (LGA 1155/1156) on the motherboard.
- Жүктөө рычагын акырын көтөрүп, CPU уячасынын капкагын ачыңыз.
- CPUдагы алтын үч бурчтук менен розеткадагы үч бурчтук белгиси менен CPUны розеткага кылдат тууралаңыз. Процессорду розеткага күчтөп салбаңыз.
- Close the socket cover and press down the load lever until it locks into place.
- Apply a thin layer of thermal paste to the CPU surface (if not pre-applied on the cooler).
- Install the CPU cooler according to its manufacturer's instructions, ensuring it is securely fastened.
3.3. RAM орнотуу
- Motherboard боюнча DDR3 DIMM уячаларын табыңыз.
- DIMM уячасынын эки учундагы клиптерди ачыңыз.
- RAM модулундагы оюкту DIMM уячасындагы ачкыч менен тууралаңыз.
- RAM модулунун эки учуна клиптер орнотулганга чейин катуу басыңыз.
3.4. Motherboard Монтаждоо
- Carefully place the motherboard into the chassis, aligning the mounting holes with the standoffs.
- Энелик платаны өтө катуу тартпагандай кылып, бурамалар менен бекитиңиз.
3.5. Перифериялык түзүлүштөрдү жана кубатту туташтыруу
- 24-пин ATX кубат туташтыргычын жана 4-пин CPU кубат туташтыргычын кубат булагыңыздан энелик платага туташтырыңыз.
- Сактоо түзмөктөрүңүздөн (HDD/SSD) SATA маалымат кабелдерин энелик платадагы SATA портторуна туташтырыңыз.
- Connect front panel connectors (power button, reset button, USB, audio) to their respective headers on the motherboard. Refer to the motherboard's silkscreen labels for correct orientation.
- Install any expansion cards (e.g., graphics card) into the appropriate PCIe slots and secure them.
- Connect all necessary cables to your power supply.
4. Иштөө жана конфигурациялоо
4.1. Баштапкы жүктөө
- After all components are installed and connected, close the chassis.
- Мониторуңузду, клавиатураңызды жана чычканыңызды туташтырыңыз.
- Кубат шнурун кубат булагына жана розеткага туташтырыңыз.
- Компьютериңиздеги кубат баскычын басыңыз.
4.2. BIOS/UEFI Орнотуу
The BIOS (Basic Input/Output System) or UEFI (Unified Extensible Firmware Interface) is firmware that initializes hardware during the booting process. To enter the BIOS/UEFI setup utility:
- During the initial boot-up sequence, repeatedly press the designated key (commonly Del, F2, же F10). The exact key may vary; check the on-screen prompts.
- Within the BIOS/UEFI, you can configure settings such as:
- Системанын датасы жана убактысы
- Boot Order (to install an operating system from a USB drive or DVD)
- SATA Mode (AHCI, IDE)
- CPU and Memory settings (advanced users)
- Өзгөртүүлөрдү сактап, жүктөөнү улантуу үчүн BIOS/UEFIден чыгыңыз.
4.3. Операция системасы жана драйверди орнотуу
After configuring the BIOS/UEFI, proceed with installing your preferred operating system (e.g., Windows, Linux). Once the OS is installed, install the necessary drivers for the motherboard's components (chipset, audio, LAN, etc.). These drivers are typically available on the manufacturer's website (Acer/Gateway) or can be found through the operating system's update features.
5. Техникалык тейлөө
Үзгүлтүксүз тейлөө сиздин энелик платаңыздын узак мөөнөттүү жана туруктуу иштешин камсыз кылууга жардам берет:
- Чаңды тазалоо: Periodically clean the inside of your computer case, including the motherboard, CPU cooler, and fan vents, using compressed air. Ensure the system is powered off and unplugged before cleaning.
- BIOS жаңыртуулары: Өндүрүүчүнү текшериңиз website (Acer/Gateway) for BIOS/UEFI updates. Updates can improve stability, add support for new hardware, or fix bugs. Follow the update instructions carefully to avoid damaging the motherboard.
- Драйвер жаңыртуулары: Keep your system drivers updated to ensure optimal performance and compatibility.
- Физикалык текшерүү: Маал-маалы менен энелик платада зыяндын белгилерин, бош туташууларды же конденсаторлордун дөңгөчтөрүн текшерип туруңуз.
6. Кыйынчылыктарды
Эгерде сиз эне платаңызда көйгөйлөргө туш болсоңуз, төмөнкү жалпы көйгөйлөрдү чечүү кадамдарын караңыз:
- Кубат жок:
- Ensure the power supply is connected correctly to the motherboard (24-pin ATX and 4-pin CPU).
- Check that the power supply switch is in the 'ON' position.
- Verify the power cord is securely plugged into both the power supply and the wall outlet.
- Confirm the front panel power button connector is correctly attached to the motherboard.
- Дисплей жок:
- Ensure the monitor is powered on and connected to the correct video output (either integrated graphics or a dedicated graphics card).
- RAM модулдарын кайра орнотуңуз. Бир гана RAM модулу орнотулуп, жүктөөгө аракет кылыңыз.
- Графикалык картаны кайра орнотуңуз (эгер бар болсо).
- Check if the CPU cooler is properly installed and the CPU power connector is secure.
- System Fails to Boot / POST Errors:
- Listen for beep codes from the motherboard's speaker (if installed). Consult the motherboard's documentation for beep code meanings.
- Clear the CMOS (Complementary Metal-Oxide-Semiconductor) by removing the CMOS battery for a few minutes or using the clear CMOS jumper (refer to motherboard layout).
- Ensure all essential components (CPU, RAM, GPU) are correctly installed.
- Операциялык системанын көйгөйлөрү:
- Verify that all necessary drivers are installed and up to date.
- Сактоо түзмөктөрү үчүн SATA кабелдик туташууларын текшериңиз.
- Run diagnostic tools for hard drives/SSDs and RAM.
7. Техникалык шарттар
Key technical specifications for the Gateway SX2865 SFF Desktop Motherboard H61 (Model DB.U7411.001):
| Өзгөчөлүк | Деталь |
|---|---|
| Бренд | Gateway |
| Модель аты | SX2865 |
| Элемент моделинин номери | DB.U7411.001 |
| Өндүрүүчү | Acer |
| Чипсет түрү | Intel H61 Express |
| CPU розетка | LGA 1155 or LGA 1156 |
| Шайкеш процессорлор | Intel Xeon (and other compatible LGA 1155/1156 CPUs) |
| RAM эс технологиясы | DDR3 |
| Memory Clock Speed | 2133 MHz (Max supported, actual speed depends on CPU and RAM) |
| Эстутум сактоо сыйымдуулугу | 16 GB (Maximum supported) |
| Шайкеш түзмөктөр | Персоналдык компьютер |
| Платформа | Linux (and other compatible operating systems) |
| Форма фактору | uATX (Micro-ATX) |
8. Кепилдик жана колдоо
For warranty information and technical support regarding your Gateway SX2865 SFF Desktop Motherboard H61 (Model DB.U7411.001), please refer to the documentation provided with your original system or contact the manufacturer directly.
- Өндүрүүчү: Acer (as per product specifications)
- Бренд: Gateway
- расмий сапар Gateway колдоо webсайт or Acer колдоо webсайт for drivers, FAQs, and contact information.
- Кепилдик дооматтар үчүн сатып алганыңыздын далилин сактаңыз.