1. Киришүү
This manual provides detailed instructions for the installation, operation, and maintenance of your Reolink RLC-410WS 4MP Super HD Dual-Band Wi-Fi Wireless Security IP Camera. Please read this manual thoroughly before using the product to ensure correct usage and optimal performance.
2. Продукт бүтүп калдыview
2.1 Камеранын компоненттери
Familiarize yourself with the main components of your RLC-410WS camera:

Сүрөт 2.1: Reolink RLC-410WS Camera Component Diagram. This image illustrates the various parts of the camera including the antenna, lens, IR LEDs, daylight sensor, and connection ports for power, network, and the reset button.
- Антенна: Wi-Fi туташуусу үчүн.
- Metal Aluminum Case: Durable housing for outdoor use.
- High Definition F=4.0mm Lens: Captures 4MP Super HD video.
- 36 PCS IR LEDs: Provides infrared illumination for night vision up to 100ft.
- Күндүзгү сенсор: Detects ambient light to switch between day and night modes.
- Калыбына келтирүү баскычы: Заводдун демейки жөндөөлөрүн калыбына келтирүү үчүн колдонулат.
- Электр порту: For connecting the 12V DC power adapter.
- Тармак кабелинин порту: For initial setup and optional wired Ethernet connection.
2.2 Негизги өзгөчөлүктөрү
- 4 мегапикселдүү супер HD видео: Records clear video at 1440p resolution, supporting 1080p and 720p.
- 100 фут түнкү көрүнүш: Equipped with IR LEDs for clear surveillance in low-light conditions.
- Кош тилкелүү Wi-Fi: Supports 2.4GHz and 5GHz Wi-Fi for flexible and stable wireless connection.
- Кыймылды аныктоо эскертүүлөрү: Sends real-time email alerts with photos or 30-second video clips, and push notifications to mobile phones.
- Жергиликтүү сактагыч: Built-in 16GB Micro SD card for recording and storing up to 400 motion-activated events.
- Алыстан кирүү: Monitor your home from anywhere using the Reolink Client software (PC/Mac) or Reolink App (iPhone/Android).
- 80 градус Viewбурч: кенен чөйрөсүн камсыз кылат view.
- IP67 аба ырайы: Ар кандай аба ырайынын шарттарында сыртта колдонуу үчүн иштелип чыккан.
3. Кутуда эмне бар
Пакетиңизде бардык буюмдар бар экенин текшериңиз:

Сүрөт 3.1: Package Contents. This image displays the camera, antenna, power adapter, extension cable, network cable, software CD, quick start guide, surveillance sign, mounting template, and screws.
- Reolink RLC-410WS Camera
- Кубаттуу адаптер
- Power Extension Cable
- Network Cable (1 meter)
- Антенна
- Quick Start Guide
- Монтаждык тешик шаблону
- Бурамалар жана дубал сайгычтары
- Байкоо белгиси
- CD (Manual/Software)
4. Орнотуу жана орнотуу
4.1 Баштапкы конфигурация
- Connect Power and Ethernet: Connect the camera to the power adapter and then to your router using the provided Ethernet cable.
- Download Reolink App/Client: Download the Reolink App from the App Store or Google Play, or the Reolink Client software from the official Reolink website for PC/Mac.
- Камера кошуу: Open the app/client, click the "+" icon to add the camera. The app/client should automatically detect the camera on your local network.
- Сырсөз коюу: Create a strong password for your camera.
- Wi-Fi'ды конфигурациялоо: Once connected via Ethernet, navigate to the camera settings in the app/client to configure Wi-Fi. Select your 2.4GHz or 5GHz network and enter the password. Ensure a strong Wi-Fi signal at the installation location. Note: Wi-Fi settings can typically only be changed while the camera is connected via Ethernet.
- Сыноо байланышы: After configuring Wi-Fi, test the connection. Once successful, you can disconnect the Ethernet cable.
4.2 Камераны орнотуу
Consider the following when mounting your camera:
- Жайгашкан жери: Каалаган жерди камсыз кылган жерди тандаңыз viewбурчтуу жана Wi-Fi тармагыңыздын диапазонунда.
- Power Cable Routing: The power cable requires a hole of approximately 3/4 inch (19mm) to pass through a wall due to the Ethernet socket and reset switch on the breakout cable. Plan your cable routing carefully.
- кашаа тууралоо: The mounting bracket allows for three-dimensional adjustment. Loosen the small Allen screws to adjust the camera angle, then tighten them securely.
- Сууну коргоо: For outdoor installations, ensure the breakout cable connections (power, network, reset button) are protected from water. Consider using a waterproof junction box.

Сүрөт 4.1: Camera Dimensions. This image provides the physical measurements of the RLC-410WS camera, useful for planning installation.
5. Камераны иштетүү
5.1 Камерага кирүү
You can access your Reolink RLC-410WS camera using various platforms:

Сүрөт 5.1: Reolink Software Platform. This image illustrates how the Reolink camera can be accessed and managed from various devices, including Mac, Windows, iPhone, and Android.
- Reolink App: Available for iOS (iPhone/iPad) and Android devices. Provides live view, ойнотуу жана жөндөөлөрдү башкаруу.
- Reolink Client: Desktop software for Windows and macOS. Offers comprehensive control, multi-camera viewing, and recording options.
- Web Браузер: Access the camera directly via its IP address using a web browser (features may be limited compared to the app/client).
5.2 Кыймылды аныктоо жана жаздыруу
The RLC-410WS camera features customizable motion detection:
- Сезимталдыкты жөндөө: Жалган коңгуроолорду азайтуу үчүн кыймылды аныктоо сезгичтигин тууралаңыз.
- аныктоо зоналары: Камеранын ичинде белгилүү бир аймактарды аныктаңыз view to monitor for motion, ignoring irrelevant areas.
- Купуялык маскасы: Mask out sensitive areas from being recorded or viewред.
- Эскертүүлөр: Receive instant push notifications on your phone, email alerts with snapshots or video clips, and upload recordings to an FTP server.
- Жергиликтүү сактагыч: Motion-activated events are recorded to the built-in 16GB Micro SD card for later playback.
5.3 Видеонун сапаты жана түнкү көрүнүш
The camera provides high-quality video day and night:
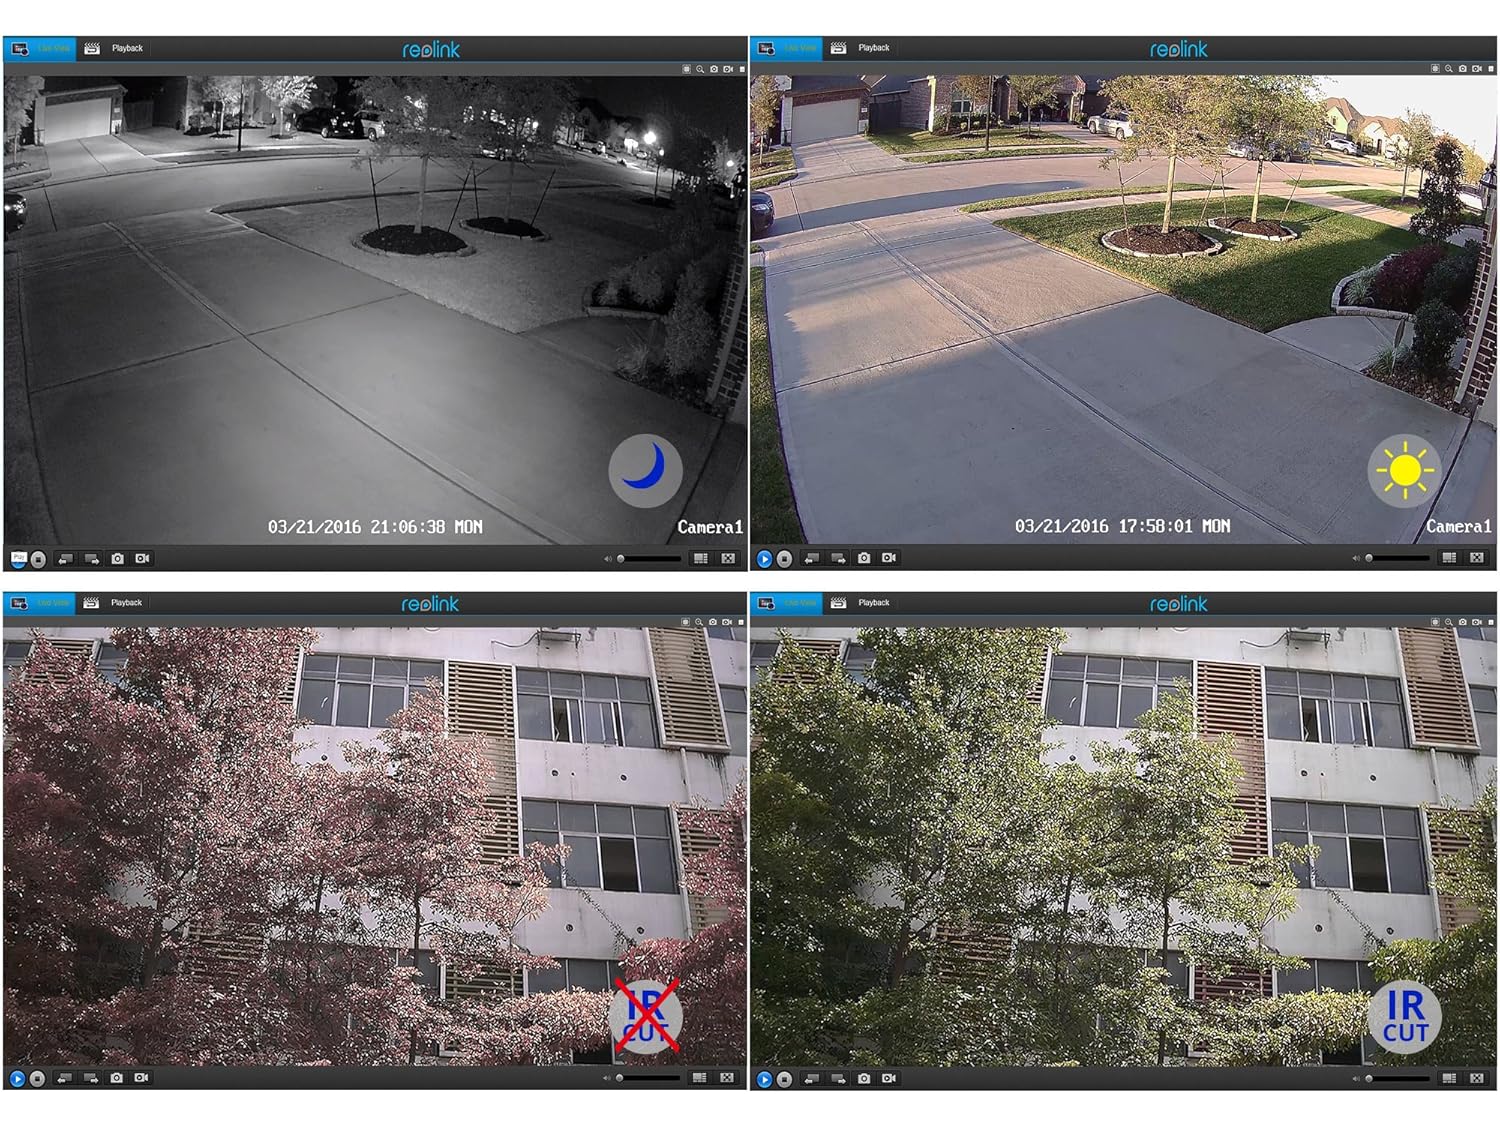
Сүрөт 5.2: Day and Night Vision Comparison. This image demonstrates the camera's ability to capture clear video in both daylight and low-light conditions using its infrared capabilities.
- 4MP Super HD: Delivers crisp and clear video footage.
- Инфракызыл түнкү көрүнүш: Automatically switches to night mode in low light, providing clear black and white video up to 100 feet.
- IR Cut Filter: Ensures accurate color reproduction during the day and enhanced infrared sensitivity at night.
6. Техникалык шарттар
Detailed technical specifications for the Reolink RLC-410WS camera:
| Өзгөчөлүк | Спецификация |
|---|---|
| Модел | RLC-410WS |
| Натыйжалуу Video Resolution | 4 MP (1440p) |
| Viewбурч | 80 градус |
| Түнкү көрүү диапазону | 100 Фут |
| Frame Rate | секундасына 25 кадр |
| Зымсыз байланыш | Wi-Fi (2.4/5 ГГц кош диапазондуу) |
| Сактагыч | Built-in 16GB Micro SD Card |
| Power Source | 12 вольт DC |
| Эл аралык коргоо рейтинги | IP67 |
| Өлчөмдөрү (L x W x Y) | 18.8 x 6.6 x 6.6 сантиметр |
| Элемент Салмагы | 454 g (1 Pound) |
| Башкаруу ыкмасы | Колдонмо |
| Монтаж түрү | Дубалга орнотуу |

Сүрөт 6.1: Reolink Model Feature Comparison. This table highlights the features available across various Reolink camera models, including PoE, Wi-Fi, Micro SD storage, optical zoom, and pan/tilt capabilities.
7. Кыйынчылыктарды
This section addresses common issues you might encounter with your RLC-410WS camera.
7.1 Wi-Fi туташуу маселелери
- Wi-Fi туташуусу жок:
- Ensure the camera is initially configured via Ethernet before setting up Wi-Fi.
- Wi-Fi сырсөзүңүздүн туура экенин текшериңиз.
- Perform a firmware update. Outdated firmware can cause connectivity problems.
- Ensure the camera is within range of your Wi-Fi router and has a strong signal. Signal strength can drop quickly with distance.
- If changing Wi-Fi settings, ensure the camera is connected via Ethernet, run a connection test, and save changes.
- Frequent Disconnects:
- Check Wi-Fi signal strength at the camera's location. Consider using a Wi-Fi extender if the signal is weak.
- Ensure your router's 2.4GHz and 5GHz channels are not overly congested.
- Камеранын микропрограммасын эң акыркы версиясына жаңыртыңыз.
7.2 Camera Not Responding After Settings Change/Firmware Update
- If the camera becomes unresponsive after a settings change or firmware update, try power cycling the camera (unplug and re-plug the power adapter).
- If power cycling does not work, reconnect the camera via Ethernet. This often restores connectivity and allows further troubleshooting or re-configuration.
- If the issue persists, perform a factory reset using the reset button on the breakout cable. Note: This will erase all settings.
7.3 Жалган кыймылды аныктоо эскертүүлөрү
- Adjust the motion detection sensitivity in the camera settings.
- Define specific motion detection zones to exclude areas with frequent irrelevant movement (e.g., trees swaying, busy roads).
- In night vision mode, insects flying close to the IR illuminators can trigger alerts. Consider adjusting sensitivity or, if possible, using an external IR illuminator placed away from the camera.
8. Техникалык тейлөө
- Тазалоо: Дайыма камеранын линзасын жана корпусун жумшак, гamp ачык сүрөт сапатын камсыз кылуу үчүн кездеме. Абразивдүү тазалагычтардан алыс болуңуз.
- Программалык камсыздоонун жаңыртуулары: Periodically check the official Reolink webмикропрограммалык камсыздоону жаңыртуу сайты. Камераңыздын микропрограммасын жаңыртып туруу оптималдуу иштөөнү, коопсуздукту жана жаңы функцияларга жетүүнү камсыз кылат.
- Кабелдик текшерүү: Periodically inspect all cables and connections for wear or damage, especially in outdoor installations. Ensure waterproof seals are intact.
- SD Card башкаруу: While the camera manages the 16GB SD card, it's good practice to occasionally check its status via the app/client.
9. Кепилдик жана колдоо
For warranty information, please refer to the warranty card included in your product package or visit the official Reolink website. Reolink provides dedicated customer support.
- Техникалык колдоо: For technical assistance, troubleshooting, or any product-related queries, please contact Reolink support via their official website. Email support is typically provided with responses within 24 hours.
- Программалык камсыздоону жүктөп алуулар: Latest firmware versions and software clients can be downloaded from the Reolink support page.


