1. Киришүү
This manual provides essential instructions for the safe and efficient operation of your JVC LT-32EM75 32-inch 720p LED TV. Please read this manual thoroughly before using the television and retain it for future reference. Proper installation, setup, and maintenance are crucial for optimal performance and longevity of your device.
Маанилүү коопсуздук маалыматы
- Вентиляция тешиктерин жаап албаңыз. Тийиштүү аба агымы үчүн сыналгынын айланасында жетиштүү мейкиндикти камсыз кылыңыз.
- Телевизорду радиаторлор, жылуулук регистрлери, мештер же башка аппараттар (анын ичинде) сыяктуу жылуулук булактарынын жанына койбоңуз. ampкөтөргүчтөр) жылуулукту пайда кылуучу.
- Электр шнурунун басылып кетүүсүнөн же кысып калуудан сактаңыз, өзгөчө сайгычтарда, розеткаларда жана алар аппараттан чыга турган жеринде.
- Өндүрүүчү тарабынан көрсөтүлгөн тиркемелерди/аксессуарларды гана колдонуңуз.
- Чагылган бороондо же көпкө колдонулбаганда бул аппаратты электр розеткасынан ажыратыңыз.
- Бардык тейлөөлөрдү квалификациялуу тейлөө кызматкерлерине тапшырыңыз. Аппарат кандайдыр бир зыянга учураганда, мисалы, кубат берүүчү шнур же сайгыч бузулганда, суюктук төгүлгөндө же аппараттын ичине нерселер түшкөндө, аппарат жамгырга же нымдуулукка дуушар болгондо, нормалдуу иштебей калганда тейлөө талап кылынат. , же түшүрүлгөн.
2. Пакеттин мазмуну
Орнотууну улантуудан мурун, төмөндө тизмеленген нерселердин баары пакетиңизге камтылганын текшериңиз:
- JVC LT-32EM75 32-inch 720p LED TV
- Сыналгы стенд (негиз жана моюн)
- Алыстан башкаруу
- Электр кабели
- Колдонуучунун Колдонмосу (бул документ)
- Стендди чогултуу үчүн бурамалар
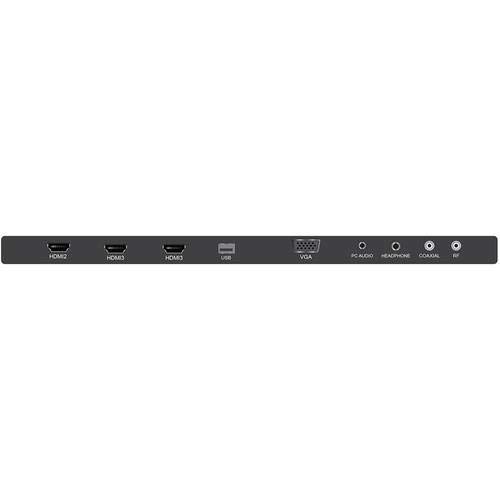
Figure 2.1: JVC LT-32EM75 32-inch 720p LED TV. This image shows the front view of the television with its stand.
3. Орнотуу
3.1 Телевизордун отургучун бекитүү
- Сыналгынын экранын кылдаттык менен ылдый каратып жумшак, таза бетке коюңуз.
- Align the stand neck with the mounting holes on the bottom of the TV.
- Берилген бурамалар менен стенддин мойнун телевизорго бекитиңиз.
- Attach the stand base to the stand neck, ensuring it clicks into place or is secured with screws if applicable.
- Телевизорду этияттык менен көтөрүп, туруктуу, тегиз жерге коюңуз.
3.2 Тышкы түзмөктөрдү туташтыруу
Your JVC LT-32EM75 TV features multiple input ports for connecting various devices. Ensure the TV is powered off before making any connections.

3.1-сүрөт: Арткы view of the JVC LT-32EM75 TV showing input ports. This image illustrates the location of HDMI, USB, and other connection ports.
- HDMI түзмөктөрү: Connect up to three HDMI-enabled devices (e.g., Blu-ray player, game console, cable box) to the HDMI ports. Use high-quality HDMI cables for best picture and sound.
- Антенна/кабель: Connect an antenna or cable TV coaxial cable to the "ANT/CABLE" input for over-the-air or basic cable channels.
- USB түзмөктөрү: Insert a USB flash drive into the USB port to view photos or play compatible media files.
- Аудио чыгаруу: Use the digital audio output (optical) or headphone jack to connect external audio systems or headphones.
3.3 Power Connection and Initial Scan
- Plug the power cord into the TV's power input, then into a standard electrical outlet (AC 120V, 60Hz).
- Press the Power button on the TV or remote control to turn on the TV.
- Follow the on-screen instructions to complete the initial setup, including language selection and channel scanning. This process will detect available channels from your antenna or cable connection.
4. Телевизорду иштетүү
4.1 Алыстан башкаруу функциялары
The included remote control allows you to access all TV functions. Ensure two AAA batteries are inserted with correct polarity.

Figure 4.1: JVC LT-32EM75 Remote Control. This image displays the layout of the remote control buttons, including power, volume, channel, input, and menu navigation.
- КҮЧ: Телевизорду күйгүзөт же өчүрөт.
- КИРҮҮ: Киргизүү булагын тандайт (HDMI 1, HDMI 2, HDMI 3, TV, USB).
- VOL +/-: Үн деңгээлин тууралайт.
- CH +/-: Каналдарды өзгөртөт.
- МЕНЮ: Жөндөөлөрдү тууралоо үчүн негизги менюну ачат.
- ARROW BUTTONS (Up/Down/Left/Right): Меню параметрлери боюнча чабыттайт.
- КИРГИЗҮҮ/МАКУЛ: Тандоолорду ырастайт.
- ЧЫГУУ: Учурдагы менюну же экрандагы дисплейди жабат.
4.2 Негизги операциялар
- Киргизүү булагын өзгөртүү: басыңыз INPUT button on the remote repeatedly to cycle through available input sources, or press it once to bring up the input menu and select your desired source using the arrow buttons and ENTER.
- Сүрөт жөндөөлөрүн тууралоо: Басыңыз МЕНЮ, navigate to "Picture" settings. Here you can adjust Brightness, Contrast, Color, Tint, Sharpness, and select Picture Modes (e.g., Standard, Dynamic, Movie).
- Үн орнотууларын тууралоо: Басыңыз МЕНЮ, navigate to "Sound" settings. Options include Bass, Treble, Balance, and Sound Modes (e.g., Standard, Music, Movie). Note that the built-in speakers may have limitations in sound quality.
5. Техникалык тейлөө
5.1 Телевизордун экранын тазалоо
- Тазалоодон мурун дайыма сыналгыдан ажыратыңыз.
- Экранды акырын сүртүү үчүн жумшак, түксүз чүпүрөктү (мисалы, микрофибра кездеме) колдонуңуз.
- өжөр белгилери үчүн, жеңил гampчүпүрөккө суу же атайын экран тазалоочу каражат. Эч качан тазалагычты түздөн-түз экранга чачпаңыз.
- Avoid using abrasive cleaners, alcohol, benzene, or thinners, as these can damage the screen coating.
5.2 Телевизорду тазалоо Casing
- с сүртүңүзasing жумшак, кургак чүпүрөк менен.
- Зарыл болсо, бир аз колдонуу damp cloth. Do not allow water to enter the TV's interior.
6. Кыйынчылыктарды
Кардарларды колдоо кызматына кайрылуудан мурун, жалпы көйгөйлөр үчүн төмөнкү көйгөйлөрдү чечүү боюнча колдонмону караңыз.
| Көйгөй | Мүмкүн себеп | Чечим |
|---|---|---|
| Күч жок | Power cord not connected; Power outlet not working; TV is off. | Ensure power cord is securely plugged into TV and outlet. Test outlet with another device. Press the Power button on the TV or remote. |
| Сүрөт жок, бирок үн бар | Туура эмес киргизүү булагы тандалды; Тышкы түзмөк күйгөн эмес же туура туташкан эмес. | басыңыз INPUT button to select the correct source. Check connections of external devices and ensure they are powered on. |
| Үн жок, бирок сүрөт бар | Volume is muted or too low; Incorrect audio output selected; External device audio issue. | Басыңыз VOL+ or unmute the TV. Check audio settings in the menu. Ensure external device audio settings are correct. |
| Пульт иштебей жатат | Батареялар түгөнгөн же туура эмес салынган; Пульт менен телевизордун ортосундагы тоскоолдук; Телевизордогу пульт сенсору бөгөттөлгөн. | Replace batteries with new ones, ensuring correct polarity. Remove any obstructions. Ensure the TV's remote sensor is clear. |
| Poor picture quality (e.g., blurry, grainy) | Weak antenna signal; Incorrect picture settings; Low-quality source material. | Adjust antenna position or check cable connection. Reset picture settings to default or adjust manually. Ensure source device is outputting high-quality signal. |
| Sound quality is not optimal | Built-in speaker limitations; Incorrect sound settings. | Adjust sound settings (Bass, Treble, Sound Mode) in the TV menu. Consider connecting external speakers or a soundbar for improved audio experience. |
7. Техникалык шарттар
| Өзгөчөлүк | Деталь |
|---|---|
| Модель аты | LT-32EM75 |
| Screen Size | 32 дюйм |
| Дисплей технологиясы | LED |
| Резолюция | 720p |
| Жаңыртуу ылдамдыгы | 60 Гц |
| Байланыш технологиясы | HDMI |
| HDMI порттору | 3 |
| Тtage | 120 вольт |
| Ватtage | 45 ватт |
| Элемент Салмагы | 10 фунт (болжол менен 4.5 кг) |
| Продукциянын өлчөмдөрү (L x W x Y) | 40 x 10 x 25 дюйм (стенд менен) |
| Монтаж түрү | Стол орнотуу |
8. Кепилдик жана колдоо
8.1 Өндүрүүчүнүн кепилдиги
This JVC LT-32EM75 television typically comes with a 1 жылдык өндүрүүчүнүн кепилдиги from the date of purchase. This warranty covers defects in materials and workmanship under normal use. Please retain your proof of purchase for warranty claims. For specific terms and conditions, refer to the warranty card included with your product or visit the official JVC support webсайт.
8.2 Кардарларды колдоо
If you encounter issues not covered in the troubleshooting section or require further assistance, please contact JVC customer support. You can usually find contact information (phone number, email, or support website) on the official JVC webсайтында же сыналгы менен берилген документтерде.
Note: JVC does not sell extended warranties for this specific model.


