1. Киришүү
This manual provides detailed instructions for the installation, operation, and maintenance of your Avision FL-1501B document scanner. Please read this manual thoroughly before using the scanner to ensure proper and safe operation. Keep this manual for future reference.

Figure 1: Avision FL-1501B Document Scanner with its automatic document feeder (ADF) and output tray extended.
2. Коопсуздук маалыматы
Observe the following safety precautions to prevent damage to the scanner and ensure user safety:
- Сканер менен кошо берилген кубат адаптерин гана колдонуңуз.
- Сканерди сууга же ашыкча нымдуулукка дуушар кылбаңыз.
- Place the scanner on a stable, level surface.
- Вентиляция тешиктерин жаап коюудан качыңыз.
- Сканерди өз алдынча бөлүктөргө бөлүүгө же оңдоого аракет кылбаңыз. Квалификациялуу тейлөө кызматкерлерине кайрылыңыз.
- Keep the scanner away from direct sunlight and heat sources.
3. Пакеттин мазмуну
Пакетте бардык буюмдар бар экенин текшериңиз:
- Avision FL-1501B Scanner Unit
- Кубаттуу адаптер
- USB кабели
- Quick Start Guide
- Software CD (or download instructions)
4. Орнотуу
4.1 Пакеттен чыгаруу жана жайгаштыруу
- Сканерди таңгагынан кылдаттык менен чыгарып алыңыз.
- Бардык коргоочу ленталарды жана таңгактоочу материалдарды алып салыңыз.
- Сканерди документти берүү жана чыгаруу үчүн жетиштүү мейкиндиги бар жалпак, туруктуу бетке кой.

Figure 2: The Avision FL-1501B scanner in its closed position, suitable for storage or before extending trays.
4.2 Сканерди туташтыруу
- Connect the power adapter to the scanner's power input port and then to an electrical outlet.
- Connect the USB cable to the scanner's USB port and then to an available USB port on your computer.
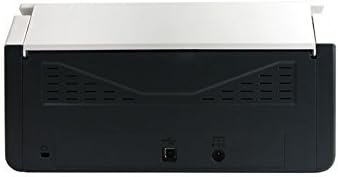
Figure 3: Rear panel of the scanner, illustrating the power input and USB connection ports.
4.3 Драйверди жана программалык камсыздоону орнотуу
Before using the scanner, you must install the necessary drivers and scanning software on your computer.
- Insert the provided Software CD into your computer's optical drive, or download the latest drivers and software from the official Avision webсайт.
- Follow the on-screen instructions to complete the installation process. It is recommended to install all bundled software for full functionality.
- Суралган учурда компьютериңизди өчүрүп күйгүзүңүз.
5. Операция
5.1 Документтерди жүктөө
- Extend the input tray and output tray of the scanner.
- Кагаз көрсөтмөлөрүн документтериңиздин туурасына дал келтириңиз.
- Place the documents face down, top edge first, into the automatic document feeder (ADF). Ensure the stack is neatly aligned. The scanner supports a maximum input sheet capacity of 100 sheets.

4-сүрөт: Side profile of the scanner, showing the fully extended input and output trays ready for document feeding.
5.2 Башкаруу панелин колдонуу
The scanner features a control panel for quick access to common scanning functions.

5-сүрөт: Детальдуу view of the scanner's control panel, featuring a digital display, function selection buttons, Cancel, Scan, and Power buttons.
- Кубат баскычы: Press to turn the scanner on or off.
- Function Buttons (Up/Down Arrows): Use these to select different scanning profiles or functions displayed on the digital screen.
- Скандоо баскычы: Initiates the scanning process based on the currently selected function.
- Жокко чыгаруу баскычы: Stops the current scanning operation.
5.3 Скандоону аткаруу
- Сканер күйгүзүлүп, компьютериңизге туташып турганын текшериңиз.
- Load your documents into the ADF as described in section 5.1.
- Open the Avision scanning software on your computer (e.g., Button Manager, Capture Tool).
- Select your desired scanning settings (e.g., color mode, resolution, destination folder, single-sided/duplex).
- Click the "Scan" button in the software or press the Скандоо button on the scanner's control panel to begin scanning.
- The scanned images will be processed and saved according to your software settings.
6. Техникалык тейлөө
6.1 Сканерди тазалоо
Regular cleaning helps maintain optimal scanning performance.
- Тазалоодон мурун сканерди өчүрүп, кубат кабелин сууруп алыңыз.
- Жумшак, түксүз кездемени жеңил колдонуңуз dampсканердин сыртын сүртүү үчүн суу же жумшак, абразивдүү эмес тазалоочу каражат менен эритип коюңуз.
- To clean the glass platen (if applicable) and rollers, open the scanner cover. Use a specialized scanner cleaning kit or a soft cloth with isopropyl alcohol.
- Allow all components to dry completely before reconnecting power.
6.2 Микропрограмма жаңыртуулары
Periodically check the Avision website for firmware updates. Firmware updates can improve performance, add features, or resolve issues. Follow the instructions provided with the firmware update package carefully.
7. Кыйынчылыктарды
Сканериңизде көйгөйлөргө туш болсоңуз, төмөнкү жалпы көйгөйлөрдү жана чечимдерди караңыз:
| Көйгөй | Мүмкүн себеп | Чечим |
|---|---|---|
| Сканер күйбөйт. | Электр кабели туташкан эмес; розетка туура эмес. | Кубат кабели коопсуз туташтырылганын текшериңиз. Башка электр розеткасын колдонуп көрүңүз. |
| Компьютер сканерди таппайт. | USB кабели бошоп калган; драйверлер орнотулган эмес же бузулган. | USB кабелинин туташуусун текшериңиз. Сканер драйверлерин кайра орнотуңуз. Башка USB портун колдонуп көрүңүз. |
| Scanned images are blurry or streaky. | Scanner glass or rollers are dirty; document misfeed. | Clean the scanner's internal components (refer to Section 6.1). Ensure documents are loaded correctly. |
| Documents jam in the ADF. | Documents are wrinkled or stapled; paper guides not adjusted. | Straighten documents. Remove staples/clips. Adjust paper guides to fit document width. |
8. Техникалык шарттар
| Өзгөчөлүк | Деталь |
|---|---|
| Бренд | Көрүү |
| Модел | FL-1501B |
| Сканер түрү | Документ сканери |
| Сканер резолюциясы | 600 dpi |
| Максималдуу киргизүү барагынын сыйымдуулугу | 100 барак |
| Медиа түрү | Кагаз |
| Ватtage | 24 ватт |
| Продукциянын өлчөмдөрү | 33 x 32.32 x 80.94 см |
| Элемент Салмагы | 5.67 кг |
| Дата биринчи жеткиликтүү | 6-июнь, 2016-жыл |
9. Кепилдик жана колдоо
9.1 Кепилдик маалыматы
Avision products are manufactured to high-quality standards. This product is covered by a limited warranty against defects in materials and workmanship. The specific terms and duration of the warranty may vary by region. Please refer to the warranty card included with your product or visit the official Avision webтолук кепилдик маалымат алуу үчүн сайт.
9.2 Техникалык колдоо
For technical assistance, driver downloads, or further information, please visit the official Avision support website or contact your local Avision service center. Contact details can typically be found on the Avision webсайтында же өнүмүңүздүн документтеринде.


