Introduction
This manual provides detailed instructions for the installation, operation, and maintenance of your Venstar T1900 Residential Slimline Platinum Thermostat. Please read this manual thoroughly before attempting to install or operate the thermostat to ensure proper function and to avoid potential damage.
Маанилүү коопсуздук маалыматы
- Термостатты орнотуудан же тейлөөдөн мурун ар дайым негизги автоматтык өчүргүчтөгү же сактагыч кутудагы жылытуу/муздатуу системасын өчүрүңүз.
- Бул термостат 24 вольттук өзгөрмө ток менен иштейт. Вольт линиясына туташтырбаңызtage (120V же 240V).
- Installation should be performed by a qualified technician if you are unfamiliar with electrical wiring.
- Do not short circuit the terminals on the gas valve or at the system control to test the thermostat. This will damage the thermostat and void the warranty.
- Кыска туташуулардын алдын алуу үчүн бардык зымдарды туташтыруу бекем жана изоляциялангандыгын текшериңиз.
Пакеттин мазмуну
Пакетиңизде төмөнкү заттар бар экенин текшериңиз:
- Venstar T1900 термостат блогу
- Монтаждоочу жабдуулар (буроолор жана дубал анкерлери)
- Колдонуучунун Колдонмосу (бул документ)
Продукт бүттүview
The Venstar T1900 is a 7-day programmable digital thermostat designed for residential use. It offers precise temperature control and energy-saving scheduling capabilities. This thermostat is compatible with heat/cool, heat pump, and dual-fuel systems, controlling up to three heat stages жана эки салкын сtages.
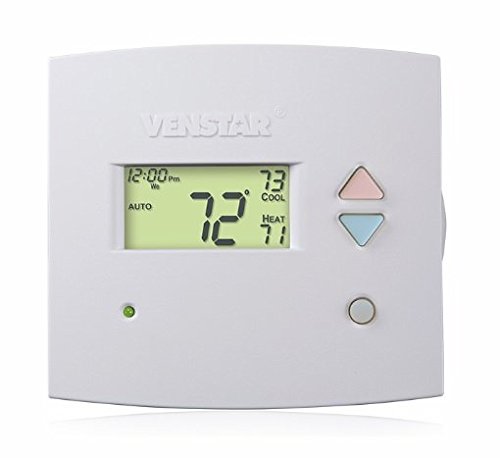
1-сүрөт: Фронт view of the Venstar T1900 Thermostat. This image displays the thermostat's LCD screen and control buttons, indicating its slimline design.
Негизги өзгөчөлүктөрү:
- 7 күндүк программалоо мүмкүнчүлүгү: Allows for customized heating and cooling schedules for each day of the week.
- Системанын шайкештиги: Works with heat/cool, dual-fuel, and heat pump systems.
- Мульти-Сtage Control: Manages up to three heat stages жана эки салкын сtages.
- Алыстан башкаруу мүмкүнчүлүгү: Controllable by phone using an optional add-on (sold separately).
- Automatic or Manual Operation: Provides flexibility for scheduled or on-demand temperature adjustments.
Орнотуу боюнча колдонмо
Керектүү куралдар:
- Бурагыч (Phillips жана/же жалпак баш)
- Drill with appropriate drill bit (if installing new wall anchors)
- Зымдарды сыйрып алуучулар
- Карандаш
- Деңгээл (милдеттүү эмес)
1. Кубатты өчүр
Locate the circuit breaker or fuse box that controls your heating and cooling system. Turn off the power completely before proceeding with any wiring.
2. Remove Old Thermostat (if applicable)
- Carefully remove the cover of your old thermostat.
- Маалымат үчүн учурдагы зымдарды туташтыруунун сүрөтүн тартыңыз.
- Label each wire with the terminal designation it was connected to (e.g., R, G, Y, W).
- Disconnect the wires and remove the old thermostat's mounting plate from the wall.
3. Mount the New Thermostat Base
- Separate the front cover of the T1900 thermostat from its base plate.
- Position the base plate on the wall where you want to install the thermostat. Ensure it is level.
- Монтаждык тешиктерди карандаш менен белгилеңиз.
- Drill pilot holes if necessary and insert wall anchors.
- Берилген бурамалар менен термостаттын негизги плитасын дубалга бекитиңиз.
4. Электр зымдары
Connect the wires from your HVAC system to the corresponding terminals on the T1900 thermostat base. Refer to the wiring diagram provided with your specific HVAC system for precise connections. Ensure wires are stripped approximately 3/8 inch and securely fastened under the terminal screws.
Common Terminal Designations:
- R/Rc/Rh: 24V Power (Heating/Cooling)
- C: Common (24V return)
- G: Күйөрман
- Y/Y1: Компрессор С.tage 1 (Муздатуу)
- Y2: Компрессор С.tage 2 (Муздатуу)
- W/W1: Жылуулук Stage 1 (Жылытуу)
- W2: Жылуулук Stage 2 (Жылытуу)
- O / B: Reversing Valve (Heat Pumps)
Note: The T1900 supports various system types. Consult the detailed wiring diagrams in the full installation manual for specific configurations (e.g., heat pump with auxiliary heat, conventional multi-stage systems).
5. Attach Thermostat to Base
Once wiring is complete and verified, carefully align the thermostat front cover with the mounted base plate and snap it into place.
6. Күчтү калыбына келтирүү
Return to your circuit breaker or fuse box and restore power to your heating and cooling system.
Баштапкы орнотуу
Upon initial power-up, the thermostat may prompt you to configure basic settings. Follow the on-screen instructions to set the current date, time, and system type (e.g., Conventional, Heat Pump).
System Type Configuration:
It is crucial to correctly configure the thermostat for your specific HVAC system. Incorrect settings can lead to improper operation or damage. Access the installer settings menu (refer to the full installation guide for specific button sequences) to select:
- Системанын түрү: Heat/Cool, Heat Pump, Dual Fuel
- Жылуулуктун саны Сtages
- Салкындардын саны Сtages
- Reversing Valve Operation: O (Cooling) or B (Heating)
Иштөө нускамалары
Дисплейди түшүнүү:
The LCD screen displays the current temperature, set temperature, system mode, fan mode, time, and programming status. Refer to the icons and indicators on the screen for current operational status.
Setting System Mode:
басыңыз РЕЖИМ жеткиликтүү система режимдери аркылуу өтүү үчүн баскыч:
- ЖЫЛУУ: The system will operate to maintain the heating setpoint.
- БАРАКЕЛДЕ: The system will operate to maintain the cooling setpoint.
- АВТО: Термостат белгиленген температура диапазонун сактоо үчүн зарылчылыкка жараша жылытуу жана муздатуу ортосунда автоматтык түрдө которулат.
- ӨЧҮК: Жылытуу жана муздатуу системасы өчүрүлгөн.
Setting Fan Mode:
басыңыз КҮЙӨРМАН желдеткич режимдери аркылуу айлануу үчүн баскыч:
- АВТО: Вентилятор жылытуу же муздатуу системасы активдүү иштеп жатканда гана иштейт.
- КҮЙҮК: Желдеткич жылытуу же муздатуу чакырыктарына карабастан үзгүлтүксүз иштейт.
Температураны жөндөө:
колдонуу UP жана ылдый arrow buttons to adjust the desired temperature setpoint. In programmable modes, this will temporarily override the schedule until the next scheduled change.
Programming Schedules (7-Day):
The T1900 allows for 7-day programming, enabling different schedules for each day of the week. This feature helps save energy by adjusting temperatures when you are away or asleep.
- басыңыз ПРОГРАММА программалоо режимине кирүү үчүн баскыч.
- колдонуу КҮН button to select the day or group of days you wish to program (e.g., Mon-Fri, Sat-Sun, or individual days).
- колдонуу TIME button to cycle through the four available periods: Wake, Leave, Return, Sleep.
- колдонуу UP жана ылдый arrow buttons to set the desired temperature for each period.
- колдонуу БЕРҮҮ button to exit programming mode or save changes.
Refer to the detailed programming section in the full user guide for advanced options and specific button sequences.
Remote Control (Optional Add-on):
The Venstar T1900 thermostat can be controlled remotely via a phone using an optional add-on module (sold separately). This module connects to the thermostat and allows for remote access and control through a dedicated application. Installation and setup instructions for the remote control module are provided with the module itself.
Техникалык тейлөө
Cleaning the Thermostat:
To maintain the appearance and functionality of your thermostat, periodically wipe the exterior with a soft, damp cloth. Do not use abrasive cleaners, solvents, or chemical sprays, as these can damage the plastic and electronic components.
Батареяны алмаштыруу:
The Venstar T1900 thermostat does not require batteries for operation as it is powered by the 24V AC system.
Проблемаларды чечүү
If you experience issues with your Venstar T1900 thermostat, consult the following common problems and solutions:
| Көйгөй | Мүмкүн себеп | Чечим |
|---|---|---|
| Термостаттын дисплейи бош | Термостатка кубат жок. | Жылытуу, желдетүү, кондиционерлөө жана кондиционерлөө системаңыздын автоматтык өчүргүчүн текшериңиз. Бардык зымдардын туташуулары бекем экенин текшериңиз. |
| Жылытуу/Муздатуу системасы жооп бербей жатат | Incorrect system mode selected; wiring issue; system lockout. | Verify the system mode (HEAT/COOL/AUTO). Check wiring connections. Wait 5 minutes for system lockout to reset. |
| Температураны окуу туура эмес көрүнөт | Термостаттын жайгашкан жери; сенсордун тыгылып калышы. | Ensure the thermostat is not exposed to direct sunlight, drafts, or heat sources. Clean any dust from the thermostat vents. |
| Programming schedule is not working | Program not saved; temporary override active; incorrect time/day setting. | Ensure programs are saved. Check if a temporary override is active and cancel it. Verify current time and day settings. |
| Вентилятор AUTO режиминде үзгүлтүксүз иштейт | Fan mode set to ON; wiring issue. | Press the FAN button to ensure it is set to AUTO. Check fan wiring. |
If these solutions do not resolve the issue, please contact customer support or a qualified HVAC technician.
Техникалык шарттар
| Өзгөчөлүк | Спецификация |
|---|---|
| Бренд | Venstar |
| Модель аты | Venstar T1900 |
| Controller Type | Push Button |
| Өзгөчө өзгөчөлүк | Программалануучу |
| Түс | Ак |
| Продукт үчүн атайын колдонуу | Heat Pump, Heater |
| Температураны көзөмөлдөө түрү | Programmable, Smart/Remote (with add-on) |
| Тtage | 24 Вольт |
| Дисплей түрү | LCD же LED |
| Башкаруу ыкмасы | Remote (with add-on) |
| Арткы жарык | Ооба |
| Продукциянын өлчөмдөрү | 5.3 x 2 x 2 дюйм |
| Элемент Салмагы | 0.01 унция |
| Батареялар керекпи? | Жок |
Кепилдик маалымат
Venstar products are manufactured to high-quality standards. This product is covered by a limited warranty against defects in materials and workmanship. The specific terms and duration of the warranty may vary. Please refer to the warranty card included with your product or visit the official Venstar webтолук кепилдик маалымат жана каттоо жол-жоболору үчүн сайт.
Кардарларды колдоо
For technical assistance, troubleshooting, or warranty inquiries, please contact Venstar customer support. You can typically find contact information, including phone numbers and email addresses, on the official Venstar webсайт (www.venstar.com) or on the product packaging.
When contacting support, please have your thermostat model number (T1900) and any relevant purchase information ready.


