1. Продукт бүтүп калдыview
The Starry Outdoor Laser Projector Light, Model ALB-RGB230-M1, is designed to project vibrant red, green, and blue laser patterns. This unit is suitable for both indoor and outdoor use, featuring a waterproof design and remote control for convenient operation. It creates dynamic light displays for various settings.

Сүрөт 1.1: Мисamples of laser projection in different environments.
2. Пакеттин мазмуну
Пакетте бардык компоненттер бар экенин текшериңиз:
- Starry Laser Projector Unit (Model ALB-RGB230-M1)
- Жер үлүшү
- Алыстан башкаруу
- Кубаттуу адаптер
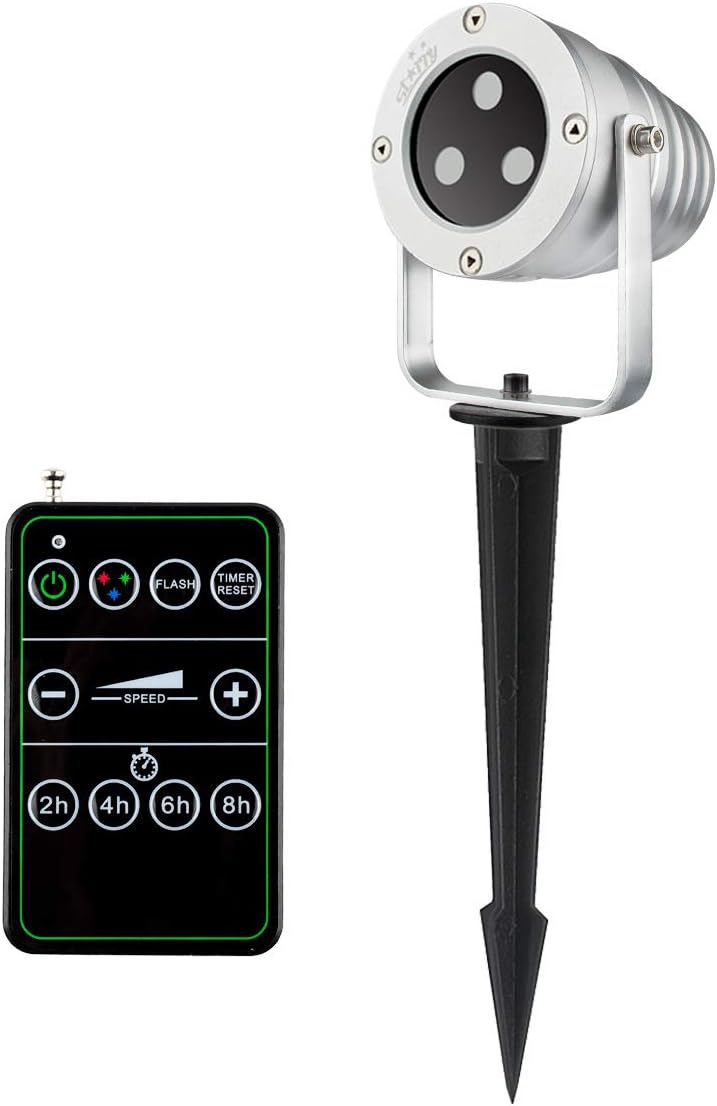
Image 2.1: Laser projector unit and remote control.
3. Коопсуздук нускамалары
Жаракат алуунун же продуктунун бузулушунун алдын алуу үчүн төмөнкү коопсуздук көрсөтмөлөрүн окуп чыгып, аткарыңыз:
- Лазердик коопсуздук: Do not look directly into the laser beam. Avoid direct eye exposure to the laser light. This product uses Class IIIA lasers.
- Электр коопсуздугу: Ensure the power adapter and cable are not damaged. Only use the provided power adapter. Do not operate the unit if the power cord is frayed or damaged.
- Суу каршылык: The projector is rated IP65 waterproof, suitable for outdoor use in rain or snow. However, do not submerge the unit in water.
- Орнотуу: Securely install the projector to prevent it from falling or being dislodged. Ensure proper ventilation around the unit.
- Температура: Operate the projector within the specified temperature range (refer to specifications). Extreme temperatures can affect performance and lifespan.
- Балдар жана үй жаныбарлары: Keep the projector and its accessories out of reach of children and pets.
4. Орнотуу жана орнотуу
Лазердик проекторуңузду орнотуу үчүн төмөнкү кадамдарды аткарыңыз:
- Жайгашкан жерди тандаңыз: Select a suitable location for projection. For outdoor use, ensure the area is clear of obstructions and provides a stable surface for mounting.
- Монтаждоо:
- Жер казынасы: Attach the ground stake to the projector base. Insert the stake firmly into soft ground.
- Flat Base (Optional): If using a flat base (not included with all models, but shown in some images), place the projector on a flat, stable surface.
- Проекциялык бурчту тууралоо: Loosen the adjustment screw on the side of the projector bracket to tilt the unit to the desired angle. Tighten the screw once adjusted.
- Туташуу кубаты: Plug the power adapter into the projector's power input, then plug the adapter into a standard 110V AC outdoor-rated power outlet.

Image 4.1: Projector with a flat base option, suitable for various outdoor placements.

Image 4.2: Outdoor installation demonstrating weather resistance.
5. Иштөө нускамалары
Once installed and powered, operate the projector using the included remote control.
- Күйгүзүү/өчүрүү: Press the power button on the remote control to turn the projector on or off.
- Түс тандоо: Use the color buttons (Red, Green, Blue, or combinations) to select the desired laser colors.
- Жаркыроо режими: Press the 'FLASH' button to activate or deactivate the flashing effect.
- Ылдамдыкты жөндөө: Use the '+' and '-' buttons under 'SPEED' to increase or decrease the motion speed of the laser patterns.
- Таймер функциясы: Select a timer duration (2H, 4H, 6H, 8H) to set the projector to automatically turn off after the specified time. The projector will then turn on automatically at the same time the next day.
- Таймерди кайра коюу: Press 'TIMER RESET' to cancel any active timer setting.

Сүрөт 5.1: Мисample of projected laser patterns.

Image 5.2: Indoor projection example.

Image 5.3: Indoor projection on a window and wall.
6. Алыстан башкаруу функциялары
The remote control allows full command over the projector's features. It requires 1 AAA battery (not included).
- Батарея орнотуу: Open the battery compartment on the back of the remote and insert 1 AAA battery, observing polarity.
- Кубат баскычы: Turns the projector ON/OFF.
- Түс баскычтары: Cycle through Red, Green, Blue, or combined color modes.
- ФЛЕШ: Toggles the flashing effect of the laser patterns.
- SPEED +/-: Adjusts the rotation speed of the projected patterns.
- TIMER (2H/4H/6H/8H): Sets the projector to operate for 2, 4, 6, or 8 hours respectively, then automatically turns off. It will reactivate at the same time the next day.
- ТАЙМЕРДИ КАЙТАРУУ: Cancels any active timer setting.
7. Техникалык тейлөө
To ensure the longevity and optimal performance of your laser projector, follow these maintenance guidelines:
- Тазалоо: Gently wipe the projector lens and housing with a soft, dry cloth. Do not use abrasive cleaners or solvents.
- Сактагыч: When not in use, especially during off-season, store the projector in a cool, dry place, away from direct sunlight and extreme temperatures.
- Кабелдик текшерүү: Periodically check the power cable and adapter for any signs of wear or damage. Replace if necessary.
- Аба ырайынын туруктуулугу: While waterproof (IP65), prolonged exposure to harsh weather conditions (e.g., heavy ice accumulation) may still affect performance. Consider bringing indoors during severe weather.

Image 7.1: Projector operating in snowy conditions, demonstrating its weather-resistant design.
8. Кыйынчылыктарды
Проекторуңузда көйгөйлөргө туш болсоңуз, төмөнкү жалпы көйгөйлөрдү жана чечимдерди караңыз:
| Көйгөй | Мүмкүн себеп | Чечим |
|---|---|---|
| Проектор күйбөйт. | No power, faulty connection, remote battery dead. | Check power outlet. Ensure power adapter is securely connected. Replace remote control battery. |
| No laser projection. | Unit is on but laser is off, lens obstructed. | Ensure the correct color mode is selected. Clean the projector lens. |
| Пульт иштебей жатат. | Dead battery, out of range, obstruction. | Replace AAA battery in the remote. Ensure remote is pointed at the projector and within effective range. Remove any obstructions. |
| Laser patterns are dim or unclear. | Ambient light too high, projector too far from surface, dirty lens. | Operate in darker conditions. Move projector closer to the projection surface. Clean the projector lens. |
| Timer function not working as expected. | Incorrect timer setting, power interruption. | Press 'TIMER RESET' and re-select the desired timer duration. Ensure continuous power supply. |
9. Техникалык шарттар
| Өзгөчөлүк | Деталь |
|---|---|
| Бренд | Жылдыздуу |
| Модель номери | ALB-RGB230-M1 |
| Жарык булагы түрү | Laser (Red, Green, Blue) |
| Ачык түстөр | Multi-colored (Red, Green, Blue) |
| Projection Patterns | Star, Square (moving motion) |
| Power Source | Электр зымдары |
| Тtage | 110 вольт |
| Ватtage | 11 ватт |
| Башкаруу ыкмасы | Алыстан башкаруу |
| Сууга туруктуулук деңгээли | IP65 (Суу өткөрбөйт) |
| Ички/тышкы колдонуу | Сыртта |
| Монтаж түрү | Floor Mount (Ground Stake) |
| Элемент Салмагы | 1.99 фунт |
| Пакеттин өлчөмдөрү | 9.65 x 6.02 x 5.24 дюйм |
| Remote Батарейка | 1 x AAA (киргизилген эмес) |
| UPC | 638827993788 |
10. Кепилдик маалыматы
For detailed warranty information regarding your Starry Outdoor Laser Projector Light, please refer to the warranty card included with your product packaging or visit the official Starry webсайт. Кепилдиктин шарттары жана шарттары ар кандай болушу мүмкүн.
11. Кардарларды колдоо кызматы
If you require further assistance, have questions about your product, or need to report an issue, please contact Starry customer support through the contact information provided in your product documentation or on the official Starry website. Please have your model number (ALB-RGB230-M1) and purchase details ready when contacting support.


