1. Киришүү
This user manual provides comprehensive instructions for the setup, operation, maintenance, and troubleshooting of your CipherLab 1500P HP 1D Corded Barcode Scanner. Please read this manual thoroughly before using the device to ensure proper functionality and to maximize its lifespan. Keep this manual for future reference.
2. Продукт бүтүп калдыview
The CipherLab 1500P HP is a high-performance 1D corded barcode scanner designed for efficient data capture. It comes with a USB cable for connectivity and an autosense stand for hands-free operation.
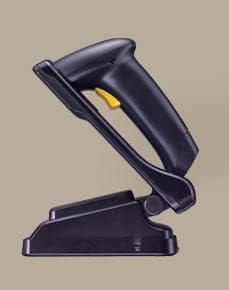
2.1-сүрөт: CipherLab 1500P HP barcode scanner placed in its autosense stand. The scanner is black with a yellow trigger button, and the stand is also black, providing a stable base for the scanner.
Пакеттин мазмуну:
- CipherLab 1500P HP Barcode Scanner
- USB туташуу кабели
- Autosense Stand
- Бул колдонуучунун колдонмосу (же санариптик версиясына шилтеме)
3. Орнотуу
- Аппаратты таңгактан чыгаруу: Carefully remove the barcode scanner, USB cable, and autosense stand from their packaging.
- USB кабелин туташтыруу:
- Locate the USB port on the base of the barcode scanner.
- Insert the smaller end of the USB cable into the scanner's port.
- Insert the larger USB-A end of the cable into an available USB port on your host computer or point-of-sale (POS) system.
- Драйверди орнотуу (Plug & Play): The CipherLab 1500P HP is typically a plug-and-play device. Your operating system should automatically detect and install the necessary drivers. Wait for the installation to complete (usually indicated by a notification).
- Position the Autosense Stand: Place the autosense stand on a stable, flat surface. The stand is designed to hold the scanner in an optimal position for hands-free scanning.
- Place Scanner in Stand: Gently place the barcode scanner into the autosense stand. Ensure it is securely seated. The scanner will automatically switch to presentation mode when placed in the stand, allowing it to detect and scan barcodes without pressing the trigger.
- Сыноо байланышы: Open a text editor (e.g., Notepad, WordPad) or a compatible application on your computer. Scan a known barcode. The scanned data should appear in the text editor, confirming successful setup.
4. Иштөө нускамалары
Кол режими:
- Remove the scanner from the autosense stand.
- Point the scanning window towards the barcode you wish to scan.
- Press and hold the yellow trigger button. A red scanning line will emit from the scanner.
- Position the scanner so the red line crosses the entire barcode.
- Once the barcode is successfully read, the scanner will emit an audible beep and/or a visual indicator (e.g., LED flash). The data will be transmitted to your connected device.
- Триггер баскычын коё бериңиз.
Autosense (Presentation) Mode:
- Ensure the scanner is securely placed in the autosense stand.
- Hold the barcode in front of the scanner's window.
- The scanner will automatically detect the barcode and activate its scanning engine.
- Once the barcode is successfully read, the scanner will emit an audible beep and/or a visual indicator. The data will be transmitted to your connected device.
Scanning Tips:
- Ensure the barcode is clean and not damaged.
- Adjust the distance between the scanner and the barcode for optimal reading.
- Avoid scanning at extreme angles; try to keep the scanner perpendicular to the barcode.
- For reflective surfaces, try tilting the scanner slightly to avoid glare.
5. Техникалык тейлөө
- Тазалоо:
- Сканерлөө терезесин жумшак, мамыксыз чүпүрөк менен үзгүлтүксүз тазалап туруңуз.
- өжөр кир үчүн, бир аз гampкездемени суу же жумшак, абразивдүү эмес тазалоочу каражат менен сүртүңүз. Тазалоочу каражатты түз эле сканерге чачпаңыз.
- Avoid using harsh chemicals, solvents, or abrasive materials, as these can damage the scanner's surface or internal components.
- Сактагыч: Сканерди күн нурунан жана экстремалдык температурадан алыс салкын, кургак жерде сактаңыз.
- Кабельге кам көрүү: USB кабелин өтө ийип же бурап албаңыз, анткени бул ички зымдарга зыян келтириши мүмкүн.
- Туруктуу кам көрүү: Keep the autosense stand clean and free of obstructions to ensure the scanner can be placed and removed smoothly.
6. Кыйынчылыктарды
| Көйгөй | Мүмкүн себеп | Чечим |
|---|---|---|
| Сканер штрих-коддорду окубай жатат. |
|
|
| Компьютерге эч кандай маалыматтар өткөрүлгөн жок. |
|
|
| Сканер сигнал берет, бирок маалымат жок. |
|
|
7. Техникалык шарттар
| Өзгөчөлүк | Деталь |
|---|---|
| Модел | 1500P HP (33-A1500PCBKU001) |
| Type | 1D Corded Barcode Scanner |
| Байланыш | USB |
| Камтылган аксессуарлар | USB Cable, Autosense Stand |
| Өндүрүүчү | CipherLab |
| ASIN | B01MDRIJRS |
| Биринчи жеткиликтүү күн | 24-январь, 2024-жыл |
8. Кепилдик жана колдоо
For specific warranty information regarding your CipherLab 1500P HP barcode scanner, please refer to the warranty card included with your product or contact your point of purchase. Warranty terms may vary by region and reseller.
For technical support, driver downloads, or additional product documentation, please visit the official CipherLab website or contact their customer support directly. You may need your product model number (33-A1500PCBKU001) and serial number for support inquiries.
CipherLab Official Webсайт: www.cipherlab.com


