1. Киришүү
This manual provides essential information for the safe and efficient operation of your NEC NP-PA653U LCD Projector. Please read this manual thoroughly before using the projector and retain it for future reference. The NEC NP-PA653U is an advanced professional installation projector designed for higher education and corporate environments, offering high brightness and flexible installation options.
2. Коопсуздук маалыматы
Маанилүү коопсуздук көрсөтмөлөрү:
- Always connect the projector to a grounded power outlet.
- Вентиляция тешиктерин жаап албаңыз. Туура аба агымы үчүн проектордун айланасында жетиштүү мейкиндикти камсыз кылыңыз.
- l болгондо проектордун объективине тике карабаamp is on, as this can cause eye damage.
- Avoid placing the projector in direct sunlight, near heat sources, or in environments with excessive dust or humidity.
- Бардык тейлөөлөрдү квалификациялуу тейлөө кызматкерлерине тапшырыңыз. Проекторду өзүңүз ачууга же оңдоого аракет кылбаңыз.
- Өндүрүүчү белгилеген тиркемелерди/аксессуарларды гана колдонуңуз.
3. Пакеттин мазмуну
Төмөндө тизмеленген нерселердин баары пакетиңизге камтылганын текшериңиз:
- NEC NP-PA653U LCD Projector
- Линзанын тешигинин капкагы
- Зымсыз алыстан башкаруу
- Lens lock screw
- Электр кабели
- Колдонуучунун Колдонмосу (бул документ)
4. Продукт бүтүп калдыview
The NEC NP-PA653U is a high-performance LCD projector designed for professional installations. It features 6500 lumens brightness, WUXGA (1920x1200) resolution, and advanced connectivity options including HDBaseT.
4.1 Фронт View

4.1-сүрөт: Фронт view of the NEC NP-PA653U LCD Projector. This image shows the main lens assembly and the overall white casing of the projector.
4.2 Арткы View (Input/Output Panel)
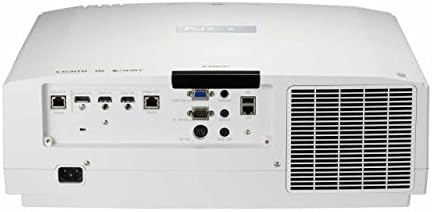
4.2-сүрөт: Арткы view of the NEC NP-PA653U LCD Projector. This panel includes various connectivity options such as HDMI, HDBaseT, VGA, audio inputs/outputs, and network ports.
4.3 тарап View (Башкаруу панели)
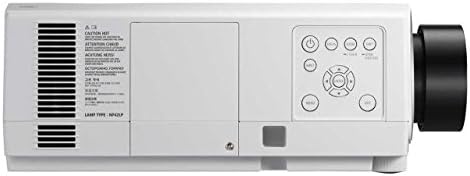
4.3-сүрөт: Side view of the NEC NP-PA653U LCD Projector. This image highlights the integrated control panel with buttons for power, menu navigation, and input selection.
5. Орнотуу
5.1 Физикалык жайгаштыруу
The NP-PA653U offers flexible installation options, including tilt-free and portrait installation capabilities. Ensure the projector is placed on a stable, level surface or securely mounted. Maintain adequate ventilation space around the unit.
- Линзаны орнотуу: This projector uses optional powered lenses. Align the lens with the lens mount and secure it according to the lens-specific instructions. Use the provided lens lock screw.
- Проекциялык аралык: Adjust the distance from the screen to achieve the desired image size. The optional powered lenses allow for lens shift, focus, and zoom adjustments.
5.2 Түзмөктөрдү туташтыруу
Connect your source devices (e.g., computer, Blu-ray player) to the appropriate input ports on the projector's rear panel (refer to Figure 4.2).
- HDBaseT: For uncompressed Full HD digital video, audio, Ethernet, power, and control signals over a single cable. The HDBaseT input and separate HDBaseT loop out provide versatile connectivity.
- HDMI: Connect devices using HDMI cables for high-definition digital video and audio.
- VGA: Connect computers using a VGA cable for analog video signals.
- Тармак (Ethernet): Connect to a network for control and monitoring.
5.3 Күйгүзүү/өчүрүү
- Connect the power cord to the projector and a grounded electrical outlet.
- басыңыз Күч button on the projector's control panel or the remote control to turn on the projector. The power indicator light will change.
- Өчүрүү үчүн, басыңыз Күч button again. Confirm shutdown if prompted. Allow the projector to cool down before unplugging.
6. Иштөө нускамалары
6.1 Негизги операция
- Киргизүүнү тандоо: Use the "Input" button on the remote or control panel to cycle through available input sources (HDMI, HDBaseT, VGA, etc.).
- Меню навигациясы: Press the "Menu" button to access the on-screen display (OSD) menu. Use the arrow keys to navigate and "Enter" to select options.
- Фокус жана масштаб: Adjust the focus and zoom using the controls on the optional powered lens or via the remote control/OSD menu.
- Линзаны жылдыруу: Utilize the lens shift function (horizontal and vertical) to adjust the image position without moving the projector.
6.2 Өркүндөтүлгөн функциялар
- 4K Ready (HDR10, BT.2020): The projector supports HDR10 and BT.2020 signal formats, making it compatible with Ultra HD Blu-ray and 4K TV broadcasting content. Ensure your source device is configured for these formats.
- TileMatrix: This feature enables the creation of a large 4K x 2K resolution image by utilizing up to four projectors. Connect multiple projectors via the HDBaseT loop out and configure TileMatrix settings in the OSD menu.
- Edge Blending: For seamless multi-projector installations, use the built-in edge blending feature to smoothly combine images from adjacent projectors, eliminating visible seams.
- чогулуу: The projector supports stacking, allowing two or more projectors to be aligned to increase brightness or provide redundancy.
- High Performance Video Processing/Scaling: The projector incorporates advanced video processing to create life-like images from various input resolutions.
7. Техникалык тейлөө
7.1 Тазалоо
- Проектор Casing: с сүртүңүзasing жумшак, кургак чүпүрөк менен. өжөр кир үчүн, бир аз d колдонууamp жумшак, абразивдүү тазалагыч менен кездеме.
- Объектив: Gently clean the lens with a lens cleaning cloth or lens paper. Avoid using abrasive materials or harsh chemicals.
- Аба чыпкалары: Regularly check and clean the air filters to prevent dust buildup, which can affect performance and lamp life. Refer to the OSD menu for filter usage time.
7.2 Лamp Алмаштыруу
Проектор лamp чектүү өмүрү бар. Качан лamp life approaches its end, a warning message will appear. Replace the lamp with an authentic NEC replacement lamp (Lamp Type: NP42LP) to ensure optimal performance and safety.
- Turn off the projector and unplug the power cord. Allow it to cool completely (at least 60 minutes).
- l жайгашканamp cover (refer to Figure 4.3 for general location on the side panel).
- l бурап алыңызamp жаап, эски люстраны этияттык менен алып салыңызamp модулу.
- жаңы l киргизиңизamp модулу, анын туура отурушун камсыз кылуу.
- l алмаштырыңызamp жаап, бурамалар менен бекитиңиз.
- l баштапкы абалга келтириңизamp проектордун OSD менюсундагы таймер.
8. Кыйынчылыктарды
This section addresses common issues you might encounter. For more complex problems, contact NEC customer support.
| Көйгөй | Мүмкүн себеп | Чечим |
|---|---|---|
| Сүрөт көрсөтүлгөн жок |
|
|
| Сүрөт бүдөмүк |
|
|
| Проектор ысып, өчүп калат |
|
|
9. Техникалык шарттар
| Өзгөчөлүк | Деталь |
|---|---|
| Модель номери | NP-PA653U |
| Бренд | NEC |
| Жарыктык | 6500 Lumens |
| Display Resolution | 1920 x 1080 (supports 4K signals) |
| Байланыш технологиясы | Ethernet, HDBaseT, HDMI, VGA |
| Продукциянын өлчөмдөрү | 19.8 x 16.2 x 6.6 дюйм |
| Элемент Салмагы | 22.5 фунт |
| Сунушталган Колдонуулар | Бизнес, билим берүү |
| Өзгөчө өзгөчөлүк | Portable |
| Өндүрүүчү | NEC Solutions (America), Inc. |
| Дата биринчи жеткиликтүү | 7-январь, 2017-жыл |
10. Кепилдик жана колдоо
For warranty information, technical support, or service inquiries, please refer to the official NEC website or contact your authorized NEC dealer. Keep your purchase receipt as proof of purchase for warranty claims.
Онлайн ресурстар: Расмий NEC сайтына кириңиз website for the latest drivers, firmware updates, and additional support documentation.


