1. Киришүү
This manual provides essential instructions for the safe and effective use of your Olympus OM-D E-M1 Mark II Micro Four Thirds System Camera. The E-M1 Mark II is engineered for high performance, featuring a 20.4 Megapixel Live MOS sensor, 5-axis image stabilization, and an advanced autofocus system. Please read this manual thoroughly before using the camera and keep it in a safe place for future reference.
2. Коопсуздук маалыматы
To prevent injury to yourself or others, or damage to your equipment, observe the following safety precautions:
- Do not disassemble, repair, or modify the camera or lens.
- Keep the camera away from water and moisture. This camera is weather-sealed, but not submersible.
- Камераны экстремалдык температурага, түз күн нуруна узак убакытка же жогорку нымдуулукка дуушар кылуудан качыңыз.
- Use only Olympus-approved batteries and chargers.
- Do not look at the sun or bright light sources through the viewfinder or lens, as this can cause permanent vision damage.
- Балдар жетпеген жерде сактаңыз.
3. Пакеттин мазмуну
Пакетиңизде бардык буюмдар бар экенин текшериңиз:
- Olympus OM-D E-M1 Mark II Camera Body
- M.Zuiko Digital ED 12-40mm F2.8 PRO Lens
- BLH-1 Li-ion Battery
- BCH-1 Li-ion Battery Charger
- USB кабели
- Кабелдик клип
- Погон
- FL-LM3 Flash
- Instruction Manual (basic guide)
- Кепилдик картасы
4. Камера компоненттери
Камераңыздын ар кандай бөлүктөрүн жакшылап билип алыңыз.
4.1 Фронт View линза менен

This image displays the Olympus OM-D E-M1 Mark II camera body with the M.Zuiko 12-40mm PRO lens mounted. Key features visible include the lens barrel, focus ring, zoom ring, and the Olympus branding on the camera body.
4.2 Фронт View (Body Only)
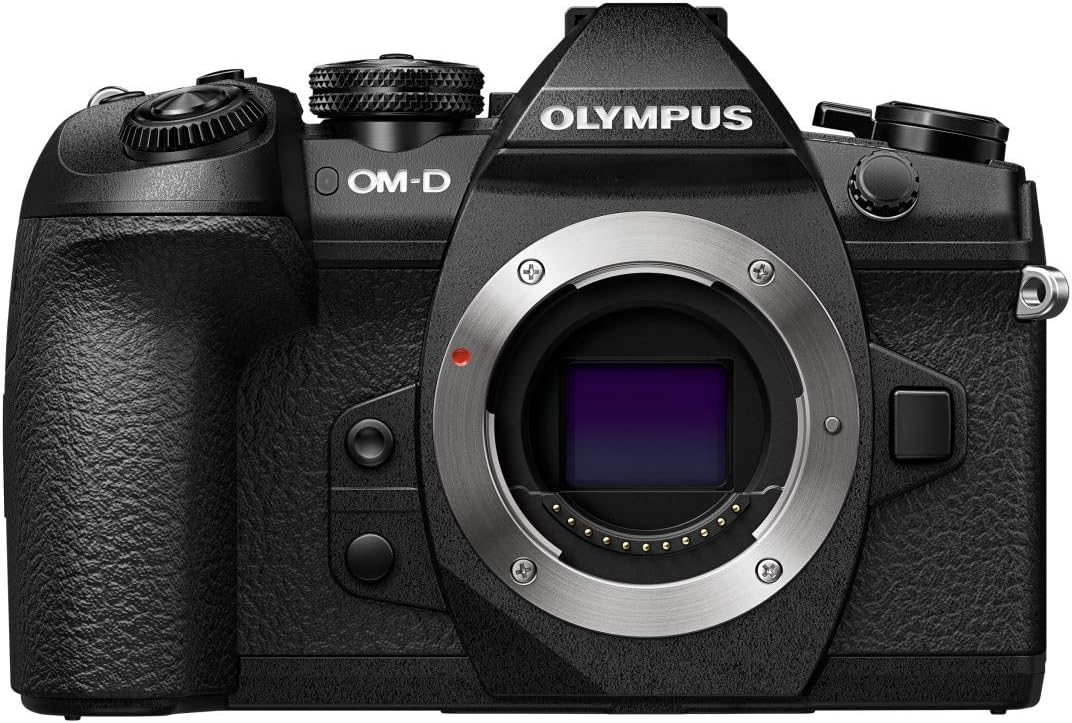
This image shows the front of the Olympus OM-D E-M1 Mark II camera body without a lens attached, revealing the Micro Four Thirds lens mount, the red lens release button, and the textured grip.
4.3 Жогору View
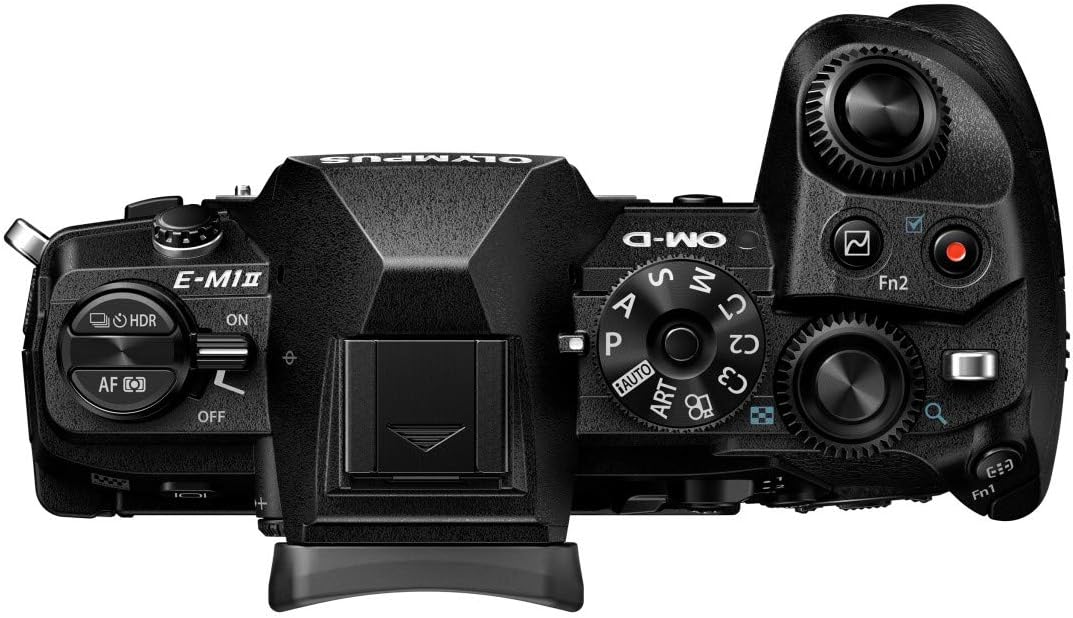
үстү view of the camera highlights the mode dial (P, A, S, M, ART, C1-C4), power switch, shutter button, front and rear control dials, and the hot shoe for external flash.
4.4 Арткы View

This image presents the rear of the camera with the LCD screen in its closed position. Visible elements include the electronic viewfinder, various function buttons, the directional pad, and the 'OK' button.
4.5 Articulated Screen

The camera's rear view with the LCD screen articulated, demonstrating its flexibility for shooting from various angles. The screen is a 3-inch capacitive touch display.
4.6 тарап View

А тарап view of the Olympus OM-D E-M1 Mark II, highlighting the deep ergonomic grip and the covered ports for connectivity (USB, video out).
4.7 Өлчөмдөрү жана Салмагы

This diagram illustrates the physical dimensions and weights of the camera body (574g with battery and memory card), the M.Zuiko 12-40mm lens (382g), and an SD card, emphasizing the compact and lightweight design.
5. Орнотуу
5.1 Батареяны заряддоо
- Insert the BLH-1 Li-ion battery into the BCH-1 Li-ion battery charger.
- Заряддагычты розеткага сайыңыз. Заряддоо индикаторунун жарыгы күйөт.
- Индикатор өчкөндө заряддоо аяктады.
5.2 Батареяны жана эстутум картасын салуу
- Камеранын ылдый жагында жайгашкан батарейка/карта бөлүмүнүн капкагын ачыңыз.
- Insert the charged BLH-1 battery with the correct orientation until it clicks into place.
- Insert an SDHC or SDXC memory card into one of the two available memory card slots until it clicks. Ensure the card is facing the correct direction.
- Бөлүмдүн капкагын бекем жабыңыз.
5.3 Объективди бекитүү
- Remove the body cap from the camera and the rear lens cap from the M.Zuiko 12-40mm PRO lens.
- Объективдеги ак индекс белгисин камеранын корпусундагы ак индекс белгиси менен тегиздеңиз.
- Линзаны ордуна чыкылдаганча саат жебеси боюнча буруп, орнотуңуз.
5.4 Баштапкы орнотуулар
Upon first power-on, you will be prompted to set the date, time, and language. Follow the on-screen instructions using the directional pad and 'OK' button.
6. Камераны иштетүү
6.1 Күйгүзүү/өчүрүү
Slide the power switch located on the top of the camera to the 'ON' or 'OFF' position.
6.2 Атуу режимдери
Каалаган тартуу режимин тандоо үчүн режим тергичин айландырыңыз:
- P (Автоматтык программа): Камера оптималдуу экспозиция үчүн диафрагманы жана жабуунун ылдамдыгын орнотот.
- A (Апертура артыкчылыгы): Сиз диафрагманы орнотосуз, камера жабуу ылдамдыгын орнотот.
- S (жабык приоритети): Сиз жабуунун ылдамдыгын, камера диафрагманы орнотот.
- M (кол): Сиз диафрагманы да, жапкыч ылдамдыгын да орнотуңуз.
- ART (Art Filter): Apply various creative filters to your photos.
- C1-C4 (Custom Modes): Save and recall your preferred camera settings.
6.3 Сүрөт тартуу
- Turn the camera on and select a shooting mode.
- Электрондук форматты колдонуп кадрга түшүрүңүз viewиздөөчү же LCD монитор.
- Press the shutter button halfway down to activate autofocus and exposure metering.
- Сүрөттү тартуу үчүн жапкычты толугу менен басыңыз.
6.4 Автофокус системасы
The OM-D E-M1 Mark II features a high-speed autofocus system with 121 cross-type phase detection AF points. You can select various AF modes and areas through the camera's menu to suit your subject and shooting conditions.
6.5 Image Stabilization
The camera incorporates a powerful 5-axis in-body image stabilization system, providing up to 5.5 EV steps of correction. This allows for sharp handheld shots even in low light or with longer shutter speeds.
6.6 Видео жаздыруу
The E-M1 Mark II supports 4K (2160p) and Cinema 4K video recording. To start recording, rotate the mode dial to the movie mode or press the dedicated video record button (if assigned).
6.7 Ойнотуу
Кайра ойнотуу баскычын басыңызview your captured images and videos. Use the directional pad or control dials to navigate through your media.
6.8 Меню Навигациясы
Press the MENU button to access the camera's settings. Use the directional pad or the touch screen to navigate through menus and adjust parameters. The camera's extensive menu system allows for fine-tuning of various functions.
7. Техникалык тейлөө
7.1 Камераны тазалоо
- Линзадан жана камеранын корпусунан чаңды кетирүү үчүн щетканы колдонуңуз.
- For stubborn smudges on the lens, use a specialized lens cleaning cloth and solution.
- Wipe the camera body with a soft, dry cloth. Do not use organic solvents.
7.2 Сактоо
- Узак убакыт бою колдонулбаган учурда, батареяны чыгарып салыңыз.
- Store the camera in a cool, dry, well-ventilated area, away from direct sunlight and high humidity.
- Consider using a desiccant to prevent mold growth, especially in humid environments.
8. Кыйынчылыктарды
Эгер камераңызда көйгөйлөргө туш болсоңуз, төмөнкү жалпы көйгөйлөрдү жана чечимдерди караңыз:
| Көйгөй | Мүмкүн себеп | Чечим |
|---|---|---|
| Камера күйбөйт. | Батарея түгөнүп калган же туура эмес салынган. | Батареяны толук заряддап, анын туура салынганын текшериңиз. |
| Сүрөттөр бүдөмүк. | Incorrect focus, slow shutter speed, or camera shake. | Check focus mode, increase shutter speed, or utilize the 5-axis image stabilization. |
| Эстутум картасынын катасы. | Карта толгон, бузулган же шайкеш келбейт. | Керексиз жок кылуу fileс, картаны форматтаңыз (бул бардык дайындарды өчүрөт) же башка туура келген картаны колдонуп көрүңүз. |
| Flash күйбөйт. | Жарк этме режими өчүк же батарея аз. | Check flash settings in the menu; ensure battery is charged. |
For more detailed troubleshooting, refer to the comprehensive digital manual available on the Olympus support webсайт.
9. Техникалык шарттар
Key technical specifications for the Olympus OM-D E-M1 Mark II:
| Өзгөчөлүк | Деталь |
|---|---|
| Модель аты | Olympus OM-D E-M1 Mark II |
| Сенсор түрү | MOS |
| Натыйжалуу дагы эле чечим | 20.4 депутат |
| Image Stabilization | 5-Axis Electronic |
| Шайкеш орнотуулар | Micro Four Thirds |
| Автофокус чекиттери | 121 (Фазаны аныктоо) |
| Video Resolution | 2160p (4K) |
| Screen Size | 3 дюйм |
| Дисплей түрү | Articulating LCD, Capacitive Touch Screen |
| Эстутум Slots Жеткиликтүү | 2 (SDHC, SDXC) |
| Байланыш технологиясы | USB, Wi-Fi |
| Процессор | Olympus TruePic VIII |
| Салмагы (дене) | 1 Kilogram (approx. 574g with battery/card) |
| Сууга туруктуулук деңгээли | Water Resistant (Splashproof) |
10. Кепилдик жана колдоо
Your Olympus OM-D E-M1 Mark II camera comes with a limited warranty. Please refer to the warranty card included in your package for specific terms and conditions. For technical support, service, or to download the full digital instruction manual, please visit the official Olympus support website or contact your local Olympus service center.
Онлайн колдоо: www.olympus-imaging.com/support/


