1. Киришүү
This manual provides detailed instructions for the iTOMA CKS3501BT FM/DAB Clock Radio. This device features a 1.4-inch cyan blue LED display, dual alarms, DAB and FM radio capabilities, Bluetooth audio streaming, a USB charging port, and a headphone jack. Please read this manual thoroughly to ensure proper operation and to utilize all available functions.

1-сүрөт: iTOMA CKS3501BT Clock Radio. This image shows the front of the clock radio with its large digital display indicating the time and date. The top panel with control buttons is visible, along with a smartphone connected for charging, highlighting the USB charging feature.
2. Орнотуу
2.1 Кубат туташтыруу
Connect the clock radio to an AC power outlet using the provided power adapter. The unit requires AC power for full functionality. Ensure the power cable is securely connected to both the device and the wall outlet.
2.2 Камдык батареяны орнотуу
The iTOMA CKS3501BT uses a CR2032 lithium battery (not always included) for backup. This battery preserves time and alarm settings during a power outage. The clock radio will not function without AC power, even with the backup battery installed. Replace the battery when the battery indicator lights up on the display.
- Аппараттын астындагы батарея отсегин табыңыз.
- Бөлүмдүн капкагын ачыңыз.
- Insert one CR2032 battery with the positive (+) side facing up.
- Бөлүмдүн капкагын бекем жабыңыз.
2.3 Баштапкы убакытты орнотуу
Upon first connection to AC power, the time and date may automatically set to a default time zone (e.g., London Time). You can adjust the time zone or manually set the time and date as follows:
2.3.1 Setting Time Format (12/24 Hour)
- Ensure the unit is in Standby mode (radio off).
- басып, кармап туруңуз ЖАНЫМДА БОЛ button for approximately 5 seconds until "H12" or "H24" is displayed.
- басыңыз ЖАНЫМДА БОЛ button again to toggle between 12-hour and 24-hour formats.
- Wait 5 seconds or press the TIME чыгуу үчүн баскыч.
2.3.2 Manual Time and Date Adjustment
- Күтүү режиминде, басыңыз TIME button. The hour display will blink.
- колдонуу TUNE + / - саатты тууралоо үчүн баскычтар.
- Басыңыз TIME мүнөттөргө жылдыруу үчүн кайрадан, андан кийин тууралаңыз TUNE + / -.
- Басууну улантыңыз TIME жыл, ай жана күн жөндөөлөрүн өзгөртүү үчүн, ар бирин тууралоо TUNE + / -.
- Басыңыз TIME one last time or wait a few seconds for the settings to save.
3. Иштөө нускамалары
3.1 Dual Alarm Function
The iTOMA CKS3501BT features two independent alarms (AL1 and AL2) that can be set for different times and wake-up sources.
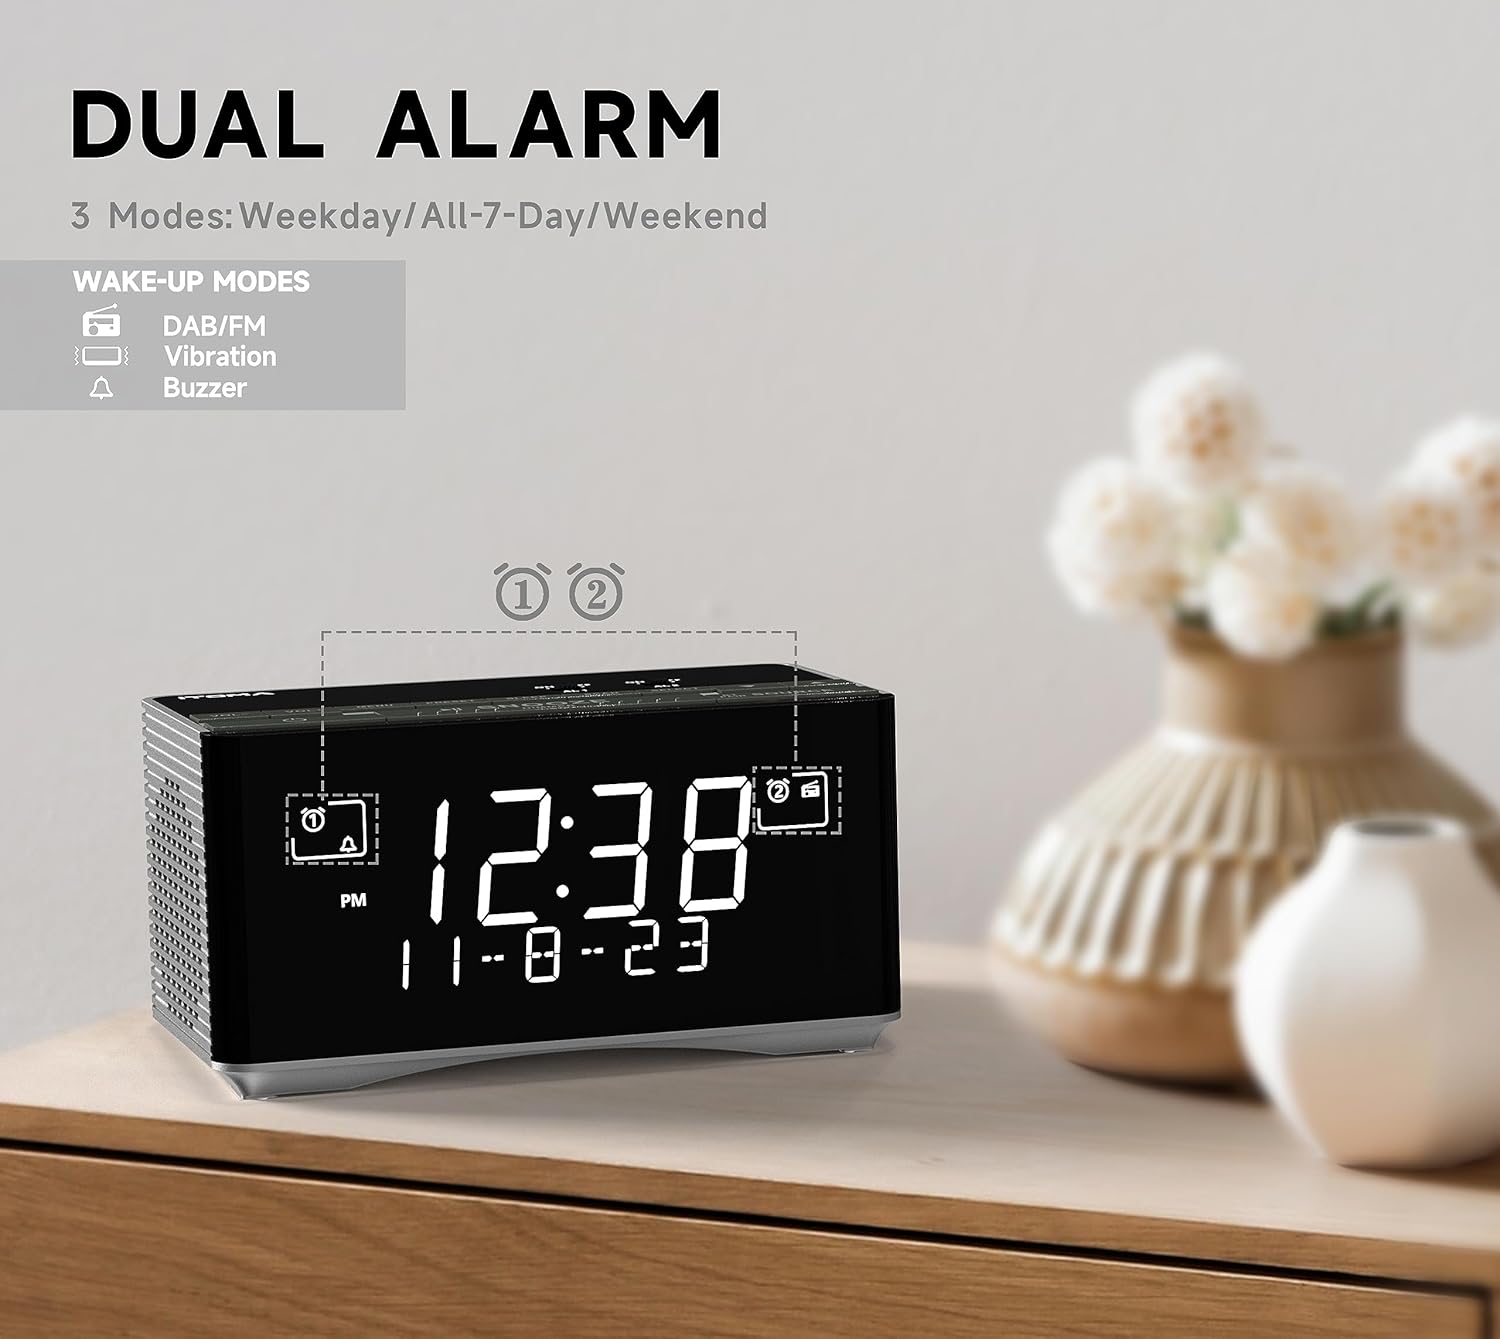
2-сүрөт: Dual Alarm Functionality. This image illustrates the dual alarm feature of the clock radio, highlighting the different wake-up modes available, including DAB/FM radio, vibration, and buzzer. The display shows the current time and date.
3.1.1 Setting an Alarm (AL1 or AL2)
- In Standby mode, press and hold either AL1 or AL2 for 2 seconds until the hour display blinks.
- колдонуу TUNE + / - каалаган ойготкуч саатын коюу үчүн баскычтар.
- Басыңыз AL1 or AL2 мүнөттөргө жылдыруу үчүн кайрадан, андан кийин тууралаңыз TUNE + / -.
- Басыңыз AL1 or AL2 again to select the alarm frequency mode:
- ЖУМА: басыңыз ЖУМА button to cycle through: Any Single Day, Everyday, Weekdays, or Weekends.
- Басыңыз AL1 or AL2 again to set the alarm volume (16 levels, displayed as U1 to U30) using TUNE + / -.
- Басыңыз AL1 or AL2 one last time or wait 3 seconds to save and exit.
3.1.2 Сигнализацияларды иштетүү/өчүрүү
- Басыңыз AL1 or AL2 briefly to cycle through alarm types: Buzzer (bell icon), Radio (music note icon), or Off (no icon).
- Сигнал чыкканда чоң баскычты басыңыз SNOOZE / DIMMER button to activate snooze for 9 minutes.
- Сигналды токтотуу үчүн, басыңыз AL1, AL2, же ЖАНЫМДА БОЛ.
3.2 DAB and FM Radio
The clock radio supports both Digital Audio Broadcasting (DAB) and FM radio frequencies. An external antenna is provided for improved reception.

3-сүрөт: DAB & FM Radio. This image highlights the clock radio's ability to receive both DAB and FM radio signals, with the display showing a DAB station name.
3.2.1 Tuning and Presets
- басыңыз ЖАНЫМДА БОЛ баскычты басуу менен
- басыңыз БУЛАК button repeatedly to select either DAB or FM radio mode.
- колдонуу TUNE + / - баскычтарды басып, станцияны кол менен жөндөңүз же кийинки жеткиликтүү станцияны автоматтык түрдө издөө үчүн басып туруңуз.
- To save a preset (up to 20 DAB and 20 FM stations):
- Каалаган станцияга коюңуз.
- басып, кармап туруңуз AL1/STORE button until "P01" (or the next available preset number) blinks.
- Колдонуу TUNE + / - каалаган алдын ала коюлган номерди тандоо үчүн (P01-P40).
- Басыңыз AL1/STORE ырастоо үчүн дагы.
- Алдын ала орнотууну эстөө үчүн:
- Радио режиминде, басыңыз AL2/MEMORY баскычы.
- Колдонуу TUNE + / - сакталган алдын ала коюлган жөндөөлөрдү карап чыгуу үчүн.
3.3 Bluetooth байланышы
Аудиону зымсыз агым аркылуу ойнотуу үчүн смартфонуңузду же башка Bluetooth иштетилген түзмөктөрүңүздү туташтырыңыз.

4-сүрөт: Bluetooth Audio Streaming. This image shows the clock radio connected via Bluetooth to a smartphone, demonstrating its ability to play music from external devices wirelessly.
- басыңыз ЖАНЫМДА БОЛ баскычты басуу менен
- басыңыз БУЛАК button repeatedly until "BT" appears on the display and starts blinking. The unit is now in pairing mode.
- On your mobile device, enable Bluetooth and search for "iTOMA CKS3501BT".
- Select "iTOMA CKS3501BT" to pair. Once connected, the "BT" indicator will stop blinking, and a confirmation tone may sound.
- Эми сиз радио саат аркылуу түзмөгүңүздөн аудиону ойното аласыз.
- колдонуу SNOOZE / DIMMER аудиону ойнотуу/тындыруу үчүн баскыч.
- Колдонуу TUNE + / - тректерди өткөрүп жиберүү.
- Үнүн колдонуп, үнүн жөндөңүз VOL + / - buttons on the clock radio or your connected device.
3.4 USB кубаттоо порту
A USB port is located on the back of the unit, allowing you to charge compatible mobile devices (e.g., smartphones, tablets) with an output of 5V, 1.2A.
- Connect your device's USB charging cable to the USB port on the clock radio.
- Ensure the clock radio is connected to AC power for the charging function to operate.
3.5 Наушник уячасы
A 3.5mm headphone jack is provided for private listening to radio or Bluetooth audio.

5-сүрөт: Headphone Jack. This image shows the clock radio with headphones connected to its side, illustrating the option for private audio listening.
- Plug your 3.5mm headphones into the headphone jack located on the unit.
- Audio will automatically switch from the internal speaker to the headphones.
3.6 Диммерди башкаруу
The display brightness can be adjusted manually or automatically to suit ambient light conditions.

6-сүрөт: Auto & Manual Dimmer. This image visually explains the display dimming options, including high, medium, low, and off settings, as well as an automatic brightness adjustment mode.
- Автоматтык жарыктык: The display brightness adjusts automatically based on the surrounding light. It will be brighter in well-lit conditions and dimmer in low-light conditions.
- Manual 3-Step Dimmer: Күтүү режиминде, басыңыз SNOOZE / DIMMER button repeatedly to cycle through High, Medium, and Low brightness levels.
3.7 Radio Sleep Timer
The sleep timer allows you to listen to the radio for a set duration before the unit automatically turns off.
- Ensure the radio is playing.
- басыңыз УЙКУ баскычы. Дисплей демейки уйку убактысын көрсөтөт (мисалы, 10 мүнөт).
- басыңыз УЙКУ button repeatedly to cycle through available sleep times (e.g., 10, 20, 30... up to 90 minutes).
- Уйку таймерин жокко чыгаруу үчүн, басыңыз УЙКУ button until "OFF" appears on the display.
4. Техникалык тейлөө
4.1 Тазалоо
Wipe the unit with a soft, dry cloth. Do not use abrasive cleaners or solvents, as they may damage the surface.
4.2 Backup Battery Replacement
When the battery indicator appears on the display, replace the CR2032 backup battery as described in Section 2.2.
5. Кыйынчылыктарды
| Көйгөй | Мүмкүн себеп | Чечим |
|---|---|---|
| Түзмөк күйбөйт. | Power cable not connected or loose. | Ensure the AC power adapter is securely plugged into the unit and a working wall outlet. |
| Радиодон/Bluetoothтон үн жок. | Volume too low; incorrect source selected; headphones connected. | Үндү катуулатуу. Басыңыз БУЛАК to select the correct input. Disconnect headphones if using speakers. |
| Радио кабыл алуу начар. | Антенна туура эмес узартылган же жайгаштырылган; сигнал начар. | Fully extend and adjust the position of the FM/DAB antenna. Try moving the unit to a different location. |
| Bluetooth түзмөгү жупташа албайт. | Unit not in pairing mode; device too far; Bluetooth already connected to another device. | Ensure the clock radio is in Bluetooth pairing mode (BT blinking). Move device closer. Disconnect from other Bluetooth devices. |
| Ойготкуч угулбайт. | Alarm not activated; volume too low; incorrect alarm mode. | Verify alarm is set and activated (bell/music note icon visible). Check alarm volume. Ensure correct alarm mode (buzzer/radio) is selected. |
| Убакыт/жөндөөлөр өчүрүлгөндөн кийин жоголдуtage. | Backup battery is dead or missing. | CR2032 камдык батареясын алмаштырыңыз. |
6. Техникалык шарттар
| Бренд | iTOMA |
| Модель номери | CKS3501BT (also referred to as 3501) |
| Дисплей түрү | 1.4" Cyan Blue LED Digital Display |
| Радио тюнер | DAB, FM Digital Tuning |
| Bluetooth | Yes, for audio streaming |
| USB заряддоо порту | 5V, 1.2A чыгышы |
| Наушник уясы | 3.5мм |
| Ойготкучтун өзгөчөлүктөрү | Dual Alarms, Snooze (9 minutes), Buzzer/Radio wake-up, Weekday/Weekend/Everyday modes, 16-level volume control |
| Dimmer Control | Automatic brightness adjustment, 3-step manual dimmer (High-Medium-Low) |
| Уйку таймери | Up to 90 minutes for radio |
| Камдык батарея | 1 x CR2032 Lithium Metal (for time/settings retention during power outage) |
| Power Source | AC кабели (электрдик) |
| Продукциянын өлчөмдөрү (L x W x Y) | 8 x 3.81 x 7.5 см (3.15 x 1.5 x 2.95 дюйм) |
| Элемент Салмагы | 730 грамм (1.61 фунт) |
7. Кепилдик жана колдоо
Specific warranty information for the iTOMA CKS3501BT is not provided in the product details. Please refer to the documentation included with your purchase or contact iTOMA customer support for warranty details and technical assistance.
For further support, visit the official iTOMA webсайтка же кардарларды тейлөө бөлүмүнө кайрылыңыз.


