1. Introduction to Dobot Magician
The Dobot Magician is a versatile and user-friendly robotic arm designed for educational purposes, particularly in STEM fields. It integrates multiple functionalities, including robotic arm control, 3D printing, laser engraving, and pick-and-place operations, making it an ideal tool for makers and K12 STEM education.
Recognized for its innovative design and capabilities, the Dobot Magician was honored with a CES Innovation Award.

Figure 1.1: The Dobot Magician robotic arm, showcasing its compact and versatile design.

Figure 1.2: Dobot Magician recognized as a CES 2018 Innovation Awards Honoree.
2. Бөлүктөр тизмеси
The Dobot Magician Advanced Educational Kit includes the following components:
- Robot Arm
- Vacuum pump Kit
- Writing and Drawing Kit
- 3D Printing Kit
- Gripper
- Сорохтор
- WIFI модулу
- Bluetooth модулу
- Гравёр
- Джойстик топтому

Figure 2.1: ашыкview of the various components and accessories included in the Dobot Magician kit.
3. Орнотуу колдонмосу
To begin using your Dobot Magician, follow these general setup steps:
- Пакеттен чыгаруу: Carefully remove all components from the packaging. Verify that all items listed in the Part List (Section 2) are present.
- Жайгашкан жери: Place the robot arm on a stable, flat surface. Ensure there is sufficient clear space around the arm for its full range of motion.
- Кубат туташуу: Connect the power adapter to the robot arm and then to a suitable power outlet.
- Баштапкы туташуу: Connect the Dobot Magician to your computer via USB, or establish a wireless connection using the provided WiFi or Bluetooth modules.
- Программалык камсыздоону орнотуу: Install the Dobot Studio software on your computer. This software is essential for controlling and programming the robotic arm.
- End Tool Attachment: Select the desired end tool (e.g., gripper, writing kit, 3D printing kit) and attach it to the robotic arm using the standardized plug-in style holder. Ensure it is securely screwed into place.
- Калибрлөө: Perform initial calibration as guided by the Dobot Studio software. This ensures accurate operation.
For detailed, step-by-step instructions on specific connections and software setup, please refer to the comprehensive digital manual available with the Dobot Studio software or on the official Dobot webсайт.
4. Operating the Dobot Magician
The Dobot Magician offers multiple intuitive methods for control and operation, catering to various user needs and skill levels.
4.1. Controlling Methods
The robotic arm can be controlled via PC, phone, gesture, voice, and even through advanced interfaces. The handhold teaching feature allows for direct, intuitive manipulation of the arm's movements, which can then be recorded and replayed.

Figure 4.1: The Dobot Magician can be controlled using various methods, including a joystick.
4.2. End Tool Quick Switch
The Dobot Magician features a standardized plug-in style end tool holder, allowing for quick and easy switching between different functionalities. Simply screw on the desired end tool, such as the writing kit, 3D printing kit, gripper, or laser engraver.
4.3. Dobot Studio Software
Dobot Studio is the primary software interface for the Dobot Magician. It provides a comprehensive set of features for controlling, customizing, and calibrating the robotic arm without requiring extensive coding knowledge. Users can adjust various parameters to fine-tune performance.
4.4. Жазуу жана сүрөт тартуу
With the Writing and Drawing Kit, the Dobot Magician can precisely replicate drawings and text. It supports BMP, SVG, and DXF file formats and offers a precision of ±0.2mm, ensuring accurate and smooth strokes.
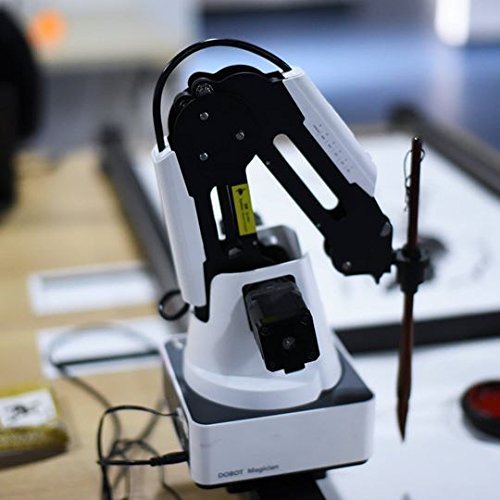
Figure 4.2: The Dobot Magician equipped with the writing and drawing tool.
4.5. 3D басып чыгаруу
The 3D Printing Kit transforms the Dobot Magician into a functional 3D printer, allowing users to create three-dimensional objects from digital designs.

Figure 4.3: The Dobot Magician demonstrating its 3D printing capabilities with various printed models.
4.6. Лазердик оюу
Equipped with the Engraver, the Dobot Magician can perform powerful laser engraving on materials such as wood and leather, enabling precise customization and artistic projects.
4.7. Программалоо жана иштеп чыгуу
The Dobot Magician supports various programming approaches:
- Visualized Programming: An intuitive block-based programming interface simplifies coding, making it accessible for beginners to learn programming concepts by simply arranging blocks.
- Өркүндөтүлгөн программалоо: For experienced users, the Dobot Magician supports major programming languages including C++, C#, Python, and Java, with integrated API and pre-set modules for advanced development.
- Extension Ports: The arm features 13 extension ports, 1 programmable key, and 2MB of offline command storage, offering extensive possibilities for developers to expand its functionalities.

Figure 4.4: The visual programming interface (Dobot Blockly) for easy coding.
5. Техникалык тейлөө
To ensure the longevity and optimal performance of your Dobot Magician, regular maintenance is recommended:
- Тазалоо: Keep the robotic arm and its components clean. Use a soft, dry cloth to wipe down surfaces. Avoid using abrasive cleaners or solvents.
- Кабелдик башкаруу: Ensure all cables are neatly organized and not under tension or pinched, which can lead to damage.
- Сактагыч: When not in use for extended periods, store the Dobot Magician in a clean, dry environment, away from extreme temperatures or direct sunlight.
- Программалык камсыздоо жаңыртуулары: Periodically check for and install the latest Dobot Studio software and firmware updates to benefit from new features and performance improvements.
6. Кыйынчылыктарды
If you encounter issues with your Dobot Magician, consider the following common troubleshooting steps. For complex problems, please contact technical support.
- Түзмөк күйбөйт:
- Verify that the power adapter is securely connected to both the robot arm and a working power outlet.
- Check the power indicator light on the unit.
- Motor Unresponsive or Incorrect Movement:
- Ensure all motor connections are secure.
- Always initiate operation by using the "home" function in Dobot Studio to reset the arm's position.
- If a specific motor is unresponsive, it may indicate a hardware issue.
- Suction Cup/Gripper Malfunction:
- Check the connections of the vacuum pump kit.
- Ensure there are no obstructions in the air lines or the suction cup itself.
- Verify that the pump is correctly configured for vacuum operation in the software.
- Программалык камсыздоого туташуу маселелери:
- Ensure the correct COM port is selected in Dobot Studio if connecting via USB.
- For wireless connections, verify that the WiFi or Bluetooth modules are properly installed and configured.
- Restart Dobot Studio and the robotic arm.
- Language Displayed Incorrectly:
- Access the settings within Dobot Studio to change the display language to English or your preferred language.
If these steps do not resolve the issue, or if you suspect a hardware problem, please contact Dobot technical support for further assistance.
7. Техникалык шарттар
The following table outlines the key specifications for the Dobot Magician Advanced Educational Kit:
| Өзгөчөлүк | Спецификация |
|---|---|
| Модель номери | Dobot006 |
| Продукциянын өлчөмдөрү | 12.99 x 12.8 x 16.14 дюйм |
| Элемент Салмагы | 17.64 фунт |
| Өндүрүүчүнүн сунуш кылган курагы | 10 жаш жана андан жогору |
| Дата биринчи жеткиликтүү | 7-ноябрь, 2016-жыл |
| Precision (Drawing) | ±0.2мм |
| Кеңейтүү порттору | 13 |
| Программалануучу ачкыч | 1 |
| Offline Command Storage | 2MB |
8. Кепилдик жана колдоо
Dobot is committed to providing comprehensive support for the Magician Advanced Educational Kit. All units undergo testing before shipment to ensure quality.
Life-Long Technical Support: Dobot offers life-long technical support for the Magician. Whether you encounter a hardware issue, a software problem, or require assistance with operations, please do not hesitate to contact support. They are available to guide you through troubleshooting steps and resolve any technical difficulties.
For technical assistance, please refer to the contact information provided with your product documentation or visit the official Dobot webколдоо булактары үчүн сайт.


