Introduction
The ASUS ROG Maximus IX Hero is an ATX motherboard designed for 7th generation Intel Core processors. It features an LGA1151 socket, DDR4 memory support, and various connectivity options including DisplayPort, HDMI, M.2 slots, and USB 3.1. This motherboard provides a robust foundation for building a high-performance personal computer.

Сүрөт: жогорудан төмөнгө view of the ASUS ROG Maximus IX Hero motherboard, showcasing its layout, CPU socket, RAM slots, and various expansion slots.
Кутуда эмне бар
Төмөндө саналып өткөн бардык компоненттер пакетиңизге камтылганын текшериңиз:
- Колдонуучунун колдонмосу
- DVD колдоо
- I / O Shield
- 2-in-1 SATA 6Gb/s cables (2)
- SLI™ HB Bridge (2-way-M)
- Q-туташтыргыч
- ROG Coaster
- 3D printing mount
- 10-in-1 ROG cable label
- CPU Installation Tool
- 2-in-1 M.2 Screw set
- ROG чаптамасы
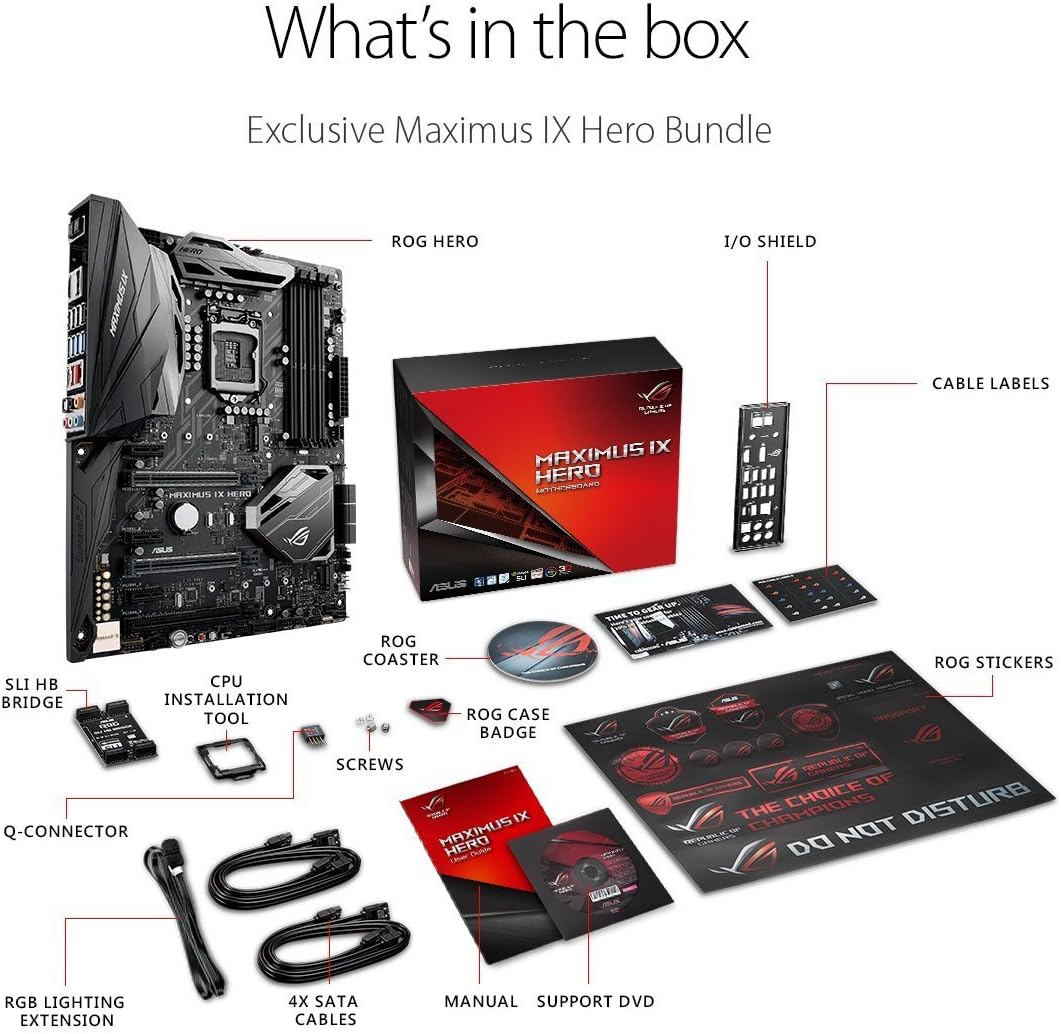
Image: A visual representation of the ASUS ROG Maximus IX Hero motherboard and its included accessories, such as cables, manuals, and installation tools.
Негизги өзгөчөлүктөрү
- Supports 7th generation Intel Core processors, enhancing connectivity and speed with Dual M.2 slots, front panel USB 3.1, and Intel Optane Memory compatibility.
- Includes 5-Way Optimization with Auto-Tuning and FanXpert 4 for automated overclocking profile adjustments and dynamic system cooling.
- Features ASUS AURA Sync RGB lighting and a 3D-printing friendly mount for customization.
- Equipped with two Patent-pending Safe Slots, which integrate metal framing for enhanced support and rigidity of large graphics processing units (GPUs).
- Provides industry-leading 8-channel HD audio through the ROG exclusive SupremeFX S1220, powered by Japanese capacitors.
Орнотуу жана орнотуу
This section provides general guidelines for installing your ASUS ROG Maximus IX Hero motherboard. Refer to the detailed user guide for specific instructions and safety precautions.
1. Алгачкы текшерүү
Before installation, carefully inspect the motherboard for any physical damage. Ensure the CPU socket pins are not bent.
2. CPU орнотуу (LGA1151)
- CPU розеткасынын рычагын ачыңыз.
- Align the notches on your 7th generation Intel Core processor with the socket.
- Процессорду мажбурлабастан акырын розеткага салыңыз.
- CPUну бекитүү үчүн розетка рычагын жабыңыз.
3. RAM орнотуу (DDR4)
- Open the clips on the DDR4 DIMM slots.
- DDR4 эстутум модулундагы оюкту DIMM уячасындагы ачкыч менен тууралаңыз.
- Эстутум модулунун эки учуна кысылганчалар орнотулганга чейин катуу басыңыз.
- The motherboard supports up to 64GB of DDR4 memory across four slots.
4. M.2 SSD орнотуу
The motherboard features dual M.2 slots for high-speed storage. Refer to the user guide for specific M.2 slot locations and screw set usage.
- Бош M.2 уячасын табыңыз.
- M.2 SSDди уячага бурч менен салыңыз.
- SSDди акырын басып, берилген M.2 бурамасы менен бекитиңиз.
5. PCIe Card Installation (Safe Slots)
The motherboard includes reinforced Safe Slots for graphics cards and other PCIe devices.
- Align your PCIe card with an available PCIe slot.
- Press down firmly until the card is fully seated and the retention clip engages.
6. Connecting Power and Front Panel Headers
Connect the 24-pin ATX power connector and the 8-pin CPU power connector from your power supply to the motherboard. Connect the front panel headers (power button, reset button, HDD LED, power LED, USB ports, audio) according to the motherboard manual's pinout diagram.
7. Арткы киргизүү/чыгаруу туташуулары
Connect your peripherals to the rear I/O ports. This includes USB devices, display cables (HDMI, DisplayPort), Ethernet, and audio devices.

Сүрөт: Жакын план view of the rear input/output panel of the ASUS ROG Maximus IX Hero motherboard, showing various ports including USB, HDMI, DisplayPort, Ethernet, and audio jacks.
8. RGB Lighting Setup
The motherboard features integrated AURA Sync RGB lighting. Additional RGB LED strips can be connected to the dedicated RGB LED headers for expanded lighting control.
9. Liquid Cooling Integration
For custom liquid cooling setups, the motherboard includes H2O sensor headers to monitor temperature and flow within your cooling loop.
Продукт бүттүview Video
Видео: Бүттүview of the ASUS ROG Maximus IX Hero motherboard, highlighting its key features, connectivity options, and design elements. This video provides a visual guide to the board's components and capabilities.
Иштөө нускамалары
1. Баштапкы жүктөө
After completing hardware installation, connect your display, keyboard, and mouse. Power on your system. The system should display the BIOS/UEFI interface or begin the operating system installation process.
2. BIOS/UEFI конфигурациясы
Press the designated key (usually DEL or F2) during boot-up to enter the BIOS/UEFI setup. Here you can configure boot order, system time, enable/disable features, and apply overclocking settings. The 5-Way Optimization feature can assist with automated tuning.
3. Драйверди орнотуу
Install all necessary drivers for the motherboard chipset, audio, LAN, and other integrated components. These can typically be found on the included Support DVD or downloaded from the ASUS official webсайт.
4. Программалык камсыздоонун утилиталары
Utilize ASUS software utilities such as AURA Sync for RGB lighting control and FanXpert 4 for fan speed management to optimize your system's performance and aesthetics.
Техникалык тейлөө
1. Keep Clean
Regularly clean dust from the motherboard and connected components using compressed air. Ensure the system is powered off and unplugged before cleaning.
2. BIOS/UEFI Жаңыртуулары
Мезгил-мезгили менен ASUS колдоосун текшерип туруңуз website for BIOS/UEFI updates. Updates can improve system stability, compatibility, and performance. Follow the update instructions carefully to avoid system damage.
3. Драйвер жаңыртуулары
Keep your system drivers updated to ensure optimal performance and compatibility with new hardware and software.
Проблемаларды чечүү
1. Кубат жок/Өтүк жок
- Бардык электр кабелдери (24-пин ATX, 8-пин CPU) коопсуз туташтырылганын текшериңиз.
- кубат менен камсыздоо күйгүзүлгөнүн текшериңиз.
- Check front panel power button connection.
- Минималдуу компоненттер менен жүктөөнү байкап көрүңүз (процессор, бир оперативдик эс тутум, эгерде интеграцияланган графика жок болсо, GPU).
2. Дисплейдин чыгышы жок
- Ensure the monitor is connected to the correct graphics output (either motherboard or dedicated GPU).
- Графикалык картаны жана эстутум модулдарын кайра орнотуңуз.
- Башка дисплей кабели же монитор менен сынап көрүңүз.
3. Системанын туруксуздугу/кыйроолору
- CPU жана GPU температурасын текшерүү.
- Бардык айдоочулар жаңыртылганын текшериңиз.
- Эгерде ашыкча жүктөлгөн болсо, туруктуулукту текшерүү үчүн демейки жөндөөлөргө кайтарыңыз.
- RAM бүтүндүгүн текшерүү үчүн эс диагностикалык куралдарды иштетиңиз.
Техникалык шарттар
| Өзгөчөлүк | Деталь |
|---|---|
| Бренд | ASUS |
| Модель аты | ROG MAXIMUS IX HERO |
| CPU розетка | LGA 1151 |
| Шайкеш процессорлор | 7-муун Intel Core |
| Чипсет түрү | Intel Z270 |
| RAM эс технологиясы | DDR4 |
| Эстутум Slots Жеткиликтүү | 4 |
| Maximum RAM Size | 64 ГБ |
| Графикалык карта интерфейси | PCI Express |
| Жалпы HDMI порттору | 1 |
| Жалпы USB порттору | 2 (USB 3.1 Type-A, USB 3.1 Type-C on rear I/O) |
| Системалык шина стандарты колдоого алынат | SATA 3 |
| Элемент Салмагы | 2.9 фунт |
Кепилдик жана колдоо
Бул продукт менен келет 3 жылдык кепилдик from ASUS. For technical support, driver downloads, and further assistance, please visit the official ASUS support website or the ASUS Store.


