1. Киришүү
Thank you for choosing the BECA BHT-2000GALTP Smart Floor Heating Thermostat. This device is designed to provide intelligent and efficient control over your electric floor heating system, ensuring optimal comfort and energy savings. Featuring a modern black screen display and intuitive touch controls, this thermostat offers 5+2 weekly programming capabilities to suit your lifestyle.

Сүрөт 1: Алдыңкы view of the BECA BHT-2000GALTP Smart Floor Heating Thermostat, displaying temperature, time, and mode indicators.
2. Коопсуздук маалыматы
Please read this section carefully before installation and operation to prevent personal injury or damage to the product.
- Installation must be carried out by a qualified electrician in accordance with local electrical codes and regulations.
- Always disconnect power at the circuit breaker before installing, cleaning, or servicing the thermostat.
- Термостатты сууга же ашыкча нымдуулукка дуушар кылбаңыз.
- Бардык зымдарды туташтыруу коопсуз жана туура изоляцияланганын текшериңиз.
- Бул термостат үй ичинде гана колдонуу үчүн иштелип чыккан.
3. Пакеттин мазмуну
Пакетте бардык буюмдар бар экенин текшериңиз:
- BECA BHT-2000GALTP Thermostat Unit
- Монтаждоо бурамалар (2)
- Колдонуучунун Колдонмосу (бул документ)
4. Техникалык шарттар
| Өзгөчөлүк | Спецификация |
|---|---|
| Модел | BHT-2000GALTP |
| Электр камсыздоо | AC 95 ~ 240V, 50/60Hz |
| Жүктөө агымы | 3A |
| Өлчөмдөрү (L x W x Y) | 8.61 x 8.61 x 1.32 см |
| Түс | Кара |
| Арткы жарык | Ооба |
| IP рейтинги | IP20 |
| Сенсор | NTC |
5. Орнотуу (Орнотуу)
The thermostat is designed for installation into a standard 86mm square or European 60mm round wall box. Ensure the power supply is disconnected before beginning installation.
- Turn off the main power supply to the heating system at the circuit breaker.
- Separate the mounting plate from the thermostat unit by gently prying the bottom clips.
- Connect the wiring according to the diagram in Section 6.
- Mount the back plate into the wall box using the provided screws.
- Align the thermostat unit with the mounting plate and snap it into place.
- Жылытуу системасынын электр энергиясын калыбына келтириңиз.

2-сүрөт: Side profile of the thermostat, illustrating its compact design for wall mounting.
6. Электр схемасы
Proper wiring is essential for the safe and correct operation of your thermostat. Refer to the diagrams below and ensure all connections are secure.

3-сүрөт: Арткы view of the thermostat with terminal labels for power, load, and NTC sensor.
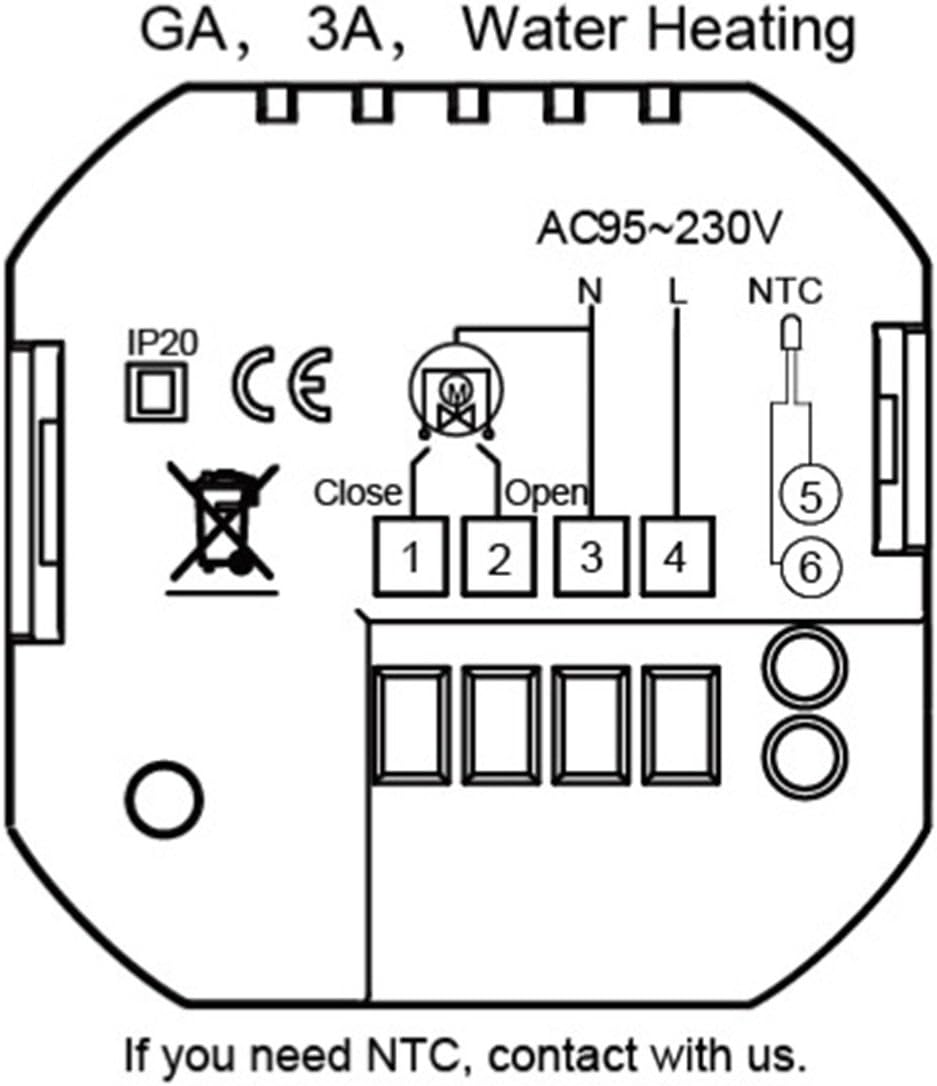
Figure 4: Detailed wiring schematic for GA, 3A, Water Heating models. Connect Live (L) and Neutral (N) to terminals 3 and 4 respectively. Connect the heating load to terminals 1 and 2. The NTC floor sensor connects to terminals 5 and 6.
Терминал сүрөттөмөлөрү:
- N: Neutral wire for power supply.
- L: Live wire for power supply.
- 1, 2: Load connections for the heating element.
- 5, 6: NTC sensor connections (for floor temperature sensing).
7. Операция
The thermostat features a clear display and touch buttons for easy operation.

Figure 5: Thermostat display and button function overview.
Баскыч функциялары:
- M (режим): Press to switch between Manual mode and Program mode.
- ⏱ (Clock/Time): Press to set time and date. Hold to enter programming settings.
- ⏻ (Күч): Press to turn the thermostat ON/OFF.
- ▲ (Up Arrow): Increase temperature or adjust settings.
- ▼ (Down Arrow): Decrease temperature or adjust settings.
Убакытты жана датаны коюу:
- With the thermostat ON, press the ⏱ button once. The hour digit will flash.
- Колдонуу ▲ жана ▼ саатты тууралоо үчүн.
- Басыңыз ⏱ мүнөттөргө жылдыруу үчүн кайрадан колдонуңуз, андан кийин колдонуңуз ▲ жана ▼ тууралоо.
- Басыңыз ⏱ again to move to the day of the week (1-7, Monday-Sunday), then use ▲ жана ▼ тууралоо.
- Басыңыз ⏱ again or wait 10 seconds to save and exit.
8. Programming (5+2 Weekly Schedule)
The thermostat supports 5+2 weekly programming, allowing you to set different temperatures for weekdays (Monday-Friday) and weekends (Saturday-Sunday) across six time periods each day.
- With the thermostat ON, hold the ⏱ button for 3-5 seconds to enter programming mode. The display will show "WEEK" and the first period (Period 1) for weekdays.
- Колдонуу ▲ жана ▼ to adjust the start time for Period 1.
- Басыңыз ⏱ to move to the temperature setting for Period 1. Use ▲ жана ▼ каалаган температураны жөнгө салуу үчүн.
- Repeat steps 2 and 3 for Period 2 through Period 6 for weekdays.
- After setting all 6 periods for weekdays, the display will switch to weekend programming (Saturday-Sunday). Repeat the process for Period 1 through Period 6 for weekends.
- Once all periods are set, press ⏱ again or wait 10 seconds to save the settings and exit programming mode.
Default Program Settings (Exampле):
| Мезгил | Time (Mon-Fri) | Temp (Mon-Fri) | Time (Sat-Sun) | Temp (Sat-Sun) |
|---|---|---|---|---|
| 1 | 06:00 | 22℃ | 08:00 | 23℃ |
| 2 | 08:00 | 18℃ | 11:00 | 20℃ |
| 3 | 11:30 | 18℃ | 14:00 | 20℃ |
| 4 | 13:30 | 18℃ | 17:00 | 23℃ |
| 5 | 17:00 | 22℃ | 20:00 | 20℃ |
| 6 | 22:00 | 18℃ | 22:00 | 18℃ |
9. Техникалык тейлөө
The BECA BHT-2000GALTP thermostat requires minimal maintenance.
- Тазалоо: Дисплейди сүртүңүз жана вasing жумшак менен, гamp кездеме. Абразивдүү тазалагычтарды же эриткичтерди колдонбоңуз.
- Колдонуучунун тейлөөчү тетиктери жок: Термостатты өз алдынча ачууга же оңдоого аракет кылбаңыз. Бардык тейлөө иштерин квалификациялуу адистерге тапшырыңыз.
10. Кыйынчылыктарды
Термостатыңызда көйгөйлөргө туш болсоңуз, төмөнкү жалпы көйгөйлөрдү жана чечимдерди караңыз:
| Көйгөй | Мүмкүн себеп | Чечим |
|---|---|---|
| Термостат электр кубаты менен иштеген жок/дисплей өчүк. | Электр энергиясы жок; өчүргүч өчүрүлдү; бош зымдар. | Check power supply at the circuit breaker. Ensure wiring connections are secure (refer to Section 6). |
| Heating system not turning on/off as expected. | Incorrect temperature setting; thermostat in wrong mode (Manual/Program); wiring issue. | Verify desired temperature is set correctly. Check thermostat mode (M button). Inspect wiring. |
| Температураны окуу туура эмес көрүнөт. | Sensor issue; thermostat location. | Ensure the NTC sensor is properly connected and not damaged. Avoid placing thermostat near heat sources or drafts. |
| Cannot enter programming mode. | Баскыч көпкө кармалбай калды. | кармаңыз ⏱ баскычын 3-5 секунд. |
11. Кепилдик жана колдоо
For warranty information or technical support, please contact your point of purchase or the manufacturer directly. Keep your purchase receipt as proof of purchase.
Manufacturer: BECA


