Introduction
This manual provides comprehensive instructions for the setup, operation, and maintenance of your ROOFULL External CD DVD Drive. Designed for reliable performance and ease of use, this portable optical drive is compatible with a wide range of computers, offering versatile functionality for reading, writing, and ripping various disc formats.

Image: The ROOFULL External CD DVD Drive, neatly stored within its protective carrying case, alongside the included USB 3.0 to USB-C adapter.
Кутуда эмне бар
- External CD/DVD-RW Drive Player
- USB 3.0 to USB-C Adapter
- Кара ташуучу куту
Техникалык шарттар
| Бренд | ЧАТЫР |
| Модель номери | ECD918-SU3 |
| Аппараттык платформа | Ноутбук, компьютер |
| Операциялык системанын шайкештиги | Windows 11/10/8.1/7/Vista/XP, Mac OS 10.16 and above, Linux |
| Оптикалык диск түрү | CD-ROM, CD-R/RW, CD+R/RW, DVD-ROM, DVD±R/RW, DVD-RAM, DVD±R DL |
| Оптикалык сактагычтын жазуу ылдамдыгы | Max 24x CD / 8x DVD |
| Аппараттык интерфейс | USB 3.0 түрү А, USB 3.0 түрү C |
| Продукциянын өлчөмдөрү | 5.8 x 5.8 x 0.6 дюйм |
| Элемент Салмагы | 10.6 унция |

Сүрөт: деталдуу view of the drive highlighting its compact dimensions, integrated USB 3.0 data cable (7.87 inches / 20 cm), non-slip rubber pads, eject button, and forced ejection pinhole.
Жайгашуу
Дискти туташтыруу
- Locate an available USB port on your computer. The drive features a genuine USB 3.0 solution for high-speed data transfer.
- For computers with standard USB-A ports, plug the drive's USB 3.0 cable directly into the port.
- For modern laptops with only USB-C ports, use the included USB 3.0 to USB-C adapter. Connect the drive's USB-A plug to the adapter, then plug the adapter into your computer's USB-C port.
- For desktop PCs, if the drive does not function correctly, connect it to a rear USB port for a more stable power supply.
- For best performance, ensure your laptop or MacBook is connected to external power when using the drive.
The drive is plug-and-play; no additional driver installation is typically required. It should be automatically recognized by your operating system.
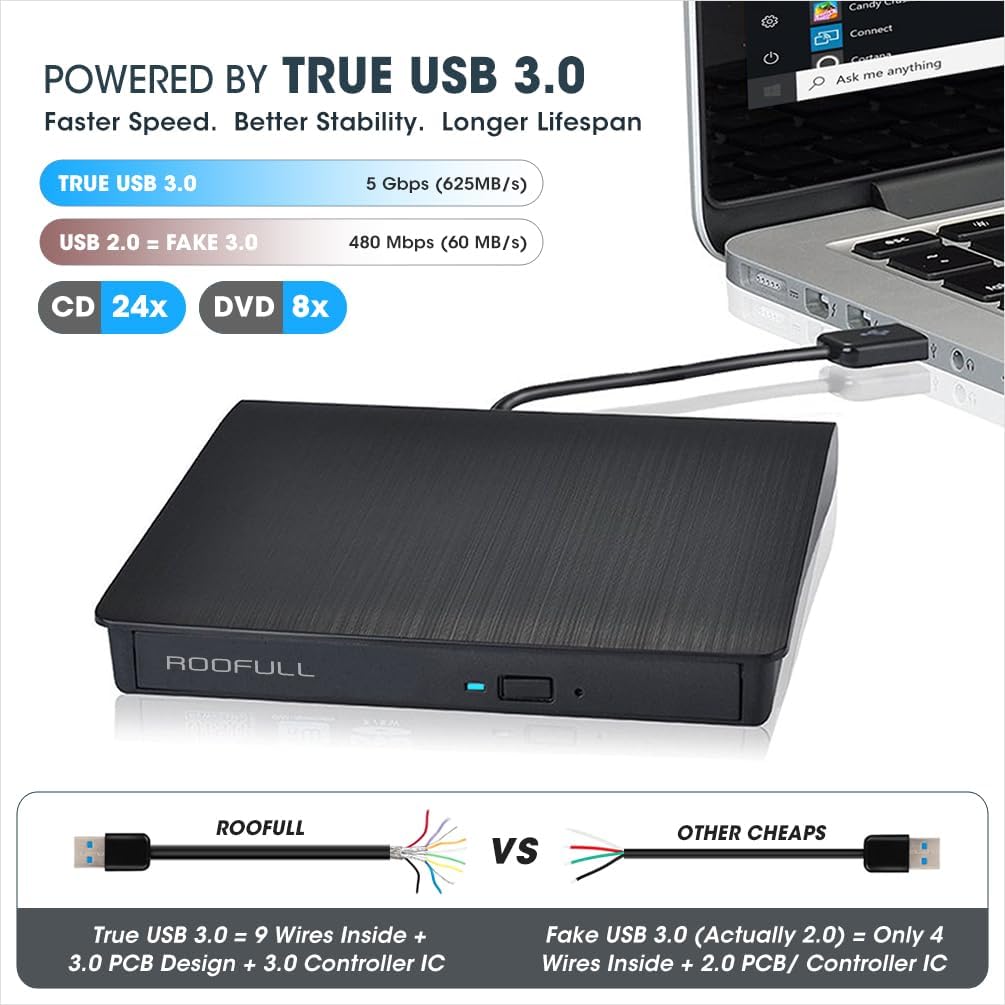
Image: The ROOFULL drive connected to a laptop, illustrating the true USB 3.0 connection for faster and more stable data transfer compared to older USB 2.0 connections.

Image: The external CD/DVD drive connected to a MacBook, with its protective carrying case positioned next to it, demonstrating its portability and ease of use with modern laptops.
Иштөө нускамалары
Disc Insertion and Ejection
- To open the disc tray, press the eject button located on the front of the drive.
- Carefully place your CD or DVD onto the tray, ensuring it is centered on the spindle.
- Лотокту акырындык менен дисктин ичине киргизип, ал чыкылдаган үн чыкканча басыңыз.
- On Mac systems, once a disc is successfully inserted and read, a drive icon will appear on the desktop.
- To eject a disc on Mac, right-click the desktop icon of the drive and select "Eject," or go to "File" > "Eject" from the menu in an active application. Due to macOS limitations, the physical eject button on the drive may not function after a disc has been played or burned.
Playing and Burning Discs
This drive functions as a reader, burner, writer, rewriter, recorder, and ripper. While the drive is plug-and-play, you will need compatible software to play or burn discs.
- Медиа ойнотуу: Use software like 5KPlayer or VLC Media Player to play movies or music from discs.
- Burning Data: Use burning software to write videos, music, photos, or other data to blank CDs/DVDs.
- Ripping Content: Rip audio CDs or video DVDs to digital files (e.g., MP3, WMA, MP4) for storage on your computer.
- Башка колдонуулар: View photo discs, install software or games, and back up important data.

Image: The drive with an open tray for disc insertion, illustrating its capabilities to read CDs/DVDs, burn CDs/DVDs, and rip digital content. It also highlights USB 3.0 and USB-C adapter compatibility.
Video: An official demonstration of the ROOFULL External CD DVD Drive, showcasing its setup process, disc insertion, and playback functionality on a Windows computer. This video provides a visual guide to basic operation.
Шайкештик
Supported Systems and Disc Formats
- Операциялык системалар: Windows (11/10/8.1/7/Vista/XP), Linux, and macOS 10.16 and above.
- Computer Types: Laptops, desktops, and all-in-one computers from major brands like HP, Dell, Lenovo, ASUS, and Apple.
- Диск форматтары: CD-ROM, CD-R/RW, CD+R/RW, DVD-ROM, DVD±R/RW, DVD-RAM, DVD±R DL, and VCD.
Келишпестик
This drive does жок support the following:
- Blu-ray or 4K discs.
- Chromebooks.
- Phones, iPads, or tablets.
- TVs or cars.
- Gaming consoles (PS4/PS5/Xbox).
- Projectors.
- Some Surface models.

Image: A visual chart detailing the compatibility of the drive with Windows, Mac, and Linux operating systems, and explicitly listing incompatible devices such as Chromebooks, iPads, and Blu-ray discs.
DVD Region Codes
DVDs will only play on DVD drives that use the same region country codes. For example, if you live in the U.S or CA, you are in Region 1. You need to set the DVD drive Region code to #1 to play Region 1 DVDs. CDs are not region coded.
Each external optical drive only allows you to change the region code 4-5 times.
| Аймак 1 | Canada, the United States |
| Аймак 2 | Japan, Europe, South Africa, Middle East |
| Аймак 3 | Southeast Asia, East Asia (including Hong Kong) |
| Аймак 4 | Australia, New Zealand, Pacific Islands, Central America, Mexico, South America |
| Аймак 5 | Eastern Europe, Russia, Indian Subcontinent, Africa, North Korea, and Mongolia |
| Аймак 6 | Кытай |
| Аймак 7 | Reserved for unspecified special use |
| Аймак 8 | Air and oceanic travel |

Image: A diagram illustrating the concept of DVD region codes and their importance for disc playback, along with a list of regions and their corresponding countries.
Техникалык тейлөө
Жалпы кам көрүү жана тазалоо
- Keep the drive in its protective carrying case when not in use to shield it from dust, water, and accidental drops.
- Clean the exterior of the drive with a soft, dry cloth. Avoid using harsh chemicals or abrasive materials.
- Do not attempt to open the drive casing or clean internal components, as this may void the warranty and damage the device.
- Handle discs by their edges to prevent fingerprints and scratches, which can affect playback and burning quality.
- Store discs in their cases or sleeves to protect them from dust and damage.
Проблемаларды чечүү
Жалпы маселелер жана чечимдер
- Диск таанылган жок:
- USB кабели дискке жана компьютериңизге коопсуз туташканын текшериңиз.
- Try connecting to a different USB port. For desktop PCs, use a rear USB port for better power supply.
- If using a USB hub, ensure it is a self-powered hub.
- Компьютериңизди өчүрүп күйгүзүңүз.
- Disc not reading/playing:
- Дисктин таза жана чийиксиз же таксыз экенин текшериңиз.
- Verify that the disc format is supported by the drive (e.g., not Blu-ray or 4K).
- Confirm you have compatible playback software installed (e.g., VLC Media Player, 5KPlayer).
- Check DVD region code compatibility if playing a DVD.
- Disc not burning/writing:
- Ensure you are using a blank, writable CD-R/RW or DVD±R/RW disc.
- Verify that you have appropriate burning software installed.
- Check the disc for defects or damage.
- Ensure your computer has sufficient free disk space for the burning process.
- Mac eject button not working:
- On macOS, after playing or burning a disc, the physical eject button on the drive may not work. To eject, right-click the drive icon on your desktop and select "Eject," or use the "File" > "Eject" option in relevant applications.
- Жай аткаруу:
- Ensure you are connected to a USB 3.0 port for optimal speed.
- Connect your laptop/MacBook to external power for stable operation.
Кепилдик жана колдоо
ROOFULL provides comprehensive after-sales support for this product, including a warranty of up to 2 years. If you encounter any issues or have questions regarding your external CD DVD drive, please do not hesitate to contact our technical support team.
Көбүрөөк жардам алуу үчүн, сиз ошондой эле онлайн режиминде жеткиликтүү болгон расмий колдонуучу колдонмосун (PDF) карасаңыз болот: Колдонуучунун колдонмосун жүктөп алуу (PDF)


