Introduction
This manual provides essential information for the safe and efficient use of your Gikfun Mini DC R385 Water Pump. Please read these instructions carefully before operating the pump and retain this manual for future reference.
Коопсуздук маалыматы
- Do not run continuously: This diaphragm pump is designed for experimental and intermittent use, not for continuous industrial operation. Prolonged continuous use may lead to overheating and damage.
- Тtage диапазону: Operate the pump within the specified DC 6-12V voltage range. Exceeding this range can cause damage to the motor.
- Суюктуктун шайкештиги: Ensure the liquid being pumped is compatible with the pump's materials (silicone). Avoid corrosive or highly viscous liquids unless specifically designed for them.
- Электр байланыштары: Ensure all electrical connections are secure and correctly polarized (red wire for positive, white/gray for negative). Incorrect wiring can damage the pump or power source.
- Монтаждоо: Use the provided mounting brackets to secure the pump, reducing vibration and noise.
- Көзөмөл: Always supervise the pump during operation, especially during initial setup or when used in experimental models.
Продукт бүттүview
The Gikfun Mini DC R385 Water Pump is a compact diaphragm pump suitable for various small-scale liquid transfer applications. Its design incorporates a black silicone case for shock absorption and noise reduction.

Сүрөт: бүттүview of the Gikfun Mini DC R385 Water Pump, showing its compact design and mounting points.
Негизги өзгөчөлүктөрү:
- DC 6-12V operation.
- Maximum flow rate of 1.5-1.8 L/Min.
- Compact size: 95mm(L) x 47mm(W) x 36mm(H).
- Inlet pipe diameter: 5mm.
- Black silicone case for shockproof and silent operation.
- Suitable for experimental models, car washing, watering, and mineral water filling.

Image: The Gikfun Mini DC R385 Water Pump shown with its detachable black mounting brackets, which help secure the pump and reduce vibration.

Сүрөт: Жакын план view of the motor end of the Gikfun Mini DC R385 Water Pump, highlighting the heat dissipation holes for optimal performance.
Техникалык шарттар
| Параметр | Нарк |
|---|---|
| Working Voltage | DC 6-12V |
| Максималдуу агым ылдамдыгы | 1.5-1.8 L/Min (0.04 Gallons Per Minute) |
| Максималдуу көтөрүү бийиктиги | 5 метр |
| Pump Size (L x W x H) | 95mm x 47mm x 36mm (Approx. 3.74"L x 1.85"W x 1.42"H) |
| Кирүүчү түтүктүн диаметри | 5mm (Inner Diameter) |
| Outer Diameter of Nozzles | 8.5мм |
| Материал | Silicone (for casing) |
| Элемент Салмагы | 110 грамм (3.88 унция) |
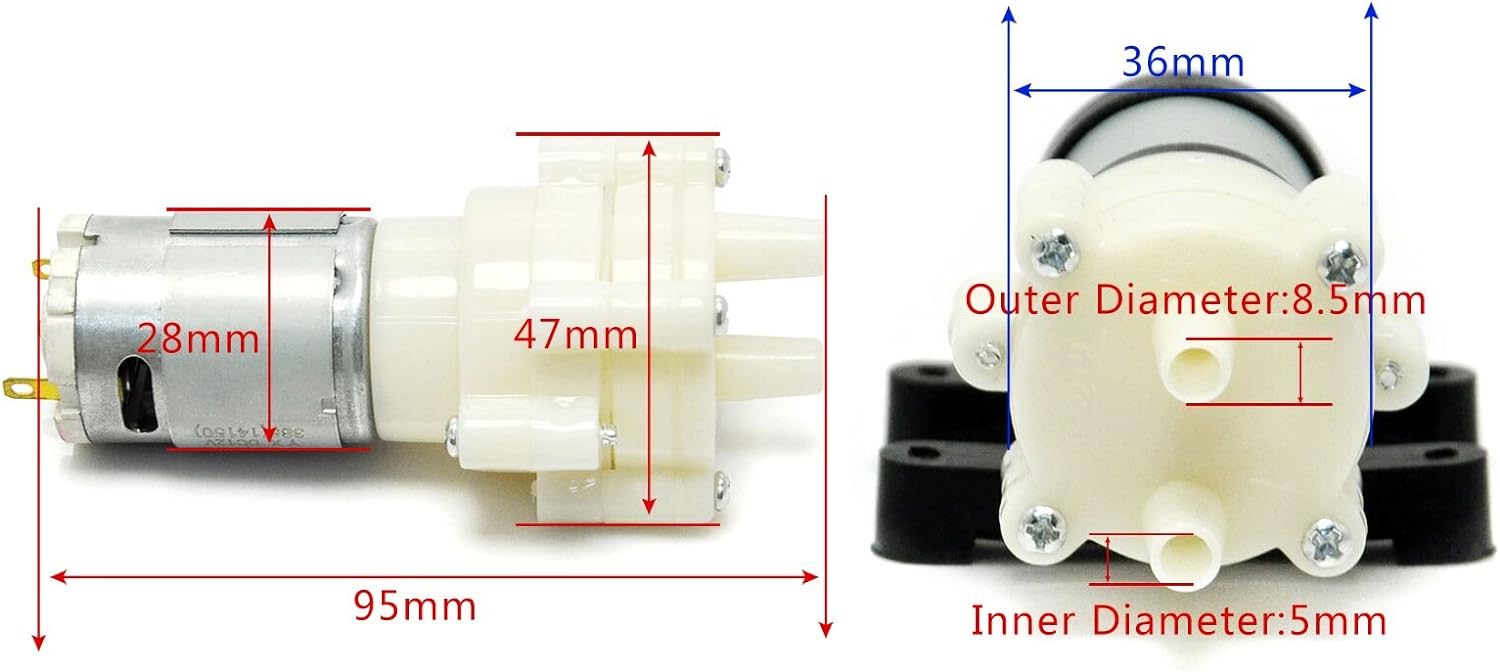
Image: Detailed dimensions of the Gikfun Mini DC R385 Water Pump, showing length, width, height, and inlet/outlet diameters.
Жайгашуу
- Таңылганын ачуу: Carefully remove the pump and any accessories from the packaging.
- Түтүктөрдү тиркөө: Connect appropriate tubing (with an inner diameter of 5mm) to the inlet and outlet nozzles of the pump. Ensure a snug fit to prevent leaks.
- Позиция насосу: Place the pump in a stable location. The black silicone case provides shock absorption, but securing it with the mounting brackets is recommended for long-term use.
- Туташуу кубаты: Connect the red wire to the positive (+) terminal of your DC power supply (6-12V) and the white/gray wire to the negative (-) terminal. Ensure the power supply is off before connecting.
- Submerge Inlet: Place the inlet tube into the liquid source.
- Prepare Outlet: Direct the outlet tube to the desired destination for the liquid.
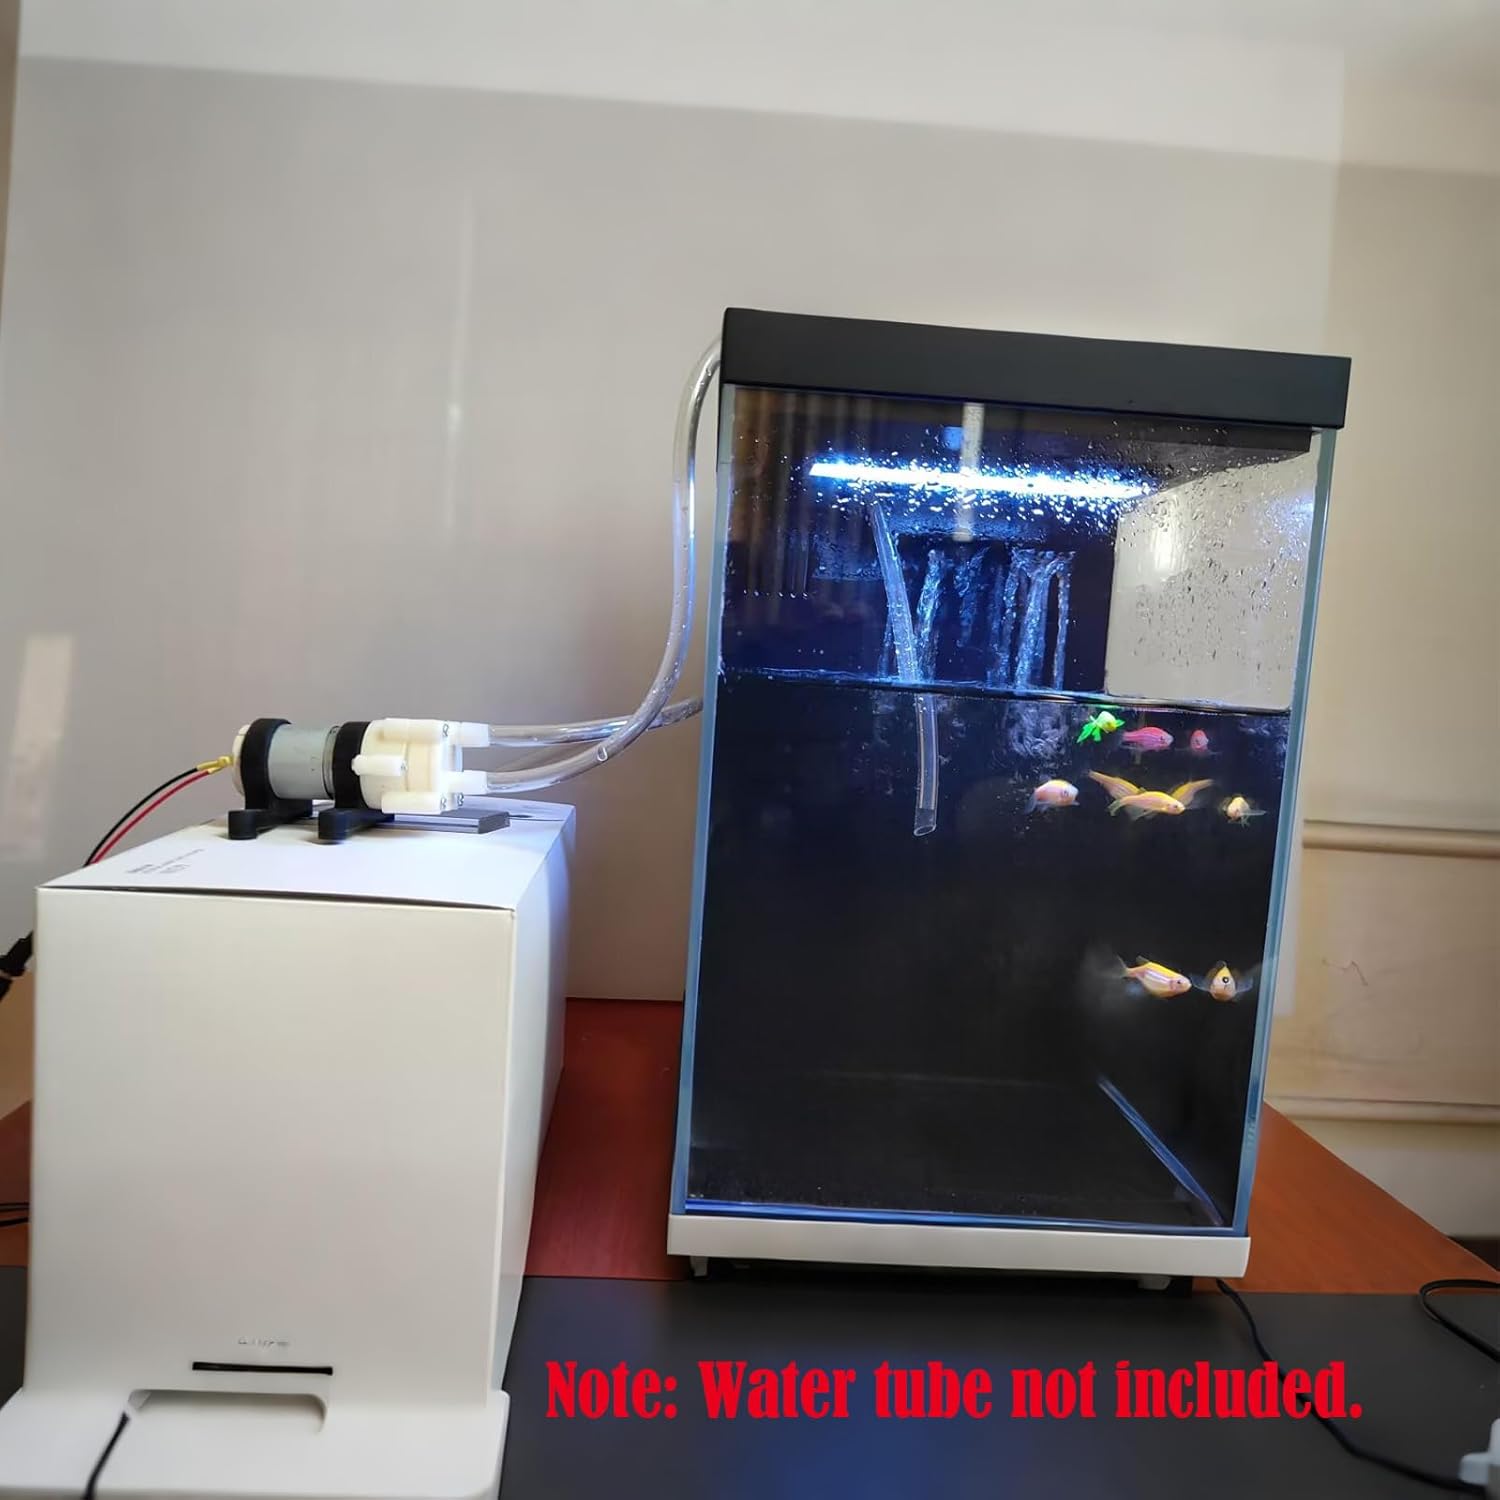
Image: The Gikfun Mini DC R385 Water Pump connected with clear tubing, demonstrating a typical setup for liquid transfer between containers.
Орнотуу демонстрациялык видео:
Video: A demonstration of connecting the Gikfun R385 Water Pump to tubing and a power source for liquid transfer. This video illustrates the basic setup process.
Иштөө нускамалары
- Күйгүзүү: Once all connections are secure and tubing is in place, turn on the DC power supply. The pump should begin to operate.
- Толуктоо: This pump is generally self-priming. If it does not start pumping immediately, ensure the inlet tube is fully submerged and there are no significant air pockets in the tubing. A slight tilt or gentle shaking of the pump may help dislodge air.
- Агымды көзөмөлдөө: Observe the liquid flow. The pump is designed for a maximum flow of 1.5-1.8 L/Min.
- Өчүрүү: When liquid transfer is complete or if you need to stop the pump, turn off the DC power supply.
Операциянын демонстрациялык видеосу:
Video: A demonstration of the Gikfun R385 Water Pump in operation, showing liquid being transferred. This video highlights the pump's functionality and flow.
Техникалык тейлөө
- Тазалоо: After use, especially with non-water liquids, flush the pump with clean water to prevent residue buildup.
- Текшерүү: Periodically inspect the tubing for kinks, cracks, or blockages. Check electrical connections for corrosion or looseness.
- Сактагыч: Store the pump in a dry, cool place away from direct sunlight and extreme temperatures.
- Үзгүлтүксүз иштөөдөн качыңыз: As noted in safety, avoid running the pump continuously for extended periods to prolong its lifespan.
Проблемаларды чечүү
| Көйгөй | Мүмкүн себеп | Чечим |
|---|---|---|
| Насос иштебейт | No power, incorrect wiring, faulty power supply. | Check power connections, ensure correct polarity, test power supply. |
| No liquid flow or weak flow | Air in system, clogged tubing, inlet not submerged, incorrect voltage. | Ensure inlet is submerged, check for and remove air bubbles, clear any blockages in tubing, verify voltage 6-12V ичинде. |
| Ашыкча ызы-чуу же титирөө | Loose mounting, air in pump, pump running dry. | Securely mount the pump, ensure liquid is flowing, avoid dry running. |
| Байланыштардан агып чыгуу | Loose tubing, incorrect tubing size, damaged nozzle. | Ensure tubing is securely attached, use tubing with 5mm inner diameter, inspect nozzles for damage. |
Кепилдик жана колдоо
For warranty information or technical support, please contact Gikfun customer service through the retailer where the product was purchased or visit the official Gikfun website. Please have your model number (EK1856) and purchase details ready when contacting support.


