1. Киришүү
This manual provides essential information for the safe and effective use of your Vivibright GP90 UP Portable Video Projector. Please read it thoroughly before operating the device and retain it for future reference. The Vivibright GP90 UP is a portable video projector featuring an Android 4.42 operating system, 3200 lumens brightness, and 1280x800 native resolution, designed for multimedia entertainment and presentations.
2. Коопсуздук нускамалары
- Вентиляция тешиктерин жаппаңыз. Ашыкча ысып кетүүнүн алдын алуу үчүн проектордун айланасында адекваттуу аба агымын камсыз кылыңыз.
- Электр тогуна урунбоо же өрттөн сактануу үчүн проекторду жамгырдын же нымдуулуктун таасирине дуушар кылбаңыз.
- l болгондо проектордун объективине түз кароодон качыңызamp күйүп турат, анткени жаркыраган жарык көзгө зыян келтириши мүмкүн.
- Проектор кулап калбашы үчүн аны туруктуу, түз жерге коюңуз.
- Проектор менен келген кубат адаптерин гана колдонуңуз.
- Проекторду өз алдынча бөлүүгө же оңдоого аракет кылбаңыз. Бардык тейлөөлөрдү квалификациялуу кызматкерлерге тапшырыңыз.
- Проекторду жылуулук булактарынан жана түз күн нурунан алыс кармаңыз.
3. Пакеттин мазмуну
Пакетте бардык буюмдар бар экенин текшериңиз:
- Vivibright GP90 UP Projector
- Электр кабели
- Remote Control (may not be included with all models)
- Колдонуучунун Колдонмосу (бул документ)
4. Продукт бүтүп калдыview
Проектордун компоненттери жана туташтыруу порттору менен таанышып алыңыз.
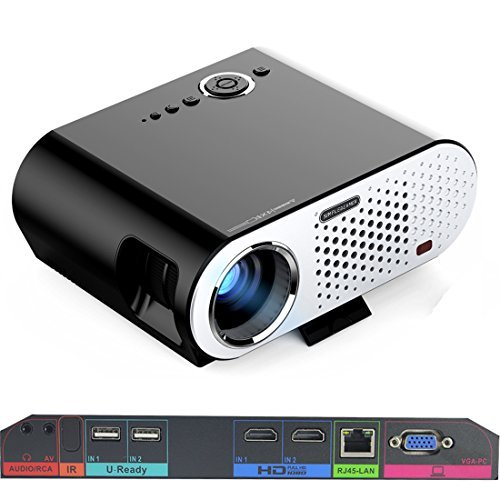
Image: The Vivibright GP90 UP projector showing its top controls, lens, and various input/output ports on the rear panel. The top features power and navigation buttons. The front has the projection lens. The rear panel includes Audio/RCA, IR receiver, two USB ports (U-Ready), two HDMI ports (HD), an RJ45-LAN port, and a VGA-PC port.
4.1 алдыңкы панели
- Проекциялык линза: Сүрөттү чыгарат.
4.2 Жогорку панель
- Башкаруу баскычтары: Power, navigation, and menu access.
4.3 Арткы панель (киргизүү/чыгыш порттору)
- AUDIO/RCA: Audio output and composite video input.
- IR: Алыстан башкаруу үчүн инфракызыл кабылдагыч.
- IN 1 / IN 2 (USB): Two USB ports for connecting USB storage devices.
- IN 1 / IN 2 (HDMI): Two HDMI inputs for digital video and audio sources.
- RJ45-LAN: Зымдуу тармакка туташуу үчүн Ethernet порту.
- VGA-PC: VGA input for connecting to computers.
5. Орнотуу
5.1 Орнотуу
- Place the projector on a flat, stable surface or mount it on a ceiling or tripod.
- Ensure the projector is positioned directly in front of the screen or wall. Avoid angled placement as horizontal keystone correction is not available.
- The optimal projection distance ranges from 1.2m to 8.5m, producing screen sizes from 35 to 280 inches. For a 100-inch image, a distance of approximately 3 meters is recommended.
5.2 Кубат туташтыруу
- Электр кабелин проектордун кубат киресине туташтырыңыз.
- Plug the other end of the power cable into a suitable electrical outlet (90~240V/50~60Hz).
5.3 Киргизүү түзүлүштөрүн туташтыруу
- HDMI: Connect an HDMI cable from your source device (e.g., laptop, Blu-ray player, gaming console) to one of the projector's HDMI ports.
- USB: Insert a USB flash drive or external hard drive into a USB port to access media files.
- VGA: Connect a VGA cable from your computer to the projector's VGA-PC port.
- OF: Use an RCA cable to connect older devices to the AV input.
- LAN: Connect an Ethernet cable to the RJ45-LAN port for a wired internet connection.
5.4 Фокусту жана Keystone жөндөөсүн
- Фокус: Rotate the focus ring around the lens until the projected image is sharp and clear.
- Негизги ташты оңдоо: Use the manual vertical keystone correction feature (±15°) to adjust the image shape if the projector is not perfectly perpendicular to the screen. This corrects trapezoidal distortion.
6. Иштөө нускамалары
6.1 Күйгүзүү/өчүрүү
- Күйгүзүү: Press the power button on the projector or the remote control. The indicator light will change, and the projector will start.
- Өчүрүү: Press the power button again. Confirm shutdown if prompted. Allow the projector to cool down before unplugging.
6.2 Android операциялык системасында багыт алуу
- The projector runs on Android 4.42. Use the remote control or connect a wireless mouse (recommended for easier navigation) to interact with the interface.
- Access pre-installed apps or download compatible applications from the app store. Note that some newer applications may not be compatible with Android 4.42.
6.3 Зымсыз проекция
- Wi-Fi: Connect to a wireless network via the settings menu. Supports dual-band Wi-Fi 2.4G.
- Bluetooth: Supports Bluetooth 4.0 for connecting wireless devices such as speakers. Note that Bluetooth audio output may only be available when using USB or Android sources, not HDMI.
- Wireless Push (EZCast / Miracast / Airplay): Use compatible apps on your smartphone or tablet to mirror your device's screen to the projector. Ensure your device and the projector are on the same Wi-Fi network.
6.4 Аудио орнотуулары
- The projector features built-in 4Ω, 5W stereo speakers with SRS sound technology.
- For enhanced audio, connect external speakers via the Audio Out port or wirelessly via Bluetooth (when using Android or USB sources).
7. Техникалык тейлөө
7.1 Тазалоо
- Объектив: Оптикалык линзалар үчүн атайын жасалган жумшак, түксүз кездемени колдонуңуз. Абразивдүү тазалагычтарды колдонбоңуз.
- Casing: Проектордун сыртын жумшак, кургак чүпүрөк менен сүртүңүз. Өтө кир болсо, бир аз сүртүңүз.amp чүпүрөк, анан кылдат кургатуу.
- Вентиляция тешиктери: Чаңдын топтолушун алдын алуу үчүн, желдетүү тешиктерин мезгил-мезгили менен жумшак щетка же кысылган аба менен тазалап туруңуз, бул алардын иштешине жана иштөө мөөнөтүнө таасир этиши мүмкүн.
7.2 Сактоо
- Узак мөөнөткө пайдаланылбаганда, проекторду салкын, кургак жерде, тике күн нурунан жана экстремалдык температурадан алыс сактаңыз.
- Линзаны чаңдан жана чийилүүдөн коргоо үчүн капкагы менен жабыңыз.
8. Кыйынчылыктарды
| Көйгөй | Мүмкүн себеп | Чечим |
|---|---|---|
| Сүрөт чагылдырылган жок | Электр кубаты туташкан эмес; Киргизүү булагы тандалган эмес; Линза капкагы күйүк | Электр кубатына туташууну текшериңиз; Туура киргизүү булагын тандаңыз; Линза капкагын алып салыңыз |
| Сүрөт бүдөмүк | Фокус туураланган эмес; Проектор өтө жакын/алыс | Adjust focus ring; Adjust projection distance |
| Сүрөт трапеция түрүндө | Проектор экранга перпендикуляр эмес | Adjust vertical keystone correction; Reposition projector to be centered |
| Үн жок | Volume too low; Muted; External speakers not connected/selected | Increase volume; Unmute; Check external speaker connections/settings |
| Wireless projection unstable | Weak Wi-Fi signal; Device incompatibility; Outdated Android OS | Ensure strong Wi-Fi signal; Check device compatibility with Miracast/Airplay; Consider wired connection if issues persist with older Android version. |
9. Техникалык шарттар
| Өзгөчөлүк | Деталь |
|---|---|
| Бренд | Vivibright |
| Модел | GP90 UP |
| Операция системасы | Android 4.42 |
| Жарыктык | 3200 Lumens (LED Luminous efficiency) |
| Native Resolution | 1280 x 800 (supports up to 1080P) |
| Контраст катышы | 3000:1 (Dynamic up to 10,000:1) |
| Проекциянын өлчөмү | 35-280 дюйм |
| Проекциялык аралык | 1.2м - 8.5м |
| Ыргытуу катышы | 1.45:1 |
| Keystone Correction | Кол менен тигинен ± 15 ° |
| Жарык булагы Life | 30,000 саатка чейин |
| Байланыш | Wi-Fi (2.4G), Bluetooth 4.0, 2x HDMI, 2x USB, VGA, AV, RJ45-LAN |
| Аудио | Built-in 4Ω, 5W stereo speakers with SRS sound |
| Электр камсыздоо | 90~240V/50~60Hz |
| Продукциянын өлчөмдөрү | 27 x 22 x 9 см |
| Элемент Салмагы | 3.17 кг |
10. Кепилдик жана колдоо
For warranty information and technical support, please refer to the documentation provided at the time of purchase or contact Vivibright customer service. Keep your purchase receipt as proof of purchase for warranty claims.


